Creating, Listing and Removing VM Snapshots with PowerCLi and PowerShell

PowerCLi + PowerShell Method

-=Creating snapshots=-

Let’s say you are doing a maintenance, and need a quick way to snapshot certain VMs in the vCenter.  The create_snapshot.ps1 PowerShell does just that, and it can be called from PowerCli.

createsnapshot

  •  Open PowerCLi and connect to the desired vCenter

powercli_connect

  • From the directory that you have placed the create_snapshot.ps1 script, run the command and watch for output.
> .\create_snapshot.ps1 -vm <vm-name>,<vm-name> -name snapshot_name

Like so:

snapshot2

In vCenter recent tasks window, you’ll see something similar to:

snapshot1


-=Removing snapshots=-

Once you are ready to remove the snapshots, the remove_snapshot.ps1 PowerShell script does just that.

snapshot5

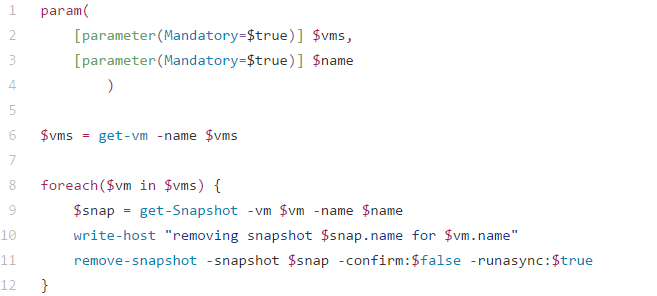
  • Once you are logged into the vCenter through PowerCli like before, from the directory that you have placed the remove_snapshot.ps1 script, run the command and watch for output.
> .\remove_snapshot.ps1 -vm xx01-vmname,xx01-vmname -name snapshot_name 

Like so:

snapshot3

In vCenter recent tasks window, you’ll see something similar to:

snapshot4

Those two PowerShell scripts can be found here:

create_snapshot.ps1 and remove_snapshot.ps1

_________________________________________________________________

PowerCLi Method

-=Creating snapshots=-

The PowerCLi New-Snapshot cmdlet allows the creation of snapshots in similar fashion, and there’s no need to call on a PowerShell script.  However can be slower

> get-vm an01-jump-win1,an01-1-automate | new-snapshot -Name "cbtest" -Description "testing" -Quiesce -Memory

snapshot6

  • If the VM is running and it has virtual tools installed, you can opt for a quiescent snapshot withQuiesce parameter.  This has the effect of saving the virtual disk in a consistent state.
  • If the virtual machine is running, you can also elect to save the memory state as well with the –Memory parameter
  • You can also

Keep in mind using these options increases the time required to take the snapshot, but it should put the virtual machine back in the exact state if you need to restore back to it.

-=Listing Snapshots=-

If you need to check the vCenter for any VM that contains snapshots,  the get-snapshot cmdlet allows you to do that.  You can also use cmdlets like format-list to make it easier to read.

> Get-vm | get-snapshot | format-list vm,name,created

snapshot8

Other options:

Description
Created
Quiesced
PowerState
VM
VMId
Parent
ParentSnapshotId
ParentSnapshot
Children
SizeMB
IsCurrent
IsReplaySupported
ExtensionData
Id
Name
Uid

-=Removing snapshots=-

The PowerCLi remove-snapshot cmdlet does just that, and used in combination with the get-snapshot cmdlet looks something like this.

> get-snapshot -name cbtest -VM an01-jump-win1,an01-1-automate | remove-snapshot -RunAsync -confirm:$false

snapshot7

  • If you don’t want to be prompted, include –confirm:$False.
  • Removing a snapshot can be a long process so you might want to take advantage of the –RunAsync parameter again.
  • Some snapshots may have child snapshots if you are taking many during a maintenance, so you can also use –RemoveChildren to clean those up as well.


Failure Adding an Additional Node to vRealize Operations Manager Due to Expired Certificate

The Issue:

Unable to add additional nodes to cluster.  This error happened while adding an additional data and remote collector.  The cause ended up being a expired customer certificate, and surprisingly there was no noticeable mechanism such as a yellow warning banner in vROps UI to warn that a certificate had expired, or is about to expire.

Troubleshooting:

Log into the the new node being added, and tail the vcopsConfigureRoles.log

# tail -f /storage/vcops/log/vcopsConfigureRoles.log

You would see entries similar to:

2016-08-10 00:11:56,254 [22575] - root - WARNING - vc_ops_utilities - runHttpRequest - Open URL: 'https://localhost/casa/deployment/cluster/join?admin=172.22.3.14' returned reason: 
[SSL: CERTIFICATE_VERIFY_FAILED] certificate verify failed (_ssl.c:581), exception: 
2016-08-10 00:11:56,254 [22575] - root - DEBUG - vcopsConfigureRoles - joinSliceToCasaCluster - Add slice to CaSA cluster response code: 9000
2016-08-10 00:11:56,254 [22575] - root - DEBUG - vcopsConfigureRoles - joinSliceToCasaCluster - Expected response code not found. Sleep and retry. 0 
2016-08-10 00:12:01,259 [22575] - root - INFO - vcopsConfigureRoles - joinSliceToCasaCluster - Add Cluster to slice response code: 9000 
2016-08-10 00:12:01,259 [22575] - root - INFO - vc_ops_logging - logInfo - Remove lock file: /usr/lib/vmware-vcopssuite/utilities/sliceConfiguration/conf/vcops-configureRoles.lck
2016-08-10 00:12:01,259 [22575] - root - DEBUG - vcopsPlatformCommon - programExit - Role State File to Update: '/usr/lib/vmware-vcopssuite/utilities/sliceConfiguration/data/roleState.properties'
2016-08-10 00:12:01,260 [22575] - root - DEBUG - vcopsPlatformCommon - UpdateDictionaryValue - Update section: "generalSettings" key: "failureDetected" with value: "true" file: "/usr/lib/vmware-vcopssuite/utilities/sliceConfiguration/data/roleState.properties"
2016-08-10 00:12:01,260 [22575] - root - DEBUG - vcopsPlatformCommon - loadConfigFile - Loading config file "/usr/lib/vmware-vcopssuite/utilities/sliceConfiguration/data/roleState.properties"
2016-08-10 00:12:01,261 [22575] - root - DEBUG - vcopsPlatformCommon - copyPermissionsAndOwner - Updating file permissions of '/usr/lib/vmware-vcopssuite/utilities/sliceConfiguration/data/roleState.properties.new' from 100644 to 100660
2016-08-10 00:12:01,261 [22575] - root - DEBUG - vcopsPlatformCommon - copyPermissionsAndOwner - Updating file ownership of '/usr/lib/vmware-vcopssuite/utilities/sliceConfiguration/data/roleState.properties.new' from 1000/1003 to 1000/1003
2016-08-10 00:12:01,261 [22575] - root - DEBUG - vcopsPlatformCommon - UpdateDictionaryValue - The key: failureDetected was updated 
2016-08-10 00:12:01,261 [22575] - root - DEBUG - vcopsPlatformCommon - programExit - Updated failure detected to true 
2016-08-10 00:12:01,261 [22575] - root - INFO - vcopsPlatformCommon - programExit - Exiting with exit code: 1, Add slice to CaSA Cluster failed. Response code: 9000.  Expected: 200

Resolution:

Step #1

Take snapshot of all vROps nodes

Step #2

Revert back to VMware’s default certificate on all nodes using the following kb article. KB2144949

Step #3

The custom cert files that need to be renamed on the nodes are located at /storage/vcops/user/conf/ssl.  This should be completed on all nodes.   Alternatively, you can remove them, but renaming them is sufficient.

# mv customCert.pem customCert.pem.BAK
# mv customChain.pem customChain.pem.BAK
# mv customKey.pem customKey.pem.BAK
# mv uploaded_cert.pem uploaded_cert.pem.BAK   

Step #4

Now attempt to add the new node again.  From the master node, you can watch the installation of the new node by tailing the casa.log

# tail -f /storage/vcops/log/casa/casa.log

Delete the snapshots as soon as possible.

  • To add a new custom certificate to the vRealize Operations Manager, follow this KB article: KB2046591

_________________________________________________________________

Alternative Solutions

  • There could be an old management pak installed that was meant for an older version of vROps.  This has been know to cause failures.  Follow this KB for more information: KB2119769


  • If you are attempting to add a node to the cluster using an IP address previously used, the operation may fail.  Follow this KB for more information: KB2147076


NSX Host VIB Upgrade From 6.1.X to 6.2.4

There is a known issue when upgrading the NSX host VIB from 6.1.X to 6.2.4, where once the host is upgraded to VIB 6.2.4, and the virtual machines are moved to it, if they should somehow find their way back to a 6.1.X host, the VM’s NIC will become disconnected causing an outage. This has been outlined in KB2146171

Resolution

We found the following steps to be the best solution in getting to the 6.2.4 NSX VIB version on ESXi 6u2, without causing any interruptions in regards to the network connectivity of the virtual machines.

  1. Log into the vSphere web client, go to Networking & Security, select Installation on the navigation menu, and then select the Host preparation tab.
  2. Select the desired cluster, and click the “Upgrade Available” message next to it.  This will start the upgrade process of all the hosts, and once completed, all hosts will display “Reboot Required”.
  3. Mark the first host for maintenance mode as you normally would, and once all virtual machines have evacuated off, and the host marked as in maintenance mode, restart it as you normally would.
  4. While we wait for the host to reboot, right click on the host cluster being upgraded and select Edit Settings.  Select vSphere DRS, and set the automation level to Manual.  This will give you control over host evacuations and where the virtual machines go.
  5. Once the host has restarted, monitor the Recent Tasks window and wait for the NSX vib installation to complete.
  6. Bring the host out of maintenance mode.  Now migrate a test VM over to the new host and test network connectivity.  Ping to another VM on a different host, and then make sure you can ping out to something like 8.8.8.8.
  7.  Verify the VIB has been upgraded to 6.2.4 from the vSphere web Networking & Security host preparation section.
  8. Open PowerCLI and connect to the vCenter where this maintenance activity is being performed.  In order to safely control the migration of virtual machines from hosts containing the NSX VIV 6.1.X to the host that has been upgraded to 6.2.4, we will use the following command to evacuate the next host’s virtual machines onto the one that was just upgraded.
Get-VM -Location "<sourcehost>" | Move-VM -Destination (Get-Vmhost "<destinationhost>")
  • “sourcehost” being the next host you wish to upgrade, and the “destinationhost” being the one that was just upgraded.

9.  Once the host is fully evacuated, place the host in maintenance mode, and reboot it.

10. VMware provided us with a script that should ONLY be executed against NSX vib 6.2.4 hosts, and does the following:

  • Verifies the VIB version running on the host.
    For example: If the VIB version is between VIB_VERSION_LOW=3960641, VIB_VERSION_HIGH=4259819 then it is considered to be a host with VIB 6.2.3 and above. Any other VIB version the script will fail with a warningCustomer needs to make sure that the script is executed against ALL virtual machines that have been upgraded since 6.1.x.
  • Once the script sets the export_version to 4, the version is persistent across reboots.
  • There is no harm if customer executes the script multiple times on the same host as only VMs that need modification will be modified.
  • Script should only be executed NSX-v 6.2.4 hosts

I have attached a ZIP file containg the script here:  fix_exportversion.zip

Script Usage

  • Copy the script to a common datastore accessible to all hosts and run the script on each host.
  • Log in to the 6.2.4 ESXi host via ssh or CONSOLE, where you intend to execute the script.
  • chmod u+x the files
  • Execute the script:
./vmfs/volumes/<Shared_Datastore>/fix_exportversion.sh /vmfs/volumes/<Shared_Datastore>/vsipioctl


Example output:

~ # /vmfs/volumes/NFS-101/fix_exportversion.sh /vmfs/volumes/NFS-101/vsipioctl
Fixed filter nic-39377-eth0-vmware-sfw.2 export version to 4.
Fixed filter nic-48385-eth0-vmware-sfw.2 export version to 4.
Filter nic-50077-eth0-vmware-sfw.2 already has export version 4.
Filter nic-52913-eth0-vmware-sfw.2 already has export version 4.
Filter nic-53498-eth0-vmware-sfw.2 has export version 3, no changes required.

Note: If the export version for any VM vNIC shows up as ‘2’, the script will modify the version to ‘4’ and does not modify other VMs where export version is not ‘2’.

11.  Repeat steps 5 – 10 on all hosts in the cluster until completion.  This script appears to be necessary as we have seen cases where a VM may still lose its NIC even if it is vmotioned from one NSX vib 6.2.4 host to another 6.2.4 host.

12. Once 6.2.4 host VIB installation is complete, and the script has been run against the hosts and virtual machines running on them, DRS can be set back to your desired setting like Fully automated for instance.

13.  Virtual machines should now be able to vmotion between hosts without losing their NICs.

  • This process was thoroughly tested in a vCloud Director cloud environment containing over 20,000 virtual machines, and on roughly 240 ESXi hosts without issue. vCenter environment was vCSA version 6u2, and ESXi version 6u2.