Update Multiple 6.7 ESXi Hosts Root Password Via Host Profile.

Blog date: September 01, 2020
Completed on vSphere version: 6.7

Today my customer needed to change the root password for roughly 36 hosts across two data centers. These are two data centers that were recently built as part of my residency with them, and they have already seen the benefits of using host profiles. Today I was able to show them one more.

VMware has a KB68079 that details the process should the root password become unknown on a host. Well the same process can be applied and used to update the password on all hosts with that host profile attached. At the time of writing this article, all hosts are compliant with the current host profile, and there are no outstanding issues.

In the vSphere client, go to ‘Policies and Profiles’ and select ‘Host Profiles’ in the left column, click and select the desired host profile on the right.

  • Edit the desired host profile.
  • In the search field, type root and hit enter.
  • Select root in the left column.
  • In the right column, change the field below ‘Password’ to Fixed password Configuration.

Now you are prompted with password fields and can update the root password.

Click Save once the new password has been entered.

Now you can remediate the hosts against the updated host profile, and the root account will get updated on each host.
– Out of an abundance of caution, it is always good to spot check a handful of hosts to validate the new password.

I had my customer go back and edit the host profile once more and change the ‘Password’ field back to: Leave password unchanged for the default account. Click save, and then remediate the cluster again. The new password will stay.

Before I connected with the customer today, they had already researched how to update the root password on all hosts with a script, but this method is simple, automated and built into vSphere.

Get and set NTP settings of all VMware Hosts with PowerCLI

Quiet often when I connect to customer sites to conduct a health check, I sometimes find their hosts having different NTP settings, or not having NTP configured at all. Probably one of the easiest one-liners I keep in my virtual Rolodex of powerCLI one-liners, is the ability to check NTP settings of all hosts in the environment.

Checking NTP with Powercli

Get-VMHost | Sort-Object Name | Select-Object Name, @{N=”Cluster”;E={$_ | Get-Cluster}}, @{N=”Datacenter”;E={$_ | Get-Datacenter}}, @{N=“NTPServiceRunning“;E={($_ | Get-VmHostService | Where-Object {$_.key-eq “ntpd“}).Running}}, @{N=“StartupPolicy“;E={($_ | Get-VmHostService | Where-Object {$_.key-eq “ntpd“}).Policy}}, @{N=“NTPServers“;E={$_ | Get-VMHostNtpServer}}, @{N="Date&Time";E={(get-view $_.ExtensionData.configManager.DateTimeSystem).QueryDateTime()}} | format-table -autosize

With this rather lengthy command, I can get everything that is important to me.

We can see from the output that I have a single host in my Dev-Cluster that does not have NTP configured. Quiet often I find customers that have mis-configured NTP settings, do not make use of host profiles that can catch and address issues like this.

If you also wanted to see the incoming, outgoing and protocols settings, you could use the following:

Get-VMHost | Sort-Object Name | Select-Object Name, @{N=”Cluster”;E={$_ | Get-Cluster}}, @{N=”Datacenter”;E={$_ | Get-Datacenter}}, @{N=“NTPServiceRunning“;E={($_ | Get-VmHostService | Where-Object {$_.key-eq “ntpd“}).Running}}, @{N="IncomingPorts";E={($_ | Get-VMHostFirewallException | Where-Object {$_.Name -eq "NTP client"}).IncomingPorts}}, @{N="OutgoingPorts";E={($_ | Get-VMHostFirewallException | Where-Object {$_.Name -eq "NTP client"}).OutgoingPorts}}, @{N="Protocols";E={($_ | Get-VMHostFirewallException | Where-Object {$_.Name -eq "NTP client"}).Protocols}}, @{N=“StartupPolicy“;E={($_ | Get-VmHostService | Where-Object {$_.key-eq “ntpd“}).Policy}}, @{N=“NTPServers“;E={$_ | Get-VMHostNtpServer}}, @{N="Date&Time";E={(get-view $_.ExtensionData.configManager.DateTimeSystem).QueryDateTime()}} | format-table -autosize

Set NTP with Powercli

You can setup NTP on hosts with powercli as well. I have everything in my lab pointed to ‘pool.ntp.org’, so my example will use that.

code snippet

Get-VMHost | Add-VMHostNtpServer -NtpServer pool.ntp.org

Most likely you would have multiple corporate NTP servers you’d need to point to, and that is easily done by separating them with a comma. An example of having two: Instead of having just ‘pool.ntp.org’ I’d have ‘ntp-server01,ntp-server02’.

The next thing needed is the startup policy. VMware has three different options to choose from. on = Start and stop with host, automatic = start and stop with port usage, and off = start and stop manually. In my lab I have the policy set to on.

code snippet

Get-VMHost | Get-VmHostService | Where-Object {$_.key -eq "ntpd"} | Set-VMHostService -policy "on"

With that in mind, the following command I can make the NTP settings of all hosts consistent. This command assumes that I only have one NTP server. I am also stopping and starting the NTP service. It is also worth mentioning that each host that already has the ntp server ‘pool.ntp.org’, will throw a red error that the NtpServer already exists.

Get-VMHost | Get-VmHostService | Where-Object {$_.key -eq "ntpd"} | Stop-VMHostService -Confirm:$false; Get-VMHost | Get-VmHostService | Where-Object {$_.key -eq "ntpd"} | Set-VMHostService -policy "on"; Get-VMHost | Add-VMHostNtpServer -NtpServer pool.ntp.org; Get-VMHost | Get-VMHostFirewallException | Where-Object {$_.Name -eq "NTP client"} | Set-VMHostFirewallException -Enabled:$true; Get-VMHost | Get-VmHostService | Where-Object {$_.key -eq "ntpd"} | Start-VMHostService

Now NTP should be consistent across all hosts. Re-run the first command to validate.

Get VM Tools Version with VMware’s PowerCLI

I had an engineer visit me the other day asking if there was an automated way to get the current version of VMtools running for a set of virtual machines, and in this case, it was for a particular customer running in our vCenter.   I said there most certainly was using PowerCLI.

Depending on the size of the environment, the first option here may be sufficient, although it can be an “expensive” query as I’ve noticed it takes longer to return results.  Using PowerCLI, you can connect to the desired vCenter and run the following one-liner to get return output on the console.  Here I was looking for a specific customer in vCloud Director, so in the vCenter I located the customers folder containing the VMs.   Replace the ‘foldername’ inside the asterisks with the desired folder of VMs.  This command would also work in a normal vCenter as well.

Get-Folder -name *foldername* | get-vm | get-vmguest | select VMName, ToolsVersion | FT -autosize

Example output:

vmtools01

You can see that this example that folder has a mix of virtual machines running, some not (no ToolsVersion value returned), and has a mix of VMtools versions running.

What if you just wanted a list of all virtual machines in the vCenter, the whole jungle?

 Get-Datacenter -Name "datacentername" | get-vm | get-vmguest | select VMName, ToolsVersion | FT -autosize

In either case, if you want to redirect output to a CSV add the following to the end of the line

 | export-csv -path "\path\to\file\filename.csv" -NoTypeInformation -UseCulture

Example:

Get-Folder -name *foldername* | get-vm | get-vmguest | select VMName, ToolsVersion | export-csv -path "\path\to\file\filename.csv" -NoTypeInformation -UseCulture


Another method/example of getting the tools version, and probably the fastest is using ‘Get-view’. A much longer string of command-lets, but this would be the ideal method for large environments if a quick return of data was needed, lets say for a nightly script that was least impactful to the vCenter.

 Get-Folder -name *foldername* | Get-VM | % { get-view $_.id } | select name, @{Name=“ToolsVersion”; Expression={$_.config.tools.toolsversion}}, @{ Name=“ToolStatus”; Expression={$_.Guest.ToolsVersionStatus}}

Example Output:

vmtools02

If you are after a list of all virtual machines running in the vCenter, a command similar to this can be used:

 Get-VM | % { get-view $_.id } | select name, @{Name=“ToolsVersion”; Expression={$_.config.tools.toolsversion}}, @{ Name=“ToolStatus”; Expression={$_.Guest.ToolsVersionStatus}}

VMware has put together a nice introductory blog on using get-view HERE

Just like last time, if you want to redirect output to a CSV file just take the following on to the end of the line for either method ie specific folder or entire vCenter:

 | export-csv -path "\path\to\file\filename.csv" -NoTypeInformation -UseCulture


Creating, Listing and Removing VM Snapshots with PowerCLi and PowerShell

PowerCLi + PowerShell Method

-=Creating snapshots=-

Let’s say you are doing a maintenance, and need a quick way to snapshot certain VMs in the vCenter.  The create_snapshot.ps1 PowerShell does just that, and it can be called from PowerCli.

createsnapshot

  •  Open PowerCLi and connect to the desired vCenter

powercli_connect

  • From the directory that you have placed the create_snapshot.ps1 script, run the command and watch for output.
> .\create_snapshot.ps1 -vm <vm-name>,<vm-name> -name snapshot_name

Like so:

snapshot2

In vCenter recent tasks window, you’ll see something similar to:

snapshot1


-=Removing snapshots=-

Once you are ready to remove the snapshots, the remove_snapshot.ps1 PowerShell script does just that.

snapshot5

  • Once you are logged into the vCenter through PowerCli like before, from the directory that you have placed the remove_snapshot.ps1 script, run the command and watch for output.
> .\remove_snapshot.ps1 -vm xx01-vmname,xx01-vmname -name snapshot_name 

Like so:

snapshot3

In vCenter recent tasks window, you’ll see something similar to:

snapshot4

Those two PowerShell scripts can be found here:

create_snapshot.ps1 and remove_snapshot.ps1

_________________________________________________________________

PowerCLi Method

-=Creating snapshots=-

The PowerCLi New-Snapshot cmdlet allows the creation of snapshots in similar fashion, and there’s no need to call on a PowerShell script.  However can be slower

> get-vm an01-jump-win1,an01-1-automate | new-snapshot -Name "cbtest" -Description "testing" -Quiesce -Memory

snapshot6

  • If the VM is running and it has virtual tools installed, you can opt for a quiescent snapshot withQuiesce parameter.  This has the effect of saving the virtual disk in a consistent state.
  • If the virtual machine is running, you can also elect to save the memory state as well with the –Memory parameter
  • You can also

Keep in mind using these options increases the time required to take the snapshot, but it should put the virtual machine back in the exact state if you need to restore back to it.

-=Listing Snapshots=-

If you need to check the vCenter for any VM that contains snapshots,  the get-snapshot cmdlet allows you to do that.  You can also use cmdlets like format-list to make it easier to read.

> Get-vm | get-snapshot | format-list vm,name,created

snapshot8

Other options:

Description
Created
Quiesced
PowerState
VM
VMId
Parent
ParentSnapshotId
ParentSnapshot
Children
SizeMB
IsCurrent
IsReplaySupported
ExtensionData
Id
Name
Uid

-=Removing snapshots=-

The PowerCLi remove-snapshot cmdlet does just that, and used in combination with the get-snapshot cmdlet looks something like this.

> get-snapshot -name cbtest -VM an01-jump-win1,an01-1-automate | remove-snapshot -RunAsync -confirm:$false

snapshot7

  • If you don’t want to be prompted, include –confirm:$False.
  • Removing a snapshot can be a long process so you might want to take advantage of the –RunAsync parameter again.
  • Some snapshots may have child snapshots if you are taking many during a maintenance, so you can also use –RemoveChildren to clean those up as well.


How to evacuate virtual machines from one host to another with PowerCLI

If you ever find yourself in need of evacuating an esxi host there is a handy PowerCLI command that can do just that, and it maintains the resource pools for the virtual machines too.  This was used in vCenter 6u2, PowerCLI 6.3 R1, esxi 5.5

–  –  –  –  –  –  –  –  –  –  –  –  –  –  –  –  –  –  –  –  –  –  –  –  –  –  –  –  –  –  –  –  –  –  –  –

Connect-VIserver <vcenter-name/ip>

Get-VM -Location “<sourcehost>” | Move-VM -Destination (Get-Vmhost “<destinationhost>”).

–  –  –  –  –  –  –  –  –  –  –  –  –  –  –  –  –  –  –  –  –  –  –  –  –  –  –  –  –  –  –  –  –  –  –  –

I recently went through an outage that affected our ability to put hosts into maintenance mode, as the vMotion operation would get stuck at the vCenter level at 13%, with no indication at the host level that something was happening.  This PowerCLI command allowed me to evacuate one host’s virtual machines onto another getting me through all 18 hosts in the cluster.


Nightly Automated Script To Gather VM and Host Information, and Output To A CSV

Admittedly this was my first attempt at creating a Powershell script, but thought I would share my journey.  We wanted a way to track the location of customer VMs running on our ESXi hosts, and their power state in the event of a host failure.  Ideally this would be automated to run multiple times during the day, and the output would be saved to a csv on a network share.

We had discovered a bug in vCenter 5.5 where if the ESXi 5.5 host was in a disconnected state, and an attempt was made to reconnect it using the vSphere client without knowing that the host was actually network isolated, HA would not restart the VMs on another host as expected.  We would later test this in a lab to find that if we had not used the reconnect option, HA would restart the VMs as expected on other hosts.  We again tested this scenario in vCenter 6 update 2, and the bug was not present.

So the first powercli one-liner I came up with was the following:

> get-vm | select VMhost, Name, @{N="IP Address";E={@($_.guest.IPaddress[0])}}, PowerState | where {$_.PowerState -ne "PoweredOff"} | sort VMhost

get-vm1

I wanted a list of powered on VMs, their IPs, what host they were running on, and I wanted to sort the output by the host name.  Knowing I was on the right track, now I wanted to be able to connect to multiple data centers, and have each data center’s output saved to a CSV on a network share.  I didn’t really need to hang on to the CSVs in that network share for more than seven days, so I also wanted to build in logic so that it would essentially cleanup after itself.

That script looks something like this:

#Initial variables
$vCenter = @()
$sites = @("vcenter01","vcenter02","vcenter03")

#get array of sites and establishes connections to vCenters
   foreach ($site in $sites) {
   $vCenter = $site + "domain.net"

   Connect-VIServer $vCenter

#get list of not equal to powered off VMs, there IP and which hosts they're running on
 get-vm | select VMhost, Name, @{N="IP Address";E={@($_.guest.IPaddress[0])}}, PowerState | where {$_.PowerState -ne "PoweredOff"} | sort VMhost | Export-Csv -Path "c:\path\to\output\$site $((Get-Date).ToString('MM-dd-yyyy_hhmm')).csv" -NotypeInformation -useculture

#Disconnect from vCenters 
 Disconnect-VIServer -Force -Confirm:$false -Server $vCenter

}

#Cleanup old csv after 7 days.
$limit = (Get-Date).AddDays(-7)
$path = "c:\path\to\output\"

Get-ChildItem -Path $path -Recurse -Force | Where-Object { !$_.PSIsContainer -and $_.CreationTime -lt $limit } | Remove-Item -Force

Something I did not know until after running this in a large production environment, is that the get-vm call is heavy and not very efficient.  When I ran this script in my lab it took less than 15 seconds to run.  However in a production environment, connecting to data centers all over the globe, it took over 40 minutes to run.

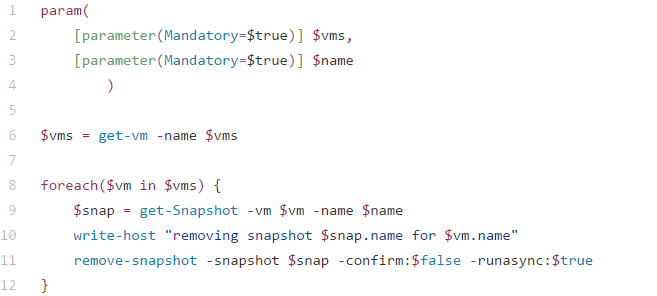
A colleague of mine who had automation experience, exposed me to another cmdlet called get-view, and said it would be much faster to run as it was more efficient gathering the data needed.  So I rewrote my script and now it looks like:

_________________________________________________________________

get-vm4-5


_________________________________________________________________

The new code took less than a couple of minutes to run in my production environment.  I have a Windows VM deployed that’s running the VMware poweractions fling, and it also runs some scheduled scripts.  This script would be running from that server, so I added an additional function to the script that creates a WIN event entry so it could be tracked from a syslog server.

So the final script can be downloaded here.  *Disclaimer – test this in a lab first as the code will need to be updated to suit your needs.