Microsoft CA: Installing Custom vSphere 7 Certificates, and Enabling VMCA To Act As The Intermediate CA.

Blog Date: 3/03/2021
Versions Tested:
vCSA: 7.0.1
ESXi: 7.0.1
Microsoft CA Server: 2016

Recently I had a customer that wanted to install their custom certificates on a new vCenter, and have it act as an Intermediate CA to install approved certificates on their hosts. This is common, but is something I have never done myself, so I ended up testing this out in my lab. In this long blog post, I will walk through:

  • Generating a Certificate Signing Request (CSR) for the vCenter.
  • Signing the request, creating the certificate using a standalone Microsoft CA.
  • Creating a trusted root chain certificate.
  • Installing the custom signed machine SSL certificate.
  • Installing the custom signed VMCA root certificate.
  • Renew host certificates and test.

Before we get started, it is worthwhile to note if you were unaware that there are different certificate modes in vSphere 7. Bob Plankers does a great job explaining these modes in the following VMware Blog: vSphere 7 – Certificate Management

I have done my best to focus the steps involved, and provided those below while testing this out in my home lab. Your mileage may vary.
_________________________________________________________________________________________________________

Snapshot the vCenter

We will be applying Custom Machine and Trusted Root certificates to the vCenter, and it is good practice to take a snapshot of the vCenter appliance beforehand.

_________________________________________________________________________________________________________

Testing vCenter Connection with WinSCP

We will be using WinSCP to transfer the files to and from the vCenter. You should validate that you can connect to yours first. If you are having problems connecting to the vCenter win WinSCP, follow this KB2107727.

_________________________________________________________________________________________________________

GENERATE CERTIFICATE SIGNING REQUEST (CSR)

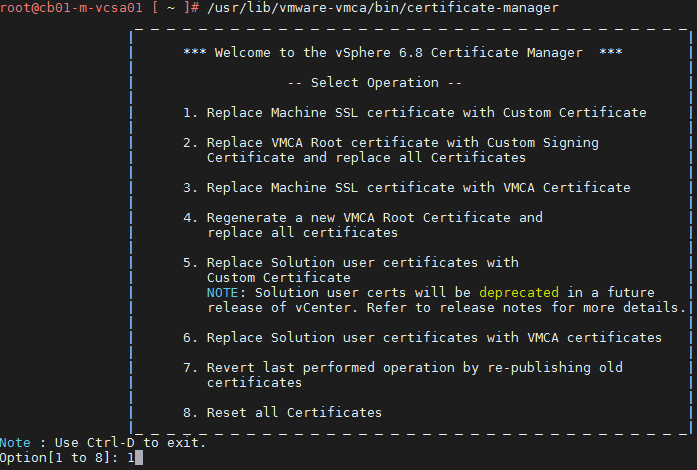
Start an SSH session with the vCenter appliance, and enter “/usr/lib/vmware-vmca/bin/certificate-manager” to launch the utility. We want option #2

Enter “Y” at the prompt: Do you wish to generate all certificates using configuration file : Option[Y/N] ? :

Enter privileged vCenter credentials. The default administrator@vsphere.local will do the trick. Hit Enter key, then input the password and hit the enter key again.

If there is a valid certtool.cfg file that exists with your organizations information you can select N here.

Else if

IF there is no certool.cfg file or you would like to look at the file, use option “Y” here.

In the next series of prompts, you will be required to enter information specific to your environment. The inputs in purple below are examples I used for my lab, and yours will be different:
value for ‘Country’ [Default value : US] : US
value for ‘Name’ [Default value : CA]: cb01-m-vcsa01.cptvops-lab.net
value for ‘Organization’ [Default value : VMware]: CaptainvOPS
value for ‘OrgUnit’ [Default value : VMware Engineering]: CaptainvOPS Lab
value for ‘State’ [Default value : California]: Colorado
value for ‘Locality’ [Default value : Palo Alto] Fort Collins
value for ‘IPAddress’ (Provide comma separated values for multiple IP addresses) [optional]: 10.0.1.28
value for ‘Email’ [Default value : email@acme.com] : info@cptvops-lab.net
value for ‘Hostname’ (Provide comma separated values for multiple Hostname entries) [Enter valid Fully Qualified Domain Name(FQDN), For Example : example.domain.com] : cb01-m-vcsa01.cptvops-lab.net
Enter proper value for VMCA ‘Name’ : cb01-m-vcsa01.cptvops-lab.net

This image has an empty alt attribute; its file name is image-5.png

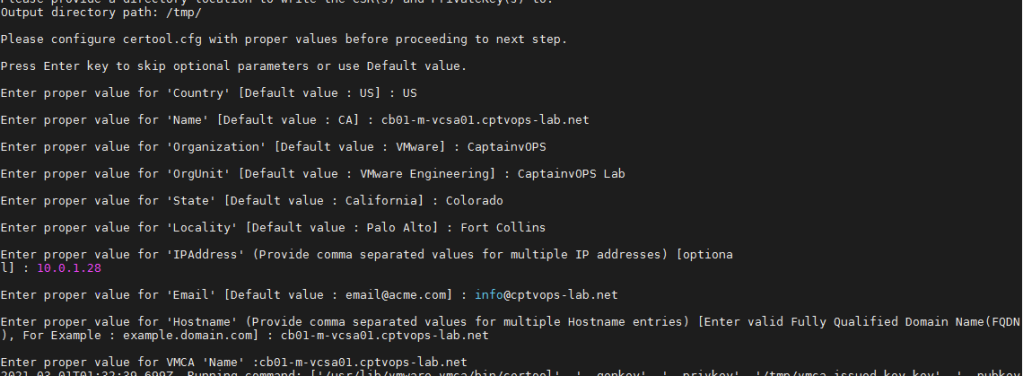
Enter option “1” to Generate Certificate signing requests

It will prompt for an export directory. In this example I used /tmp/

Now using WinSCP, copy the files off to the workstation you will be using to connect the the Microsoft CA.

_________________________________________________________________________________________________________

SIGNING THE REQUEST, CREATING THE CERTIFICATE USING STANDALONE MICROSOFT CA

I am using a standalone Microsoft CA I configured on my lab’s jump server, and don’t have the web portal. Launch the Certification Authority app.

Right-click the CA, select all tasks, and select Submit new request.

Once you browse to the directory where you stored the “vmca_issued_csr.csr” and “vmca_issued_key.key” files, you will need to change the view to “All Files (*.*)” in the lower right.

Now select the “vmca_issued_csr.csr”

Now go to “Pending Requests”. Right-click on pending cert request, go to “all tasks”, and select “Issue”.

Now go to “Issued Certificates”, double-click to open the certificate, go to the “details” tab and click the Copy to File… button.

When the wizard starts, click Next.

Select “Base-64-encoded X.509 (.CER), and Click Next

Click Browse

type in the file name and click save. In this example, I just use “vmca”.

Click Next, and then click Finish. Now click OK to close the wizard.


_________________________________________________________________________________________________________

CREATING A TRUSTED ROOT CHAIN CERTIFICATE

For this next part we will need the root certificate from the Microsoft CA. Right-click on the CA and select “Properties”

On the General tab, click the “View Certificate” button. Then on the new Certificate window that opens, click the details tab and then the “Copy to File…” button

When the wizard starts, click Next.

Select “Base-64-encoded X.509 (.CER), and Click Next

Just like before, browse to a locate to save the cert, and give it a meaningful name. In this example, I just use “root-ca”

Click Next and then click Finish. Close the windows.

In order to create a trusted root, we need to create a new file that has the root chain. This file will include the vmca.cer first, and then the root-ca.cer beneath it. I just open the vmca.cer file and root-ca.cer file with Notepad ++

Save it as a new file. In this example I use: vmca_rootchain.cer.

Using WinSCP, I create a new directory in the vCenter’s root directory called CertStore, and then copy the “vmca.cer”, “vmca_rootchain.cer”, and the “vmca_issued_key.key” there.

_________________________________________________________________________________________________________

INSTALLING THE CUSTOM MACHINE SSL CERTIFICATE

Open an SSH session to the vCenter, launch the certificate-manager: “/usr/lib/vmware-vmca/bin/certificate-manager”. First we will replace the Machine SSL certificate, so select option 1

Again we are prompted for vCenter authoritative credentials, and just like before we’ll use the administrator@vsphere.local account and password.

Now we reach the menu where we will use Option 2 to import custom certificates. Hit enter.

It will prompt for the directory containing the cert file for the Machine SSL. In this example I used: /CertStore/vmca.cer

Now it prompts for the custom key file. In this example I used: /CertStore/vmca_issued_key.key

Now it will ask for the signing certificate of the Machine SSL certificate. Here we will use the custom vmca_rootchain.cer file we created earlier: /CertStore/vmca_rootchain.cer

Respond with “Y” to the prompt: You are going to replace Machine SSL cert using custom cert
Continue operation : Option[Y/N] ? :

Assuming all of the information in the files was correct, the utility will begin replacing the machine SSL certificate. Watch the console for any errors and troupleshoot accordingly. 9 out of 10 times fat fingers are the cause for errors. Or dumb keyboards..

In my case it finished successfully.


_________________________________________________________________________________________________________

INSTALLING THE CUSTOM SIGNED VMCA ROOT CERTIFICATE

Relaunch the certificate-manager: “/usr/lib/vmware-vmca/bin/certificate-manager”. Use Option #2 now.

Enter Option: Y

Enter the authoritative vCenter account and password. Just like before I’m using the administrator@vsphere.local

We already have a known good certool.cfg file. We’ll skip ahead to the import, so use option: N

Use option #2 to import the custom certificates.

We are prompted for the custom certificate for root. Here we will use the custom vmca_rootchain.cer file we created earlier: /CertStore/vmca_rootchain.cer

Here we are prompted for the valid custom key for root. Just like last time we will use: /CertStore/vmca_issued_key.key

Use option “Y” to replace Root Certificates at the next prompt

Now the utility will replace the root certificate.


_________________________________________________________________________________________________________

TESTING THE VSPHERE CERTIFICATE

After clearing the browser cache, we can see the secure padlock on the login page for vSphere 7.

Now log into vSphere, go to Administration, and Certificate Management. Depending on how quickly you logged in after applying the certs, you may see an error on this page. Give it up to 5 minutes, and you’ll see a prompt at the top of the screen asking you to reload. Do it. Now you will see a clean Certificates Management screen. You should see a _MACHINE_CERT with your organization’s details. You will also see three Trusted Root Certificates. One of which will have your Organizations details.


_________________________________________________________________________________________________________

RENEW HOST CERTIFICATES AND TEST

If you have hosts already attached to the vCenter, and you would like to “Renew” the certificate, by default you will need to wait 24 hours before the certificate can be updated. Otherwise you will receive a similar error in vCenter:

If you need to update the certificate right away, follow KB2123386 to change the setting from 1440 to 10. This will allow for updating the ESXi certificate right away. I’d personally change it back after.

Either 24 hours has passed, or you followed the KB2123386 mentioned above. Now you can “Renew” the certificate on the ESXi host(s). You’ll see the Issuer of the certificate has changed, and should reflect your information. This operation doesn’t appear to work while the host is in maintenance mode.

If you browse to the ESXi host, it too will now have a padlock on its login page signifying a valid certificate.

Update Multiple 6.7 ESXi Hosts Root Password Via Host Profile.

Blog date: September 01, 2020
Completed on vSphere version: 6.7

Today my customer needed to change the root password for roughly 36 hosts across two data centers. These are two data centers that were recently built as part of my residency with them, and they have already seen the benefits of using host profiles. Today I was able to show them one more.

VMware has a KB68079 that details the process should the root password become unknown on a host. Well the same process can be applied and used to update the password on all hosts with that host profile attached. At the time of writing this article, all hosts are compliant with the current host profile, and there are no outstanding issues.

In the vSphere client, go to ‘Policies and Profiles’ and select ‘Host Profiles’ in the left column, click and select the desired host profile on the right.

  • Edit the desired host profile.
  • In the search field, type root and hit enter.
  • Select root in the left column.
  • In the right column, change the field below ‘Password’ to Fixed password Configuration.

Now you are prompted with password fields and can update the root password.

Click Save once the new password has been entered.

Now you can remediate the hosts against the updated host profile, and the root account will get updated on each host.
– Out of an abundance of caution, it is always good to spot check a handful of hosts to validate the new password.

I had my customer go back and edit the host profile once more and change the ‘Password’ field back to: Leave password unchanged for the default account. Click save, and then remediate the cluster again. The new password will stay.

Before I connected with the customer today, they had already researched how to update the root password on all hosts with a script, but this method is simple, automated and built into vSphere.

Get and set NTP settings of all VMware Hosts with PowerCLI

Quiet often when I connect to customer sites to conduct a health check, I sometimes find their hosts having different NTP settings, or not having NTP configured at all. Probably one of the easiest one-liners I keep in my virtual Rolodex of powerCLI one-liners, is the ability to check NTP settings of all hosts in the environment.

Checking NTP with Powercli

Get-VMHost | Sort-Object Name | Select-Object Name, @{N=”Cluster”;E={$_ | Get-Cluster}}, @{N=”Datacenter”;E={$_ | Get-Datacenter}}, @{N=“NTPServiceRunning“;E={($_ | Get-VmHostService | Where-Object {$_.key-eq “ntpd“}).Running}}, @{N=“StartupPolicy“;E={($_ | Get-VmHostService | Where-Object {$_.key-eq “ntpd“}).Policy}}, @{N=“NTPServers“;E={$_ | Get-VMHostNtpServer}}, @{N="Date&Time";E={(get-view $_.ExtensionData.configManager.DateTimeSystem).QueryDateTime()}} | format-table -autosize

With this rather lengthy command, I can get everything that is important to me.

We can see from the output that I have a single host in my Dev-Cluster that does not have NTP configured. Quiet often I find customers that have mis-configured NTP settings, do not make use of host profiles that can catch and address issues like this.

If you also wanted to see the incoming, outgoing and protocols settings, you could use the following:

Get-VMHost | Sort-Object Name | Select-Object Name, @{N=”Cluster”;E={$_ | Get-Cluster}}, @{N=”Datacenter”;E={$_ | Get-Datacenter}}, @{N=“NTPServiceRunning“;E={($_ | Get-VmHostService | Where-Object {$_.key-eq “ntpd“}).Running}}, @{N="IncomingPorts";E={($_ | Get-VMHostFirewallException | Where-Object {$_.Name -eq "NTP client"}).IncomingPorts}}, @{N="OutgoingPorts";E={($_ | Get-VMHostFirewallException | Where-Object {$_.Name -eq "NTP client"}).OutgoingPorts}}, @{N="Protocols";E={($_ | Get-VMHostFirewallException | Where-Object {$_.Name -eq "NTP client"}).Protocols}}, @{N=“StartupPolicy“;E={($_ | Get-VmHostService | Where-Object {$_.key-eq “ntpd“}).Policy}}, @{N=“NTPServers“;E={$_ | Get-VMHostNtpServer}}, @{N="Date&Time";E={(get-view $_.ExtensionData.configManager.DateTimeSystem).QueryDateTime()}} | format-table -autosize

Set NTP with Powercli

You can setup NTP on hosts with powercli as well. I have everything in my lab pointed to ‘pool.ntp.org’, so my example will use that.

code snippet

Get-VMHost | Add-VMHostNtpServer -NtpServer pool.ntp.org

Most likely you would have multiple corporate NTP servers you’d need to point to, and that is easily done by separating them with a comma. An example of having two: Instead of having just ‘pool.ntp.org’ I’d have ‘ntp-server01,ntp-server02’.

The next thing needed is the startup policy. VMware has three different options to choose from. on = Start and stop with host, automatic = start and stop with port usage, and off = start and stop manually. In my lab I have the policy set to on.

code snippet

Get-VMHost | Get-VmHostService | Where-Object {$_.key -eq "ntpd"} | Set-VMHostService -policy "on"

With that in mind, the following command I can make the NTP settings of all hosts consistent. This command assumes that I only have one NTP server. I am also stopping and starting the NTP service. It is also worth mentioning that each host that already has the ntp server ‘pool.ntp.org’, will throw a red error that the NtpServer already exists.

Get-VMHost | Get-VmHostService | Where-Object {$_.key -eq "ntpd"} | Stop-VMHostService -Confirm:$false; Get-VMHost | Get-VmHostService | Where-Object {$_.key -eq "ntpd"} | Set-VMHostService -policy "on"; Get-VMHost | Add-VMHostNtpServer -NtpServer pool.ntp.org; Get-VMHost | Get-VMHostFirewallException | Where-Object {$_.Name -eq "NTP client"} | Set-VMHostFirewallException -Enabled:$true; Get-VMHost | Get-VmHostService | Where-Object {$_.key -eq "ntpd"} | Start-VMHostService

Now NTP should be consistent across all hosts. Re-run the first command to validate.

Upgrading To vSphere 6.7 Update 1, and Using The vCenter Converge Tool: Part 2

In this second part of the blog series “Upgrading to vSphere 6.7 Update 1, and Using the vCenter Converge Tool”, I will go over my experience using the Convergence tool. Lets get started.

The Basics of the vCenter Converge Tool

David Stamen (@davidstamen) put together an excellent blog on Understanding the vCenter Server Converge Tool, at VMware’s offical blog site, which I found very useful. Shout-out to Nigel Hickey (@vCenterNerd) for answering some questions I had.

The Convergence Tool basically takes the external PSC and embeds it into the vCenter appliance like so:

Photo credit
@davidstamen

For this customer, I had three vCSA’s and three PSC’s that I needed to converge. Most of the blogs that I found didn’t cover PSC’s that were joined to a domain, environments with multiple vCenters, or with multiple PSC’s, so I thought I would write this up in a blog.

Planning the Convergence

The first thing I had to do was take note of any registered services with the SSO domain. I utilized VMware’s KB2043509 to identify these services, which I had none to worry about. VMware specifically calls out NSX and Site Recovery Manager (SRM), but since those were not in use at this customer, the only things I had to worry about were Horizon, vROps, vRLi and Zerto. Each of these services registered directly to the vCenters, so I had nothing to worry about there. If I had any services registered with the SSO domain, I’d simply need to re-register them once the convergence tool was ran. But since this didn’t apply, I can move forward with configuring the scripts for the convergence tool.

I also need to have an understanding of the replication typology of the existing SSO domain. VMware KB2127057 was an excellent resource I used to gather that information. Opening a putting session to a vCenter, and running the ‘vdcrepadmin’ command against each of the external PSCs, I was able to see the following:

# cd /usr/lib/vmware-vmdir/bin

./vdcrepadmin -f showpartners -h external_psc-a.domain.com -u administrator -w kjdshfsdkjfhskjdhf

ldap://external_psc-b.domain.com
ldap://external_psc-c.domain.com

-----------------------------------------------------------------

./vdcrepadmin -f showpartners -h external_psc-b.domain.com -u administrator -w kjdshfsdkjfhskjdhf

ldap://external_psc-a.domain.com
ldap://external_psc-c.domain.com

-----------------------------------------------------------------

./vdcrepadmin -f showpartners -h external_psc-c.domain.com -u administrator -w kjdshfsdkjfhskjdhf

ldap://external_psc-a.domain.com
ldap://external_psc-b.domain.com

I can see they already have a ring topology, which is the desired architecture. If I were to draw the SSO typology out, it would look something like:

Setting Up the JSON Templates for the Convergence Tool

The converge.json template that the convergence tool uses, can be found in the VMware VCSA ISO, that was used for the 6.7 Update 1 upgrade, under the following path: DVD Drive (#):\VMware VCSA\vcsa-converge-cli\templates\

To make my life easier, I copied the contents of the entire ISO to a folder on the root of my C drive. I then made a seperate folder on the root of C called converge, and created a folder for each of the three vCenters I’d be working with: vCenter-A, vCenter-B, vCenter-C. I made a copy of the converge.json, and placed it into each folder.

Taking a look at the converge.json for vCenter-A, the template tells you what data needs to be filled in, so pay close attention. Lines 10 – 15 needs entries for the ESXi host where the vCenter resides, or the managing vCenter appliance. Here I chose the option to used the Managing ESXi host. All I needed to do, was look in vSphere to see where the vCSA appliance VM resided on which host. While there, I also set the Cluster DRS settings to manual, to prevent the VMs from moving during the upgrade. Once I obtained the information needed, I completed that portion of the json. (I’ve redacted environment specific information).

Lines 16 – 21 need data entries for the first vCenter appliance (vCenter-A) to be converged. Here I need the FQDN for vCenter-A, for the Username, I need the administrator@vsphere.local account, its password, and the root password of the appliance.

Lines 22 – 33 would be filled out IF the Platform Services Controller (PSC) appliance is joined to the domain. My customer was joined to the domain, so I needed to fill this section out. Otherwise you can remove this section from the JSON.

Now, because this is the first vCenter of three, in the same SSO domain, for the first convergence, I did not need this section, because the first vCenter does not have a partner yet. It will be needed however, on the second (vCenter-B) and third (vCenter-C) convergences.

Now I need to fill out a second and third converge.json file for the second and third convergence, saving each in its respective folder. For vCenter-B and vCenter-C, for the partner hostname on line 32, I used the FQDN of the first converged vCenter (vCenter-A), as that is the first partner of the SSO domain.

For vCenter-A, the first to be converged, the completed converge.json looks like this (take note of the commas, brackets and lines removed):

For the second convergence (vCenter-B), and third convergence (vCenter-C), the completed converge.json looks like this:

Now that we got the converge.json done for each of the vCenters, we can work on the decommission.json.

Here is the template VMware provides in the same directory:

Lines 11 – 15 require impute for the Managing vCenter or ESXi Host of the External PSC. Again, just like the vCenter, I used the ESXi host that the PSC is running on.

Lines 16 – 21 needs data for the Platform Services Controller that will be Decommissioned.

Lines 30 – 34 requires information for the vCenter the PSC was paired with. Again here I just used the ESXi host that the vCenter is currently running on

Lines 35 – 39 require the information for the vCenter, the PSC is paired with.

Now that we have the decommission.json filled out for the first vCenter (vCenter-A), I have to repeat the process for the second and third vCenters (vCenter-B, vCenter-C). The full decommission.json should look like

Now that both the converge.json and decommission.json have been filled out for each of my environments (3), and stored in the same directory on the root of C, I can move forward with the Convergence process.

Prerequisites and Considerations Before Starting the Convergence Process

  • The converge tool only supports the VCSA and PSC 6.7 Update 1. All nodes must be on 6.7 Update 1 before converting.
  • If you are currently running a Windows vCenter Server or PSC, you must migrate to the appliance first.
  • Before converting, take a backups of your VCSA(s) and PSCs in the vSphere SSO domain(VM snapshots, and DB backups).
  • Know all other solutions using the PSC for authentication in the environment. They will need to be re-registered after the convergence completes and before decommissioning.
  • A machine on a routable network which can communicate with the VCSA and PSC will be used to run the convergence and decommission process.
  • Set the DRS Automation Level to manual, and the Migration Threshold to conservative. There will be be issues if the VCSA being converged is moved during the process.
  • If VCHA is enabled, it must be disabled prior to running the convergence process.
  • The converge process will handle PSC HA load balancers. Make sure you point to the VIP in the JSON template if you have them.
  • All vSphere SSO data is migrated with the exception of local OS users.
  • Best to take snapshots of the vCSA and external PSC VMs before continuing. We’ve already backed up the database, but it doesn’t hurt to have snapshots as well.

Executing the Converge Tool

Now that converge.json template for each vCenter (vCenter-A, vCenter-B, vCenter-C) is filled out properly, we can now execute. We will run the convergence tool against the first vCenter (vCenter-A). Note: We can only run the converge tool against one vCSA at a time.

In powershell, we can first run the following command before proceeding with the upgrade to see what options/parameters are available with the converge tool.

.\vcsa-converge-cli\win32\vcsa-util.exe converge --help 

To execute the convergence tool against the first vCenter (vCenter-A), I ran the following command:

.\vcsa-converge-cli\win32\vcsa-util.exe converge --no-ssl-certificate-verification --backup-taken C:\pathtofile.json

The output in powershell should look something like:

It will then ask you to reboot the first vCenter before continuing.

Once the first vCenter (vCenter-A) came up, I executed the convergence tool for the second vCenter (vCenter-B). Once completed I restarted the appliance.

Finally, the last vCenter (vCenter-C) is on deck. I executed the converge.json against that vCenter, and once completed, I restarted it.

Here is where you would need to re-point those systems using the old SSO domain, but since I didn’t have any, I can move forward with the decommissioning steps.

Decommissioning the Old external Platform Services Controllers (PSC)

Using the Converge Tool with the decommission option to remove the external PSC’s. Just like before, we need to do this one PSC at a time. The command looks something like this:

 .\vcsa-converge-cli\win32\vcsa-util.exe decommission --no-ssl-certificate-verification C:\pathtofile.json 

Once the process successfully completes, move onto the next PSC. Repeat the process until all PSC’s have been decommissioned.

Validate the SSO Replication Topology After the Converge Process

If you’ll remember, when I setup the converge.json, I had the second vCenter (vCenter-B) and third vCenter (vCenter-C) replication partner set to the first converged vCenter (vCenter-A). My Replication topology currently looks like this:

I needed to close the loop between vCenter-B and vCenter-C. Using VMware’s KB2127057 , I used the ‘createagreement’ parameter. I opened a putty session to vCenter-B and ran the following command:

# cd /usr/lib/vmware-vmdir/bin

./vdcrepadmin -f createagreement -2 -h vcenter-b.domain.com -H vcenter-c.domain.com -u Administrator -w VMw@re123

Now that the SSO replication agreement has been made between vCenter-B and vCenter-C, my replication topology looks like this:

I’m not going to lie, the hardest part of using the convergence tool, was just getting started. I’ve been through enough fires in my day to know how bad of a time I would have had if something went wrong, and I lost either the vCenter, or external PSC before the convergence successfully completed. Once I got myself beyond that mental hurdle, the process was actually quite easy and smooth.

I know I’ve left this customer’s environment in a lot better shape than I found it, and having embedded PSCs will make future vCenter upgrades a breeze. For a VMware PSO consultant, this was a huge value add for the customer.

Blog Date: April 16, 2019

Upgrading To vSphere 6.7 Update 1, and Using The vCenter Converge Tool: Part 1

I recently wrapped up a vSphere 6.7 U1 upgrade project, while on a VMware Professional Services (PSO) engagement, with a customer in Denver Colorado. On this project, I had to upgrade their three VMware environments from 6.5, to 6.7 Update 1. This customer also had three external Platform Services Controllers (PSC), a configuration that is now depreciated in VMware architecture.

Check the VMware Interoperability, and Compatibility Matrices

The first thing I needed to do, was to take inventory of the customer’s environment. I needed to know how many vCenters, if they had external Platform Services Controllers, how many hosts, vSphere Distributed Switch (VDS), and what the versions were.

  • From my investigation, this customer had three vCenters, and three external platform services controllers (PSC), all apart of the same SSO domain.
  • I also made note of which vCenter was paired with what external PSO. This information is critical not only for the vSphere 6.7 U1 upgrade, but also the convergence process that I will be doing in part two of this blog series.
  • Looking at the customer’s ESXi hosts, the majority were running the same ESXi 6.5 build, but I did find a few Nutanix clusters, and six ESXi hosts still on version 5.5.
  • The customer had multiple vSphere Distributed Switch (VDS) that needed to be upgraded to 6.5 before the 6.7 upgrade.

The second thing that I needed to do was to look at the model of each ESXi host and determine if it is supported for the vSphere 6.7 U1 upgrade. I also need to validate the firmware and BIOS each host is using, to see if I need to have the customer upgrade the firmware and BIOS of the hosts. We’ll plug this information into the VMware Compatibility Guide .

  • From my investigation, the three ESXi hosts running ESXi 5.5 were not compatible with 6.7U1, however they were compatible with the current build of ESXi 6.5 the customer was running on their other hosts. I would need to upgrade these hosts to ESXi 6.5 before starting the vSphere 6.7 U1 upgrade.
  • This customer had a mix of Dell and Cisco UCS hosts, and almost all needed to have their firmware and BIOS upgraded to be compatible with ESXi 6.7 U1.

The third thing I needed to check was to see what other platforms, owned by VMware, and/or bolt on third parties, that I needed to worry about for this upgrade.

  • The customer is using a later version of VMware’s Horizon solution, and luckily for me, it is compatible with vSphere 6.7 U1, so no worries there.
  • The customer has Zerto 6.0 deployed, and unfortunately it needed to be upgraded to a compatible version.
  • The customer has Actifio backup solution, but that is also running a compatible version, so again no need to update it.

Lets Get those ESXi 5.5 hosts Upgraded to 6.5

I needed to schedule an outage with the customer, as they had three offsite locations, with two ESXi 5.5 hosts each. These hosts were using local storage to house and run the VMs, so even though they were in a host cluster, HA was not an option, and the VMs would need to be powered off.

Once I had the outage secured, I was able to move forward with upgrading these six hosts to ESXi 6.5.

Time to Upgrade the vSphere Distributed Switch (VDS)

For this portion of the upgrade, I only needed to upgrade the customers VDS’s to 6.5. This portion of the upgrade was fast, and I was able to do it mid day without the customer experiencing an outage. We did submit a formal maintenance request for visibility, and CYA. Total upgrade time to do all of their VDS’s was less than 15 minutes. Each switch took roughly a minute.

Upgrade the External Platform Services Controllers Before the vCenter Appliances

Now that I had all hosts to a compatible ESXi 6.5 version, I can move forward with the upgrade. I was able to do this upgrade during the day, as the customer would only lose the ability to manage their VMs using the vCenters. I made backups of the PSC and vCSA databases, and created snapshots of the VMs just in case.

I first needed to upgrade the external PSCs (3) to 6.7 U1, so I simply attached the vCSA.iso to my jump VM, and launched the .exe. I did this process one PSC at a time until they were all upgraded to 6.7 U1.

Upgrade the vCenter Appliances to 6.7 Update 1

Now that the external platform services controllers are on 6.7 U1, it is time to upgrade the vCenters. The process is the same with the exe, so I just did one vCenter at a time. Both the external PSC’s and the vCSA’s upgraded without issue, and within a couple of hours both the external PSC’s and vCSA’s had finished the vSphere 6.7 Update 1.

Upgrade Compatible ESXi Hosts to 6.7 Update 1

I really wanted to use the now embedded VMware Update Manager (VUM), but I either faced users who re-attached ISO’s to their Horizon VMs, or had administrators who were upgrading/installing VMware Tools. In one cluster I even happened to find a host that had improper networking configured compared to its peers in the cluster. Once I got all of that out of the way, I was able to schedule VUM to work its way down through each cluster, and upgrade the ESXi hosts to 6.7 Update 1. There were still some fringe cases where VUM wouldn’t work as intended, and I needed to do one host at a time.

Conclusion for the Upgrade

In the end, upgrading the customer’s three environments, vCSA, PSC and ESXi to 6.7 Update 1 took me about a couple of weeks to do alone. Not too shabby considering I finished ahead of schedule, even with all of the issues I faced. After the upgrade, the customer started having their Cisco UCS blades purple screen at random. After opening a case with GSS, that week Cisco came out with an emergency patch for the fnic driver, on the customer’s UCS blades, for the very issue they were facing. The customer was able to quickly patch the blades. Talk about good timing.

Part 2 Incoming

Part 2 of this series will focus on using the vCenter Converge Tool. Stay tuned.

Blog Date: 4/15/2019

Failure Installing NSX VIB Module On ESXi Host: VIB Module For Agent Is Not Installed On Host

Now admittedly I did this to myself as I was tracking down a root cause on how operations engineers were putting hosts back into production clusters without a properly functioning vxlan.  Apparently the easiest way to get a host into this state is to repeatedly move a host in and out of a production cluster to an isolation cluster where the NSX VIB module is uninstalled.  This is a bug that is resolved in vCenter 6 u3, so at least there’s that little nugget of good news.

Current production setup:

  • NSX: 6.2.8
  • ESXi:  6.0.0 build-4600944 (Update 2)
  • VCSA: 6 Update 2
  • VCD: 8.20

So for this particular error, I was seeing the following in vCenter events: “VIB Module For Agent Is Not Installed On Host“.  After searching the KB articles I came across this one KB2053782 “Agent VIB module not installed” when installing EAM/VXLAN Agent using VUM”.  Following the KB, I made sure my update manager was in working order, and even tried following steps in the KB, but I still had the same issue.

  • Investigating the EAM.log, and found the following:
 1-12T17:48:27.785Z | ERROR | host-7361-0 | VibJob.java | 761 | Unhandled response code: 99 
 2018-01-12T17:48:27.785Z | ERROR | host-7361-0 | VibJob.java | 767 | PatchManager operation failed with error code: 99 
 With VibUrl: https://172.20.4.1/bin/vdn/vibs-6.2.8/6.0-5747501/vxlan.zip 
 2018-01-12T17:48:27.785Z | INFO | host-7361-0 | IssueHandler.java | 121 | Updating issues: 

 eam.issue.VibNotInstalled { 
 time = 2018-01-12 17:48:27,785, 
 description = 'XXX uninitialized', 
 key = 175, 
 agency = 'Agency:7c3aa096-ded7-4694-9979-053b21297a0f:669df433-b993-4766-8102-b1d993192273', 
 solutionId = 'com.vmware.vShieldManager', 
 agencyName = '_VCNS_159_anqa-1-zone001_VMware Network Fabri', 
 solutionName = 'com.vmware.vShieldManager', 
 agent = 'Agent:f509aa08-22ee-4b60-b3b7-f01c80f555df:669df433-b993-4766-8102-b1d993192273', 
 agentName = 'VMware Network Fabric (89)',
  • Investigating the esxupdate.log file and found the following:
 bba9c75116d1:669df433-b993-4766-8102-b1d993192273')), com.vmware.eam.EamException: VibInstallationFailed 
 2018-01-12T17:48:25.416Z | ERROR | agent-3 | AuditedJob.java | 75 | JOB FAILED: [#212229717] 
 EnableDisableAgentJob(AgentImpl(ID:'Agent:c446cd84-f54c-4103-a9e6-fde86056a876:669df433-b993-4766-8102-b1d993192273')), 
 com.vmware.eam.EamException: VibInstallationFailed 
 2018-01-12T17:48:27.821Z | ERROR | agent-2 | AuditedJob.java | 75 | JOB FAILED: [#1294923784] 
 EnableDisableAgentJob(AgentImpl(ID:'Agent:f509aa08-22ee-4b60-
  • Restarting the VUM services didn’t work, as the VIB installation would still fail.
  • Restarting the host didn’t work.
  • On the ESXi host I ran the following command to determine if any VIBS were installed, but it didn’t show any information:  esxcli software vib list 

Starting to suspect that the ESXi host may have corrupted files.  Digging around a little more, I found the following KB2122392 Troubleshooting vSphere ESX Agent Manager (EAM) with NSX“, and KB2075500 Installing VIB fails with the error: Unknown command or namespace software vib install

Decided to manually install the NSX VIB package on the host following KB2122392 above.  Did the manuel extract the downloaded “vxlan.zip”. Below are contents of the vxlan.zip. It Contains the 3 VIB files:
  • esx-vxlan
  • esx-vsip
  • esx-dvfilter-switch-security

Tried install them manually, but got errors indicating corrupted files on the esxi host.  Had to run the following commands first to restore the corrupted files.  **CAUTION – NEEDED TO REBOOT HOST AFTER THESE TWO COMMANDS**:

  • # mv /bootbank/imgdb.tgz /bootbank/imgdb.gz.bkp
  • # cp /altbootbank/imgdb.tgz /bootbank/imgdb.tgz
  • # reboot

Once the host came back up, I attempted to continue with the manual VIB installation.  All three NSX VIBS successfully installed.  Host now showing a healthy status in NSX preparation.  Guest introspection (GI) successfully installed.


Restarting Syslog Service on ESXi

Syslogs, we all use them in some form or another, and most places have their syslogs going to a collection server like Splunk or VMware’s own vRealize Log insight.  In the event you have an alert configured that notifies you when an ESXi host has stopped sending syslogs to the logging server, or you get a “General System Error” when attempting to change the syslog.global.logdir configuration option on the ESXi host itself, you should open a secure shell to the ESXi server and investigate further.

1. Once a secure shell has been established with the ESXi host, check the config of the vmsyslogd service, and that the process is running by using the following command:

# esxcli system syslog config get
  • If the process is running and configured, output received would be something similar to:
Default Network Retry Timeout: 180
Local Log Output: /vmfs/volumes/559dae9e-675318ea-b724-901b0e223e18/logs
Local Log Output Is Configured: true
Local Log Output Is Persistent: true
Local Logging Default Rotation Size: 1024
Local Logging Default Rotations: 8
Log To Unique Subdirectory: true
Remote Host: udp://logging-server.mydomain-int.net:514

2. If the process is up, look for the current syslog process with the following command:

# ps -Cc | grep vmsyslogd

3. If the service is running, the output received would be similar to the example below.  If there is no output, then the  vmsyslogd service is dead and needs to be started.  Skip ahead to step 5 if this is the case.

132798531 132798531 vmsyslogd            /bin/python -OO /usr/lib/vmware/vmsyslog/bin/vmsyslogd.pyo
132798530 132798530 wdog-132798531       /bin/python -OO /usr/lib/vmware/vmsyslog/bin/vmsyslogd.pyo

4. In this example, we would need to kill the vmsyslogd and wdog processes before we can restart the syslog daemon on the host.

# kill -9 132798530
# kill -9 132798531

5. To start the process issue the following command:

# /usr/lib/vmware/vmsyslog/bin/vmsyslogd

6. Verify that the process is correctly configured and running again.

# esxcli system syslog config get

Default Network Retry Timeout: 180
Local Log Output: /vmfs/volumes/559dae9e-675318ea-b724-901b0e223e18/logs
Local Log Output Is Configured: true
Local Log Output Is Persistent: true
Local Logging Default Rotation Size: 1024
Local Logging Default Rotations: 8
Log To Unique Subdirectory: true
Remote Host: udp://logging-server.mydomain-int.net:514

7. Log into the syslog collection server and verify the ESXi host is now properly sending logs.

NSX Host VIB Upgrade From 6.1.X to 6.2.4

There is a known issue when upgrading the NSX host VIB from 6.1.X to 6.2.4, where once the host is upgraded to VIB 6.2.4, and the virtual machines are moved to it, if they should somehow find their way back to a 6.1.X host, the VM’s NIC will become disconnected causing an outage. This has been outlined in KB2146171

Resolution

We found the following steps to be the best solution in getting to the 6.2.4 NSX VIB version on ESXi 6u2, without causing any interruptions in regards to the network connectivity of the virtual machines.

  1. Log into the vSphere web client, go to Networking & Security, select Installation on the navigation menu, and then select the Host preparation tab.
  2. Select the desired cluster, and click the “Upgrade Available” message next to it.  This will start the upgrade process of all the hosts, and once completed, all hosts will display “Reboot Required”.
  3. Mark the first host for maintenance mode as you normally would, and once all virtual machines have evacuated off, and the host marked as in maintenance mode, restart it as you normally would.
  4. While we wait for the host to reboot, right click on the host cluster being upgraded and select Edit Settings.  Select vSphere DRS, and set the automation level to Manual.  This will give you control over host evacuations and where the virtual machines go.
  5. Once the host has restarted, monitor the Recent Tasks window and wait for the NSX vib installation to complete.
  6. Bring the host out of maintenance mode.  Now migrate a test VM over to the new host and test network connectivity.  Ping to another VM on a different host, and then make sure you can ping out to something like 8.8.8.8.
  7.  Verify the VIB has been upgraded to 6.2.4 from the vSphere web Networking & Security host preparation section.
  8. Open PowerCLI and connect to the vCenter where this maintenance activity is being performed.  In order to safely control the migration of virtual machines from hosts containing the NSX VIV 6.1.X to the host that has been upgraded to 6.2.4, we will use the following command to evacuate the next host’s virtual machines onto the one that was just upgraded.
Get-VM -Location "<sourcehost>" | Move-VM -Destination (Get-Vmhost "<destinationhost>")
  • “sourcehost” being the next host you wish to upgrade, and the “destinationhost” being the one that was just upgraded.

9.  Once the host is fully evacuated, place the host in maintenance mode, and reboot it.

10. VMware provided us with a script that should ONLY be executed against NSX vib 6.2.4 hosts, and does the following:

  • Verifies the VIB version running on the host.
    For example: If the VIB version is between VIB_VERSION_LOW=3960641, VIB_VERSION_HIGH=4259819 then it is considered to be a host with VIB 6.2.3 and above. Any other VIB version the script will fail with a warningCustomer needs to make sure that the script is executed against ALL virtual machines that have been upgraded since 6.1.x.
  • Once the script sets the export_version to 4, the version is persistent across reboots.
  • There is no harm if customer executes the script multiple times on the same host as only VMs that need modification will be modified.
  • Script should only be executed NSX-v 6.2.4 hosts

I have attached a ZIP file containg the script here:  fix_exportversion.zip

Script Usage

  • Copy the script to a common datastore accessible to all hosts and run the script on each host.
  • Log in to the 6.2.4 ESXi host via ssh or CONSOLE, where you intend to execute the script.
  • chmod u+x the files
  • Execute the script:
./vmfs/volumes/<Shared_Datastore>/fix_exportversion.sh /vmfs/volumes/<Shared_Datastore>/vsipioctl


Example output:

~ # /vmfs/volumes/NFS-101/fix_exportversion.sh /vmfs/volumes/NFS-101/vsipioctl
Fixed filter nic-39377-eth0-vmware-sfw.2 export version to 4.
Fixed filter nic-48385-eth0-vmware-sfw.2 export version to 4.
Filter nic-50077-eth0-vmware-sfw.2 already has export version 4.
Filter nic-52913-eth0-vmware-sfw.2 already has export version 4.
Filter nic-53498-eth0-vmware-sfw.2 has export version 3, no changes required.

Note: If the export version for any VM vNIC shows up as ‘2’, the script will modify the version to ‘4’ and does not modify other VMs where export version is not ‘2’.

11.  Repeat steps 5 – 10 on all hosts in the cluster until completion.  This script appears to be necessary as we have seen cases where a VM may still lose its NIC even if it is vmotioned from one NSX vib 6.2.4 host to another 6.2.4 host.

12. Once 6.2.4 host VIB installation is complete, and the script has been run against the hosts and virtual machines running on them, DRS can be set back to your desired setting like Fully automated for instance.

13.  Virtual machines should now be able to vmotion between hosts without losing their NICs.

  • This process was thoroughly tested in a vCloud Director cloud environment containing over 20,000 virtual machines, and on roughly 240 ESXi hosts without issue. vCenter environment was vCSA version 6u2, and ESXi version 6u2.

vMotion fails at 67% on esxi 6 in vCenter 6.

Came across an interesting error the other night while on call, as I had a host in a cluster that VM’s could not vMotion off of either manually or through DRS.  I was seeing the following error message in vSphere:


The source detected that the destination failed to resume.

vMotion migration [-1062731518:1481069780557682] failed: remote host <192.168.1.2> failed with status Failure.
vMotion migration [-1062731518:1481069780557682] failed to asynchronously receive and apply state from the remote host: Failure.
Failed waiting for data. Error 195887105. Failure.


  • While tailing the host.d log on the source host I was seeing the following error:
2016-12-09T19:44:40.373Z warning hostd[2B3E0B70] [Originator@6876 sub=Libs] ResourceGroup: failed to instantiate group with id: -591724635. Sysinfo error on operation return ed status : Not found. Please see the VMkernel log for detailed error information


  • While tailing the host.d log on the destination host, I was seeing the following error:
2016-12-09T19:44:34.330Z info hostd[33481B70] [Originator@6876 sub=Snmpsvc] ReportVMs: processing vm 223
2016-12-09T19:44:34.330Z info hostd[33481B70] [Originator@6876 sub=Snmpsvc] ReportVMs: serialized 36 out of 36 vms
2016-12-09T19:44:34.330Z info hostd[33481B70] [Originator@6876 sub=Snmpsvc] GenerateFullReport: report file /tmp/.vm-report.xml generated, size 915 bytes.
2016-12-09T19:44:34.330Z info hostd[33481B70] [Originator@6876 sub=Snmpsvc] PublishReport: file /tmp/.vm-report.xml published as /tmp/vm-report.xml
2016-12-09T19:44:34.330Z info hostd[33481B70] [Originator@6876 sub=Snmpsvc] NotifyAgent: write(33, /var/run/snmp.ctl, V) 1 bytes to snmpd
2016-12-09T19:44:34.330Z info hostd[33481B70] [Originator@6876 sub=Snmpsvc] GenerateFullReport: notified snmpd to update vm cache
2016-12-09T19:44:34.330Z info hostd[33481B70] [Originator@6876 sub=Snmpsvc] DoReport: VM Poll State cache - report completed ok
2016-12-09T19:44:40.317Z warning hostd[33081B70] [Originator@6876 sub=Libs] ResourceGroup: failed to instantiate group with id: 727017570. Sysinfo error on operation returne d status : Not found. Please see the VMkernel log for detailed error information


  • While tailing the destination vmkernel.log host, I was seeing the following error:
2016-12-09T19:44:22.000Z cpu21:35086 opID=b5686da8)World: 15516: VC opID AA8C46D5-0001C9C0-81-91-cb-a544 maps to vmkernel opID b5686da8
2016-12-09T19:44:22.000Z cpu21:35086 opID=b5686da8)Config: 681: "SIOControlFlag2" = 1, Old Value: 0, (Status: 0x0)
2016-12-09T19:44:22.261Z cpu21:579860616)World: vm 579827968: 1647: Starting world vmm0:oats-agent-2_(e00c5327-1d72-4aac-bc5e-81a10120a68b) of type 8
2016-12-09T19:44:22.261Z cpu21:579860616)Sched: vm 579827968: 6500: Adding world 'vmm0:oats-agent-2_(e00c5327-1d72-4aac-bc5e-81a10120a68b)', group 'host/user/pool34', cpu: shares=-3 min=0 minLimit=-1 max=4000, mem: shares=-3 min=0 minLimit=-1 max=1048576
2016-12-09T19:44:22.261Z cpu21:579860616)Sched: vm 579827968: 6515: renamed group 5022126293 to vm.579860616
2016-12-09T19:44:22.261Z cpu21:579860616)Sched: vm 579827968: 6532: group 5022126293 is located under group 5022124087
2016-12-09T19:44:22.264Z cpu21:579860616)MemSched: vm 579860616: 8112: extended swap to 46883 pgs
2016-12-09T19:44:22.290Z cpu20:579860616)Migrate: vm 579827968: 3385: Setting VMOTION info: Dest ts = 1481312661276391, src ip = <192.168.1.2> dest ip = <192.168.1.17> Dest wid = 0 using SHARED swap
2016-12-09T19:44:22.293Z cpu20:579860616)Hbr: 3394: Migration start received (worldID=579827968) (migrateType=1) (event=0) (isSource=0) (sharedConfig=1)
2016-12-09T19:44:22.332Z cpu0:33670)MigrateNet: vm 33670: 2997: Accepted connection from <::ffff:192.168.1.2>
2016-12-09T19:44:22.332Z cpu0:33670)MigrateNet: vm 33670: 3049: data socket size 0 is less than config option 562140
2016-12-09T19:44:22.332Z cpu0:33670)MigrateNet: vm 33670: 3085: dataSocket 0x430610ecaba0 receive buffer size is 562140
2016-12-09T19:44:22.332Z cpu0:33670)MigrateNet: vm 33670: 2997: Accepted connection from <::ffff:192.168.1.2>
2016-12-09T19:44:22.332Z cpu0:33670)MigrateNet: vm 33670: 3049: data socket size 0 is less than config option 562140
2016-12-09T19:44:22.332Z cpu0:33670)MigrateNet: vm 33670: 3085: dataSocket 0x4306110fab70 receive buffer size is 562140
2016-12-09T19:44:22.332Z cpu0:33670)VMotionUtil: 3995: 1481312661276391 D: Stream connection 1 added.
2016-12-09T19:44:24.416Z cpu1:32854)elxnet: elxnet_allocQueueWithAttr:4255: [vmnic0] RxQ, QueueIDVal:2
2016-12-09T19:44:24.416Z cpu1:32854)elxnet: elxnet_startQueue:4383: [vmnic0] RxQ, QueueIDVal:2
2016-12-09T19:44:24.985Z cpu12:579860756)VMotionRecv: 658: 1481312661276391 D: Estimated network bandwidth 471.341 MB/s during pre-copy
2016-12-09T19:44:24.994Z cpu4:579860755)VMotionSend: 4953: 1481312661276391 D: Failed to receive state for message type 1: Failure
2016-12-09T19:44:24.994Z cpu4:579860755)WARNING: VMotionSend: 3979: 1481312661276391 D: failed to asynchronously receive and apply state from the remote host: Failure.
2016-12-09T19:44:24.994Z cpu4:579860755)WARNING: Migrate: 270: 1481312661276391 D: Failed: Failure (0xbad0001) @0x4180324c6786
2016-12-09T19:44:24.994Z cpu4:579860755)WARNING: VMotionUtil: 6267: 1481312661276391 D: timed out waiting 0 ms to transmit data.
2016-12-09T19:44:24.994Z cpu4:579860755)WARNING: VMotionSend: 688: 1481312661276391 D: (9-0x43ba40001a98) failed to receive 72/72 bytes from the remote host <192.168.1.2>: Timeout
2016-12-09T19:44:24.998Z cpu4:579860616)WARNING: Migrate: 5454: 1481312661276391 D: Migration considered a failure by the VMX. It is most likely a timeout, but check the VMX log for the true error.


We are using the vSphere distributed switch in our environment, and each host has a vmk dedicated to vMotion traffic only, so this was my first test, verified the IP and subnet for the vmk on the source/destination hosts, and I was successfully able to ping using vmkping to the destination host, and tested the connection both ways.

The second test completed was to power off a VM, and test its ability to vMotion off of the host – this worked.  When I powered the VM back on it immediately went back to the source host.  I then tried to vMotion the VM again while it was powered on from the affected source host, and move it to the destination host like I had before, and to my surprise it worked now.  Tested this process with a few other VMs for consistency.  I tried to restart a VM on the affected host, and then move it off to another host, but this did not work.

My final test was to vMotion a VM from a different host to the affected host.  This worked as well, and I was even able to vMotion off from that affected host again.


In our environment we have a Trend-micro agent VM and a GI VM running on each host.  I logged into the vSphere web-client to look at the status of the Trend-micro VM and there was no indication of an error, I found the same status checking the GI vm.

Knowing we have had issues with Trend-micro in the past, I powered down the Trend-micro VM running on the host, and attempted a manual vMotion of a test VM I knew couldn’t move before – IT WORKED.  Tried another with the same result.  Put the host into maintenance mode to try and evacuate the rest of the customer VMs off from it with success!

To wrap all of this up, the Trend-micro agent VM running on the esxi6 host was preventing other VMs from vMotioning off either manually or through DRS.  Once the trend-micro agent VM was powered off, I was able to evacuate the host.


ESXi host fails to upgrade from 5.5 Update 3 to 6 Update 2

This happened to me today and thought it was worth sharing.  Most of the hosts in this particular cluster upgraded fine to ESXi 6u2 from ESXi 5.5u3 with the exception of this one host.  Update manager kept giving me this error “Cannot run upgrade script on host” in the vCenter Recent Tasks pane.

esxi01

A quick google search brought me to this KB article 2007163, but after following the KB I wasn’t able to find the referenced error “Remediation failed due to non mode failure “on the update manager server (Win2008) under C:\AppData\VMware\Update Manager\Logs\vmware-vum-server-log4cpp.log file.

I started an SSH session to the ESXi host, but wasn’t able to find and entry similar to the error “OSError: [Errno 39] Directory not empty:” in the /var/log/vua.log file

I instead found this error:

—————————————————————-

[FFD0D8C0 error ‘Default’] Alert:WARNING: This application is not using QuickExit().

The exit code will be set to 0.@ bora/vim/lib/vmacore/main/service.cpp:147

–> Backtrace:

–> backtrace[00] rip 1bc228c3 Vmacore::System::Stacktrace::CaptureFullWork(unsigned int)

—————————————————————–

By chance, I happened to check space on the ESXi host #df -h and found I had a partition that was 100% full.

esxi02

So I changed directory to it # cd /storage/core/……./ where I found two more directories  /var/core/ .  Using the command #ls to list the directory, I found two zdumps.

esxi03

I deleted the two zdumps, and then checked the space again #df -h

esxi04

Seeing now that my directory is now 68% utilized instead of 100%, I attempted the ESXi 6u2 upgrade again this time with success.