Upgrading A Large vRealize Operations Manager (vROps) Appliance Cluster

Upgrading a multi-node vROps cluster can bring significant downtime to the monitoring/data collection abilities of the cluster.  The largest production cluster I am responsible for consists of nine data nodes, including the master and master replica, and four remote collectors for our remote data centers.  If you recall my previous post Sizing and Installing The vROps Appliance, I discussed the various sizing options of a vROps cluster based on the data collected, and in my case this cluster is configured as LARGE due to the size of our vROps cluster.  One of the biggest challenges of maintaining a large cluster, that has remote collectors collecting from data centers in different geographical locations, is the ability to upgrade the cluster with minimal downtime. As it stands now, if I were to upgrade this cluster with the traditional methods VMware provided, I would be looking at a minimal downtime of eight hours.  VMware does offer a useful work around: How to reduce update time by pre-copying software update PAK files KB2127895, and we will be using that here.

But first, I wanted to introduce you to a script developed by a Jeremy McCoy, and his repository over at github called nakedhitman.  In there you will find this awesome script called vROps Cluster Repair that I have personally used many times, and was recommended to me by VMware’s GSS. This script is intended to bring the vROps cluster back to a known healthy state, and I like to run it before upgrading my Production vROps clusters.  You will want to familiarize yourself with that script, download and get it setup with your environment details.

Preparing for the Upgrade

  • First – Run the nakedhitman’s – vROps Cluster Repair script.  This will cause a brief outage (max 30 minutes) as services are stopped on each vROps node for cleanup.  *I recommend taking a snapshot of all vROps nodes beforehand just in case.  Once the cluster comes online and starts collecting data, delete those snapshots.
  • Second – Insure you have enough free space on the appliances to support the upgrade.
  • Third – Complete a basic heath-check of the appliance outlined in my post: vRealize Operations Manager (vROps) Health-Check.  While not necessary, I have personally had upgrades fail due to the issues found in this health-check.
  • Fourth – Complete Part 1 of VMware KB2127895 article to get the upgrade paks pre-staged on all nodes except the master.  No downtime required as this can be done live.  The benefit of using this KB us that you are essentially removing the time it takes for the cluster to copy the two pak files around during the upgrade process, which could take hours depending on the size of the environment.

 Upgrading The Appliance Cluster

  1. Snapshot the cluster and remote collectors.  Take the cluster offline from the master’s admin page https://<vrops>/admin.  The the cluster is offline, shutdown the vrops appliance nodes in order of remote collector, data nodes, master replica and lastly the master.  Snapshot the VMs, and then boot the master first, wait for it to fully come up to the appliance login screen, and then boot the master replica, datanodes and remote collectors last.
  2. Log back into the master appliance Admin page, but do not bring the the cluster online.
  3. On the left pane select the Software Update tab, and then click the Install a Software Update… button.
  4. Browse for the PAK file and select it.
  5. Installation options……
    1. DO NOT select the option “Install the PAK file even if it is already installed.” – Think of this as a force install. This is used if the original software update failed and you are attempting to try again. This option will ignore the pre-staged PAK files you placed earlier, and severely delay the upgrade as the cluster will now have to copy the PAK files around to each of the nodes.
    2. You have the option to “Reset out-of-the-box content, overwriting to a newer version provided by this update. Note, user modifications to out-of-the-box alerts, Symptoms, Recommendations and Policies will be overwritten.”
  6. Click Upload.
  7. Accept the license agreement.
  8. Click Next.
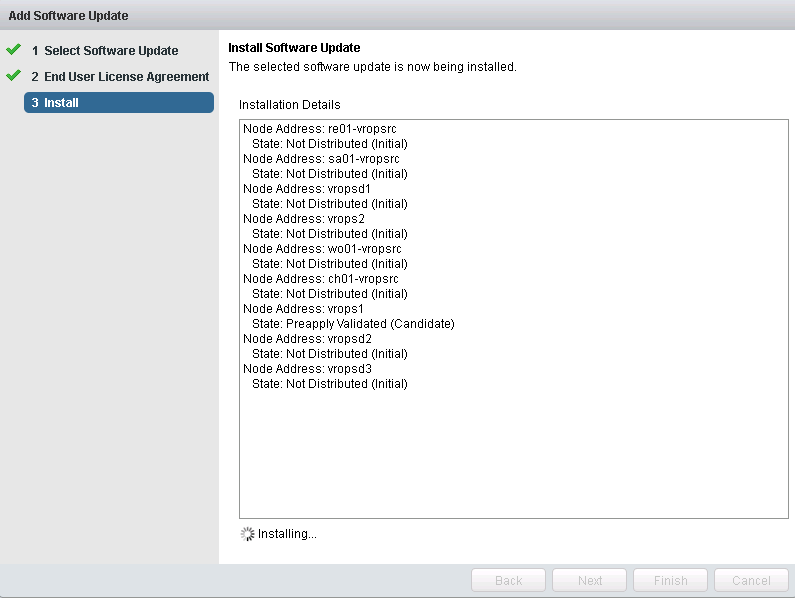
  9. The upgrade will now start. Sit back, and Relax! The upgrade can take hours to complete. There are 9 steps to this.

vrops45

  • Eventually you will need to log back into the admin page to monitor the progress of the upgrade.  Since  6.2, you can check the status of the upgrade by clicking the little notebook next to each node.  If there’s an issue detected like in the screen capture below, it may not stop the upgrade from progressing, but you should take notice.  VMware has even started included KB article links to help troubleshoot.

vrops46

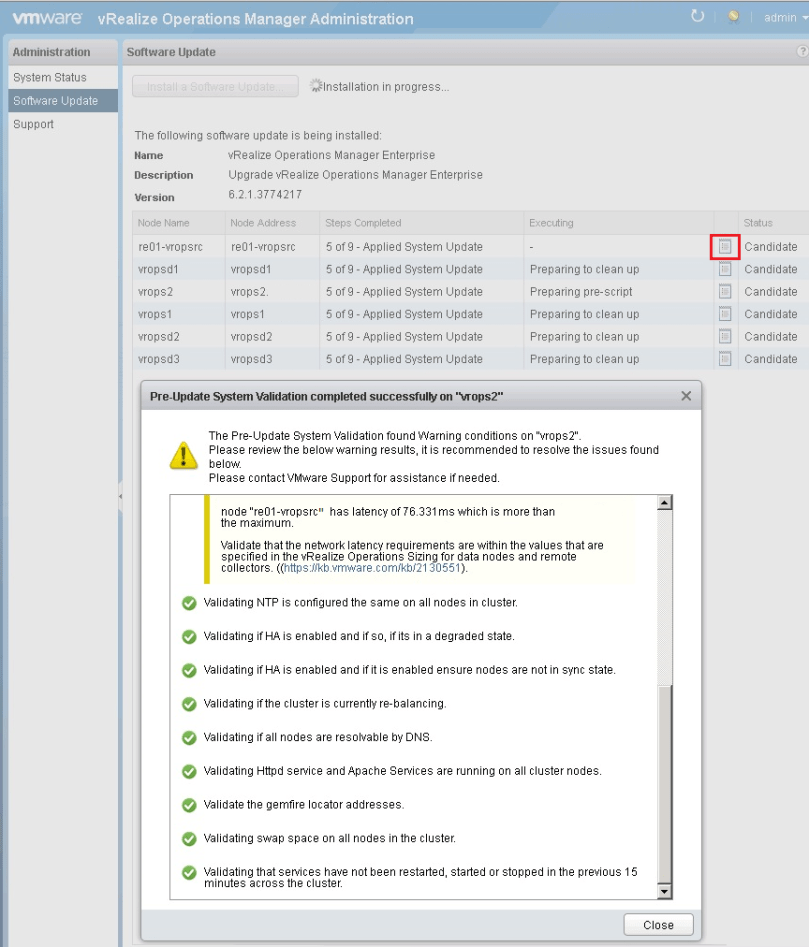
  • There are two places to watch the upgrade on the master at the log level if you’d like:
     # tail -f /storage/vcops/log/pakManager/vcopsPakManager.root.apply_system_update.log

    –and–

     # tail -f /storage/vcops/log/pakManager/vcopsPakManager.root.query.log
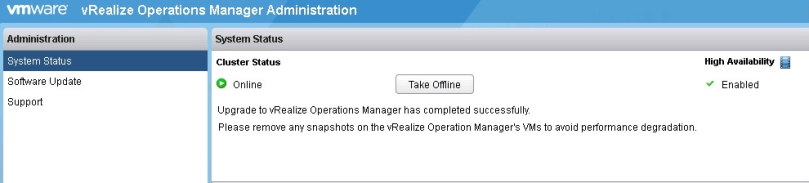
  • Once the installation is complete and at steps 9 of 9, go back to the system status tab and verify the system state is online with the little green check. VMware engineers have said that at this point the upgrade has completed successfully, and it is safe to remove the snapshots.

vrops47

  • Should the upgrade fail, open a severity 1 SR with VMware asap.
  • If the sun is shining and the upgrade finishes, delete those snapshots, and enjoy all the upgrades/bug fixes the new release brings.


As a side note…

I have submitted a couple feature requests to VMware in order to ease the upgrade process of large vROps installations.

  1. For multi-data center environments: The ability to have smaller appliances in each data center, with a single search head appliance connected to the multiple data center vROps deployments.  The idea here would be a “single pane of glass” to see all data centers like you get if there is a single large muli-node vROps cluster, with multiple remote collectors. Having smaller deployments accessible by a single search head would allow for the ability to take one deployment down per data center at a time to upgrade it, dramatically reducing  the data outage, and upgrade time.
  2. The ability to deploy the latest vROps appliance, and import the data from the old like VMware does with the vCSA.  The idea here is that this would be another way to reduce the upgrade time, and reduce the outage occurred by upgrading the appliance.
  3. Tying #1 and #2 together, the ability to stand up a new appliance in said remote data center, and then export that data centers specific data from the main large cluster to the smaller deployment, or the ability to just stand up a new appliance and import the data from the old one.

vMotion fails at 67% on esxi 6 in vCenter 6.

Came across an interesting error the other night while on call, as I had a host in a cluster that VM’s could not vMotion off of either manually or through DRS.  I was seeing the following error message in vSphere:


The source detected that the destination failed to resume.

vMotion migration [-1062731518:1481069780557682] failed: remote host <192.168.1.2> failed with status Failure.
vMotion migration [-1062731518:1481069780557682] failed to asynchronously receive and apply state from the remote host: Failure.
Failed waiting for data. Error 195887105. Failure.


  • While tailing the host.d log on the source host I was seeing the following error:
2016-12-09T19:44:40.373Z warning hostd[2B3E0B70] [Originator@6876 sub=Libs] ResourceGroup: failed to instantiate group with id: -591724635. Sysinfo error on operation return ed status : Not found. Please see the VMkernel log for detailed error information


  • While tailing the host.d log on the destination host, I was seeing the following error:
2016-12-09T19:44:34.330Z info hostd[33481B70] [Originator@6876 sub=Snmpsvc] ReportVMs: processing vm 223
2016-12-09T19:44:34.330Z info hostd[33481B70] [Originator@6876 sub=Snmpsvc] ReportVMs: serialized 36 out of 36 vms
2016-12-09T19:44:34.330Z info hostd[33481B70] [Originator@6876 sub=Snmpsvc] GenerateFullReport: report file /tmp/.vm-report.xml generated, size 915 bytes.
2016-12-09T19:44:34.330Z info hostd[33481B70] [Originator@6876 sub=Snmpsvc] PublishReport: file /tmp/.vm-report.xml published as /tmp/vm-report.xml
2016-12-09T19:44:34.330Z info hostd[33481B70] [Originator@6876 sub=Snmpsvc] NotifyAgent: write(33, /var/run/snmp.ctl, V) 1 bytes to snmpd
2016-12-09T19:44:34.330Z info hostd[33481B70] [Originator@6876 sub=Snmpsvc] GenerateFullReport: notified snmpd to update vm cache
2016-12-09T19:44:34.330Z info hostd[33481B70] [Originator@6876 sub=Snmpsvc] DoReport: VM Poll State cache - report completed ok
2016-12-09T19:44:40.317Z warning hostd[33081B70] [Originator@6876 sub=Libs] ResourceGroup: failed to instantiate group with id: 727017570. Sysinfo error on operation returne d status : Not found. Please see the VMkernel log for detailed error information


  • While tailing the destination vmkernel.log host, I was seeing the following error:
2016-12-09T19:44:22.000Z cpu21:35086 opID=b5686da8)World: 15516: VC opID AA8C46D5-0001C9C0-81-91-cb-a544 maps to vmkernel opID b5686da8
2016-12-09T19:44:22.000Z cpu21:35086 opID=b5686da8)Config: 681: "SIOControlFlag2" = 1, Old Value: 0, (Status: 0x0)
2016-12-09T19:44:22.261Z cpu21:579860616)World: vm 579827968: 1647: Starting world vmm0:oats-agent-2_(e00c5327-1d72-4aac-bc5e-81a10120a68b) of type 8
2016-12-09T19:44:22.261Z cpu21:579860616)Sched: vm 579827968: 6500: Adding world 'vmm0:oats-agent-2_(e00c5327-1d72-4aac-bc5e-81a10120a68b)', group 'host/user/pool34', cpu: shares=-3 min=0 minLimit=-1 max=4000, mem: shares=-3 min=0 minLimit=-1 max=1048576
2016-12-09T19:44:22.261Z cpu21:579860616)Sched: vm 579827968: 6515: renamed group 5022126293 to vm.579860616
2016-12-09T19:44:22.261Z cpu21:579860616)Sched: vm 579827968: 6532: group 5022126293 is located under group 5022124087
2016-12-09T19:44:22.264Z cpu21:579860616)MemSched: vm 579860616: 8112: extended swap to 46883 pgs
2016-12-09T19:44:22.290Z cpu20:579860616)Migrate: vm 579827968: 3385: Setting VMOTION info: Dest ts = 1481312661276391, src ip = <192.168.1.2> dest ip = <192.168.1.17> Dest wid = 0 using SHARED swap
2016-12-09T19:44:22.293Z cpu20:579860616)Hbr: 3394: Migration start received (worldID=579827968) (migrateType=1) (event=0) (isSource=0) (sharedConfig=1)
2016-12-09T19:44:22.332Z cpu0:33670)MigrateNet: vm 33670: 2997: Accepted connection from <::ffff:192.168.1.2>
2016-12-09T19:44:22.332Z cpu0:33670)MigrateNet: vm 33670: 3049: data socket size 0 is less than config option 562140
2016-12-09T19:44:22.332Z cpu0:33670)MigrateNet: vm 33670: 3085: dataSocket 0x430610ecaba0 receive buffer size is 562140
2016-12-09T19:44:22.332Z cpu0:33670)MigrateNet: vm 33670: 2997: Accepted connection from <::ffff:192.168.1.2>
2016-12-09T19:44:22.332Z cpu0:33670)MigrateNet: vm 33670: 3049: data socket size 0 is less than config option 562140
2016-12-09T19:44:22.332Z cpu0:33670)MigrateNet: vm 33670: 3085: dataSocket 0x4306110fab70 receive buffer size is 562140
2016-12-09T19:44:22.332Z cpu0:33670)VMotionUtil: 3995: 1481312661276391 D: Stream connection 1 added.
2016-12-09T19:44:24.416Z cpu1:32854)elxnet: elxnet_allocQueueWithAttr:4255: [vmnic0] RxQ, QueueIDVal:2
2016-12-09T19:44:24.416Z cpu1:32854)elxnet: elxnet_startQueue:4383: [vmnic0] RxQ, QueueIDVal:2
2016-12-09T19:44:24.985Z cpu12:579860756)VMotionRecv: 658: 1481312661276391 D: Estimated network bandwidth 471.341 MB/s during pre-copy
2016-12-09T19:44:24.994Z cpu4:579860755)VMotionSend: 4953: 1481312661276391 D: Failed to receive state for message type 1: Failure
2016-12-09T19:44:24.994Z cpu4:579860755)WARNING: VMotionSend: 3979: 1481312661276391 D: failed to asynchronously receive and apply state from the remote host: Failure.
2016-12-09T19:44:24.994Z cpu4:579860755)WARNING: Migrate: 270: 1481312661276391 D: Failed: Failure (0xbad0001) @0x4180324c6786
2016-12-09T19:44:24.994Z cpu4:579860755)WARNING: VMotionUtil: 6267: 1481312661276391 D: timed out waiting 0 ms to transmit data.
2016-12-09T19:44:24.994Z cpu4:579860755)WARNING: VMotionSend: 688: 1481312661276391 D: (9-0x43ba40001a98) failed to receive 72/72 bytes from the remote host <192.168.1.2>: Timeout
2016-12-09T19:44:24.998Z cpu4:579860616)WARNING: Migrate: 5454: 1481312661276391 D: Migration considered a failure by the VMX. It is most likely a timeout, but check the VMX log for the true error.


We are using the vSphere distributed switch in our environment, and each host has a vmk dedicated to vMotion traffic only, so this was my first test, verified the IP and subnet for the vmk on the source/destination hosts, and I was successfully able to ping using vmkping to the destination host, and tested the connection both ways.

The second test completed was to power off a VM, and test its ability to vMotion off of the host – this worked.  When I powered the VM back on it immediately went back to the source host.  I then tried to vMotion the VM again while it was powered on from the affected source host, and move it to the destination host like I had before, and to my surprise it worked now.  Tested this process with a few other VMs for consistency.  I tried to restart a VM on the affected host, and then move it off to another host, but this did not work.

My final test was to vMotion a VM from a different host to the affected host.  This worked as well, and I was even able to vMotion off from that affected host again.


In our environment we have a Trend-micro agent VM and a GI VM running on each host.  I logged into the vSphere web-client to look at the status of the Trend-micro VM and there was no indication of an error, I found the same status checking the GI vm.

Knowing we have had issues with Trend-micro in the past, I powered down the Trend-micro VM running on the host, and attempted a manual vMotion of a test VM I knew couldn’t move before – IT WORKED.  Tried another with the same result.  Put the host into maintenance mode to try and evacuate the rest of the customer VMs off from it with success!

To wrap all of this up, the Trend-micro agent VM running on the esxi6 host was preventing other VMs from vMotioning off either manually or through DRS.  Once the trend-micro agent VM was powered off, I was able to evacuate the host.