
Blog Date: August 12, 2022
NSX-ALB Controller version: 22.1.1
vSphere version 7.0.3 Build 20150588
In this post, I’ll be going over the steps to replace the SSL/TLS controller certificate. You can either replace the controller certificate with one from a Certificate Authority, or you can create a self signed certificate that includes the FQDN and IP in the SAN. This information is missing in the default certificate, and it will cause the deployment of Tanzu to barf if not done. In this blog I will cover both methods.
(OPTION A) Replacing the NSX-ALB Controller SSL/TLS Certificate using a CA.
The following process is what I used in my lab to replace the NSX-ALB controller certificate using my Microsoft CA. Your mileage may vary.
Remember to take a snapshot of the NSX-ALB controller before proceeding.
1- First we will need to generate a CSR. In the NSX-ALB interface, go to: Templates -> Security -> SSL/TLS Certificates.
2 – Click the blue “Create” button in the upper right, and select Controller Certificate from the drop-down menu.
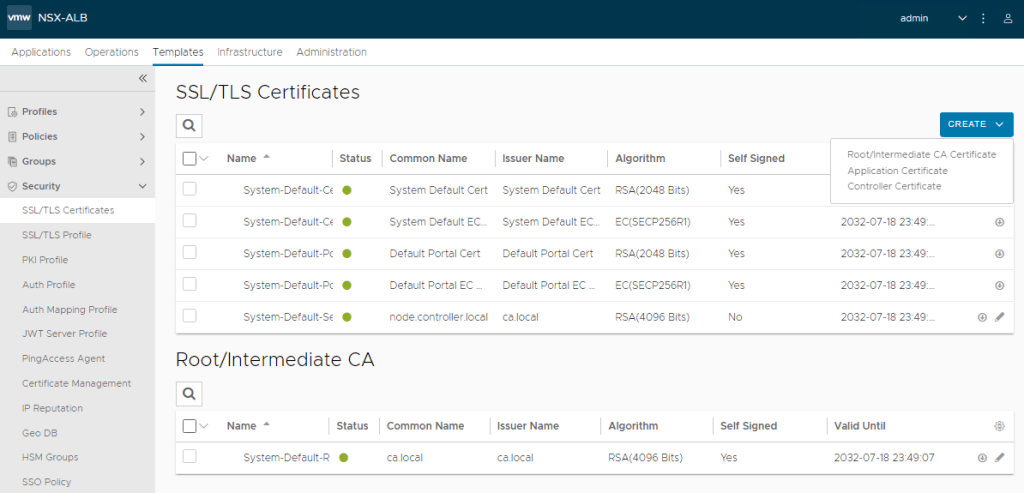
Enter the name of the certificate, and then under Type, select CSR.

Add the certificate information, and then add the FQDN and IP address to the subject Alternate Name (SAN). I am doing this example in my home lab, so I only have a single controller. Large deployments might have clustered controllers, so your configuration will very if you have multiple SANs to add.

Click the green “Save” button in the lower left.
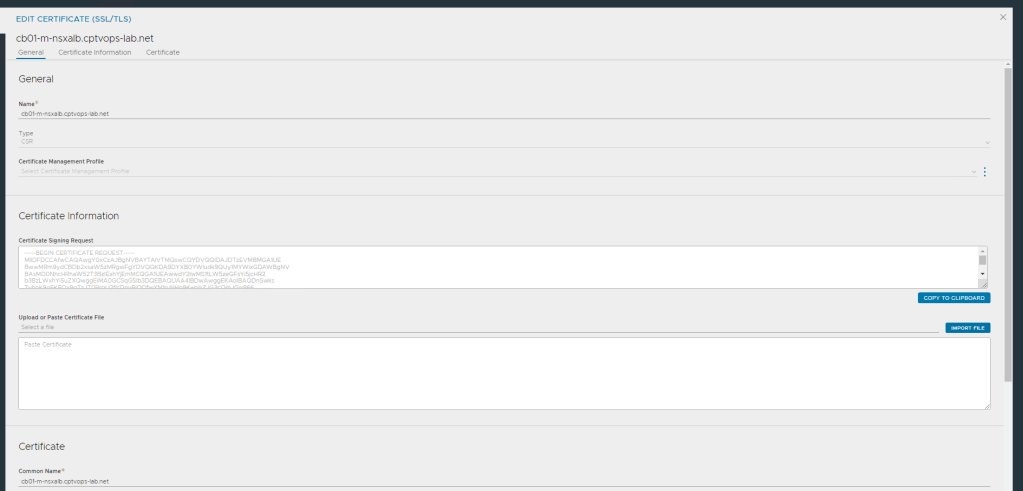
Now you will see the certificate in a grey status in the list. Click the pencil icon on its right side to edit it.
Now we need to copy the Certificate signing request to take over to our CA. Click the “Copy to Clipboard” button.
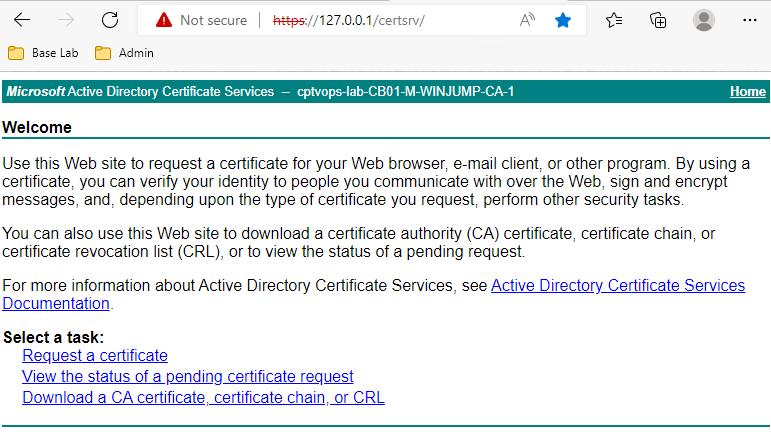
Now we need to connect to the Microsoft CA web portal. Click “Request a Certificate”.
—–END CERTIFICATE REQUEST—–.
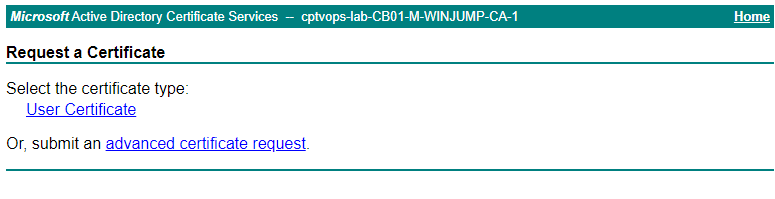
For this certificate, you will need to use the “Web Server” template on the Microsoft CA. I have created a VMware version of it following VMware’s KB article 2112009 for Creating a Microsoft Certificate Authority Template for SSL certificate creation in vSphere 6.x/7.x. I called my web server template VMware, so that is what I have selected here.

Click “Submit”.
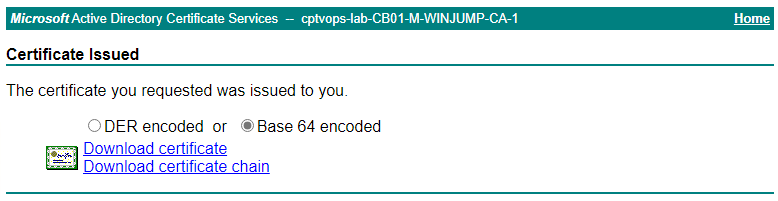
Select “Base 64 encoded”, and then click the “Download certificate” link.
We also need to obtain a copy of the root ca certificate from the Microsoft CA to complete the chain.
In order to complete the cert chain, in a text editor like Notepad++, paste the NSX-ALB SSL certificate you created first, and then paste the root ca certificate from the Microsoft CA. It should look like this:

Now you have the full chain, so copy it. Go back to the pending controller certificate in the NSX-ALB interface, and paste the full chain into the window.
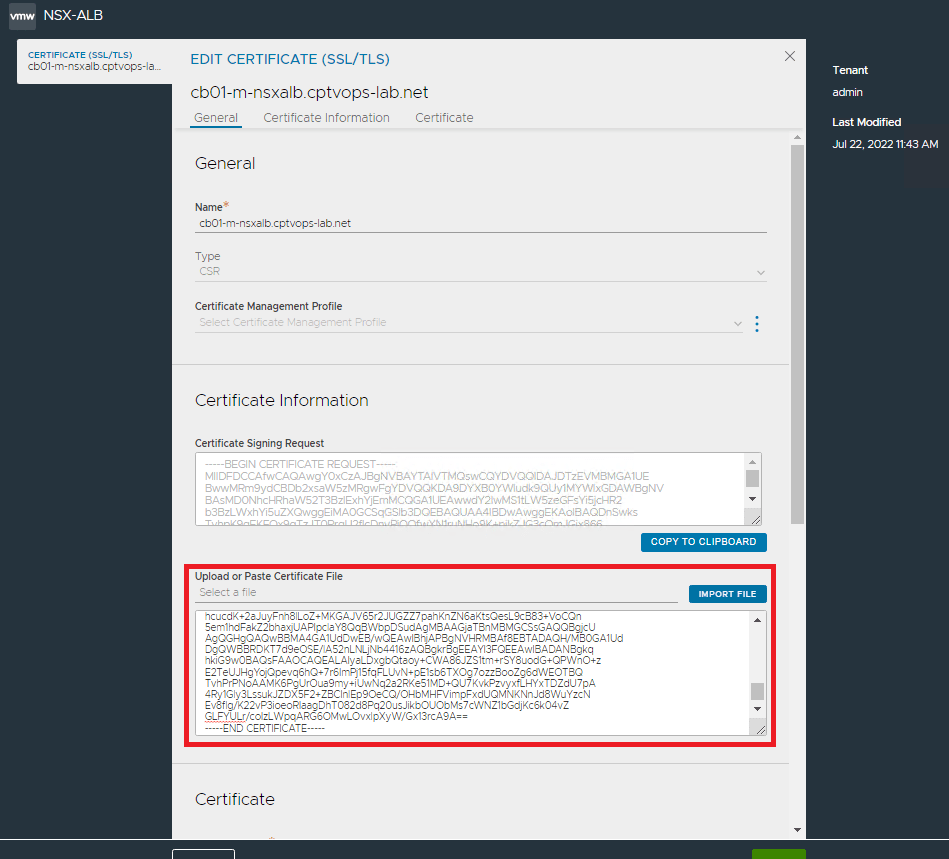
Click the “Save” button in the lower left corner.
Now back to the main SSL/TLS Certificates window, we should see that the controller SSL certificate has a green status. You might need to refresh the page a couple of times. If the controller SSL certificate is invalid, a little exclamation symbol will appear next to the certificate, and you will need to troubleshoot further.

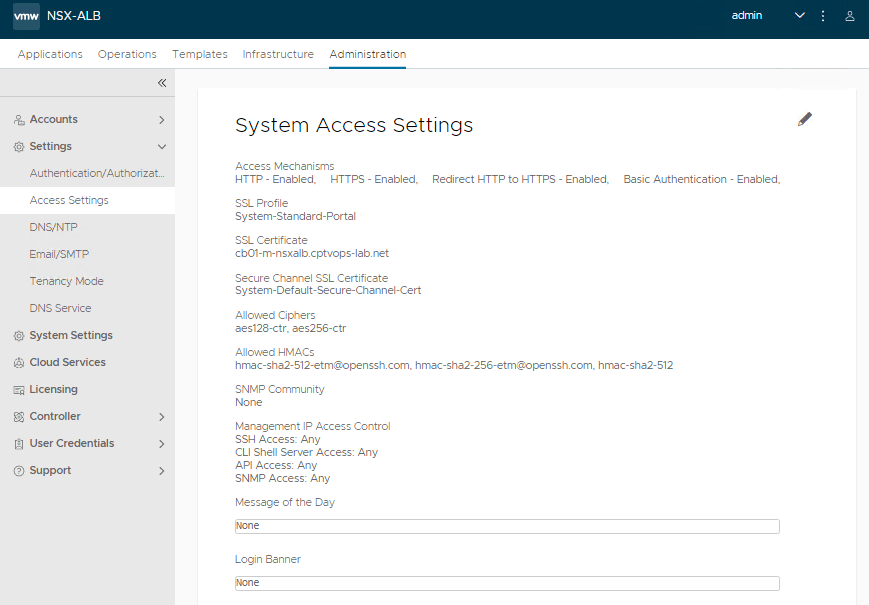
Assuming the SSL certificate is proper, we now need to apply it to the NSX-ALB controller. Go to Administration tab, In the left menu expand Settings, and then select Access Settings.
Click the pencil in the upper right, to edit the system access settings.

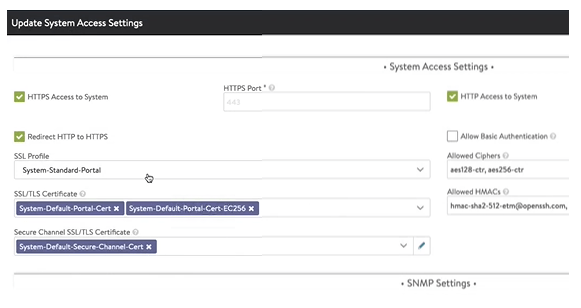
On the Wizard that opens, on the left hand side you’ll see ‘SSL/TLS Certificate’ and it will have the default certificates in it. Click the ‘X’ on those to remove them.
Select the new NSX-ALB controller certificate you imported. Click the ‘Allow Basic Authentication’ check box as well and add the check mark.
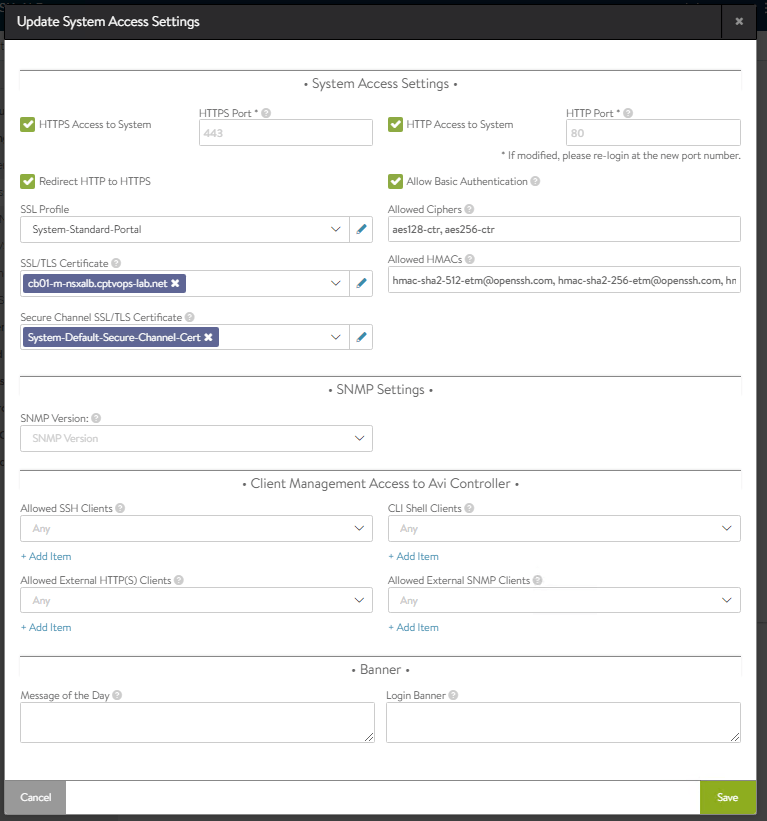
Click the “Save” button in the lower right. After 5 to 10 seconds, the certificate will be updated on the controller. Close and reopen your browser to see the newly installed certificate.

That’s it for replacing the NSX-ALB controller certificate. Not terrible once you understand the process. Don’t forget to clean your room, and delete the snapshot you took prior.
(OPTION B) Replacing the NSX-ALB Controller SSL/TLS Certificate using self signed method.
1 – In the NSX-ALB interface, go to: Templates -> Security -> SSL/TLS Certificates.
2 – Click the blue “Create” button in the upper right, and select Controller Certificate from the drop-down menu.
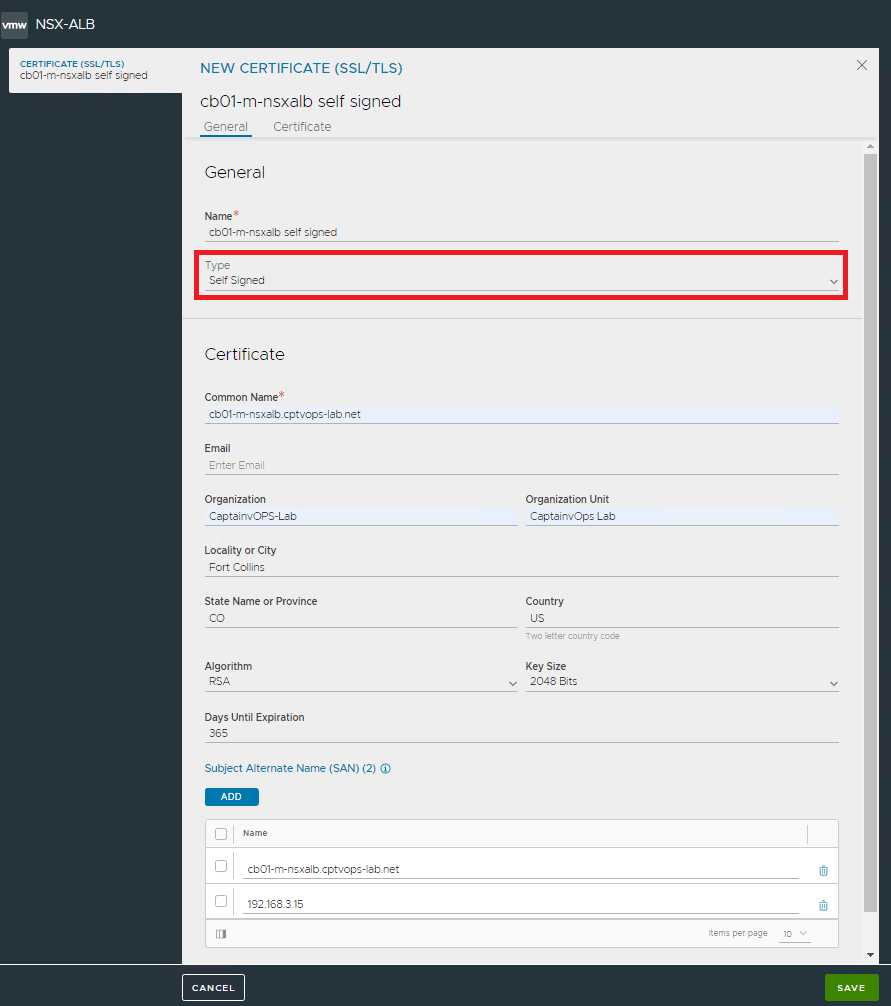
Type: Self Signed will be selected by default.
Add the certificate information, and then add the FQDN and IP address to the subject Alternate Name (SAN). I am doing this example in my home lab, so I only have a single controller. Large deployments might have clustered controllers, so your configuration will very if you have multiple SANs to add.
Fill in the details below to complete the self signed certificate. Click Save.
We now need to apply it to the NSX-ALB controller. Go to Administration tab, In the left menu expand Settings, and then select Access Settings.
Click the pencil in the upper right, to edit the system access settings.
On the Wizard that opens, on the left hand side you’ll see ‘SSL/TLS Certificate’ and it will have the default certificates in it. Click the ‘X’ on those to remove them.
Select the new NSX-ALB controller self-signed certificate in the SSL/TLS Certificate drop menu. Click the ‘Allow Basic Authentication’ check box as well and add the check mark.

Click the “Save” button in the lower right. After 5 to 10 seconds, the certificate will be updated on the controller. Refresh the page a couple of times, and you might get the “Potential Security Risk Ahead” warning message in the browser. Else you might need to close and reopen your browser to see the newly installed certificate.
That’s it. Using a self-signed certificate is a straight forward process. Most production deployments will use a CA signed certificate. Don’t forget to clean your room, and delete the snapshot you took prior.
In my next blog: vSphere with Tanzu: Configuring the NSX-ALB Controller, I continue on and configure the NSX-ALB controller to use with Tanzu.

You must be logged in to post a comment.