
Blog Date: 10/25/2019
Lasted Updated: 04/06/2020
For the purposes of this demonstration, I will be configuring NFS services on a CentOS 7 VM, deployed to a vSphere 6.7 U3 homelab environment.
NFS Server VM Configuration
Host Name: cb01-nfs01
IP Address: 10.0.0.35
CPU: 2
RAM: 4GB
Disk 1: 20GB – Linux installation (thin provisioned)
Disk 2: 100GB – Will be used for the vCD NFS share (thin provisioned)
Configure the vCD NFS share disk
For this demonstration, I have chosen not to configure Disk 2 that was added to the VM. Therefore, this “how-to” assumes that a new disk has been added to the VM, and the NFS server has been powered on after.
1) Open a secure shell to the NFS server. I have switched to the root account.
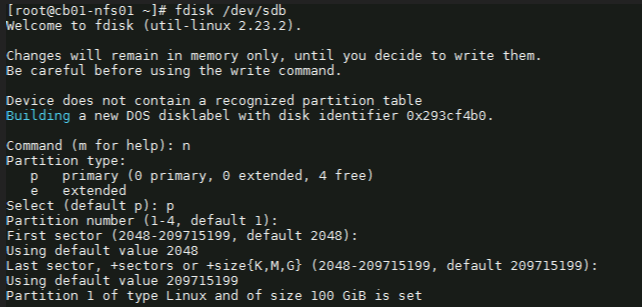
2) On my NFS server, the new disk will be “/dev/sdb”, if you are unsure run the following command to identify the new disk on yours:
fdisk -l3) We need to format the newly added disk. In my case /dev/sdb. So run the following command:
fdisk /dev/sdb
4) Next with the fdisk utility, we need to partition the drive. I used the following sequence:
(for new partition) : n
(for primary partition) : p
(default 1) : enter
(default first sector) : enter
(default last sector) : enter
5) Before saving the partition, we need to change it to ‘Linux LVM’ from its current format ‘Linux’. We’ll first use the option ‘t’ to change the partition type, then use the hex code ‘8e’ to change it to Linux LVM like so:
Command (m for help): t
Selected partition 1
Hex code (type L to list all codes): 8e
Changed type of partition ‘Linux’ to ‘Linux LVM’.
Command (m for help): w
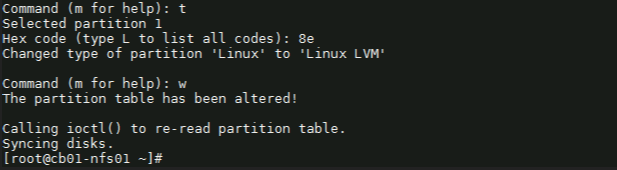
Once you see “Command (m for help):” type ‘w’ to save the config.
Create a ‘Physical Volume, Volume Group and Logical Volume
6) Now that the partition is prepared on the new disk, we can go ahead and create the physical volume with the following command:
# pvcreate /dev/sdb1

7) Now we to create a volume group. You can name it whatever suites your naming standards. For this demonstration, I’ve created a volume group named vg_nfsshare_vcloud_director using /dev/sdb1, using the following command:
# vgcreate vg_nfsshare_vcloud_director /dev/sdb1

Creating a volume group allows us the possibility of adding other devices to expand storage capacity when needed.
8) When it comes to creating logical volumes (LV), the distribution of space must take into consideration both current and future needs. It is considered good practice to name each logical volume according to its intended use.
– In this example I’ll create one LV named vol_nfsshare_vcloud_director using all the space.
– The -n option is used to indicate a name for the LV, whereas -l (lowercase L) is used to indicate a percentage of the remaining space in the container VG.
The full command used looks like:# lvcreate -n vol_nfsshare_vcloud_director -l 100%FREE vg_nfsshare_vcloud_director

9) Before a logical volume can be used, we need to create a filesystem on top of it. I’ve used ext4 since it allows us both to increase and reduce the size of the LV.
The command used looks like:# mkfs.ext4 /dev/vg_nfsshare_vcloud_director/vol_nfsshare_vcloud_director

Writing the filesystem will take some time to complete. Once successful you will be returned to the command prompt.
Mounting the Logical Volume on Boot
10) Next, create a mount point for the LV. This will be used later on for the NFS share. The command looks like:# mkdir -p /nfsshare/vcloud_director

11) To better identify a logical volume we will need to find out what its UUID (a non-changing attribute that uniquely identifies a formatted storage device) is. The command looks like:# blkid /dev/vg_nfsshare_vcloud_director/vol_nfsshare_vcloud_director

In this example, the UUID is: UUID=2aced5a0-226e-4d36-948a-7985c71ae9e3
12) Now edit the /etc/fstab and add the disk using the UUID obtained in the previous step.# vi /etc/fstab
In this example, the entry would look like:UUID=2aced5a0-226e-4d36-948a-7985c71ae9e3 /nfsshare/vcloud_director ext4 defaults 0 0

Save the change with: wq
13) Mount the new LV with the following command:# mount -a
To see that it was successfully mounted, use the following command similar to:# mount | grep nfsshare

Assign Permissions to the NFS Share
14) According to the Preparing the Transfer Server Storage section of the vCloud DIrector 10.0 guide, you must ensure that its permissions and ownership are 750 and root:root .
Setting the permissions on the NFS share would look similar to:# chmod 750 /nfsshare/vcloud_director
Setting the ownership would look similar to:# chown root:root /nfsshare/vcloud_director
Install the NFS Server Utilities
15) Install the below package for NFS server using the yum command:# yum install -y nfs-utils
16) Once the packages are installed, enable and start NFS services:# systemctl enable nfs-server rpcbind# systemctl start nfs-server rpcbind
16) Modify /etc/exports file to make an entry for the directory /nfsshare/vcloud_director .
– According to the Preparing the Transfer Server Storage guide, the method for allowing read-write access to the shared location for two cells named vcd-cell1-IP and vcd-cell2-IP is the no_root_squash method. # vi /etc/exports
17) For this demonstration, my vCD appliance IP on the second nic is 10.0.0.38, so I add the following:
/nfsshare/vcloud_director 10.0.0.38(rw,sync,no_subtree_check,no_root_squash)
– There must be no space between each cell IP address and its immediate following left parenthesis in the export line. If the NFS server reboots while the cells are writing data to the shared location, the use of the sync option in the export configuration prevents data corruption in the shared location. The use of the no_subtree_check option in the export configuration improves reliability when a subdirectory of a file system is exported.
– As this is only a lab, I only have a single vCD appliance for testing. If a proper production deployment, add additional lines for each appliance IP.

18) Each server in the vCloud Director server group must be allowed to mount the NFS share by inspecting the export list for the NFS export. You export the mount by running exportfs -a to export all NFS shares. To re-export use exportfs -r. # exportfs -a
– To check the export, run the following command:
# exportfs -v
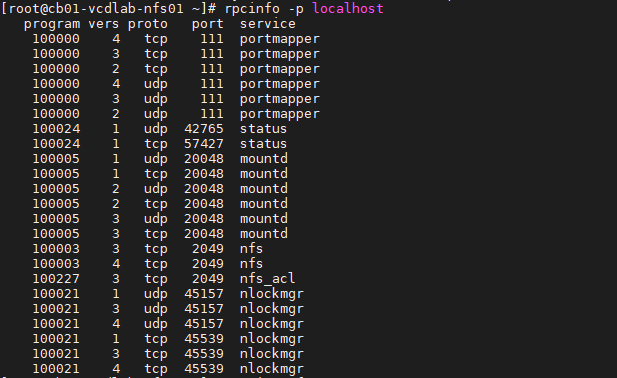
– Validate NFS daemons are running on the server by using rpcinfo -p localhost or service nfs status. NFS daemons must be running on the server. # rpcinfo -p localhost
or
# systemctl status nfs-server.service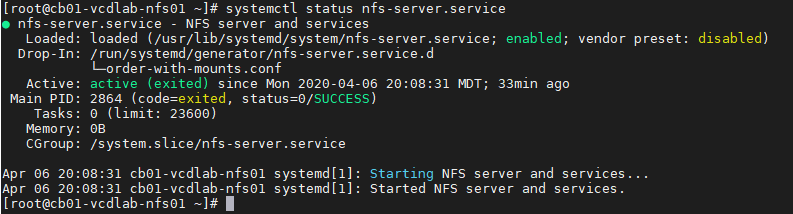
Configure the Firewall
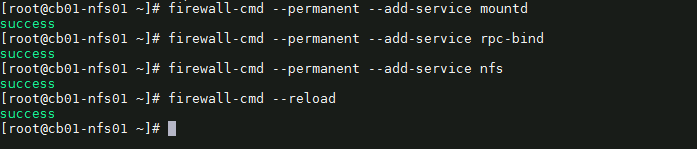
19) We need to configure the firewall on the NFS server to allow NFS client to access the NFS share. To do that, run the following commands on the NFS server.
# firewall-cmd --permanent --add-service mountd# firewall-cmd --permanent --add-service rpc-bind# firewall-cmd --permanent --add-service nfs# firewall-cmd --reload
20) That’s it. Now we can deploy the vCloud Director 10.0 appliance(s).
Optional NFS Share Testing
I highly recommend testing the NFS share before continuing with the vCloud DIrector 10.0 appliance deployment. For my testing, I have deployed a temporary CentOS 7 VM, with the same hostname and IP address as my first vCD appliance. I have installed nfs-utils on my test VM. # yum install -y nfs-utils
OT-1) Check the NFS shares available on the NFS server by running the following command on the test VM. change the IP and share here to your NFS server.# showmount -e 10.0.0.35

OT-2) Create a directory on NFS test VM to mount the NFS share /nfsshare/vcloud_director which we have created on the NFS server.
# mkdir -p /mnt/nfsshare/vcloud_director
OT-3) Use below command to mount the NFS share /nfsshare/vcloud_director from NFS server 10.0.0.35 in /mnt/nfsshare/vcloud_director on NFS test VM.
# mount 10.0.0.35:/nfsshare/vcloud_director /mnt/nfsshare/vcloud_director
OT-4) Verify the mounted share on the NFS test VM using mount command.# mount | grep nfsshare

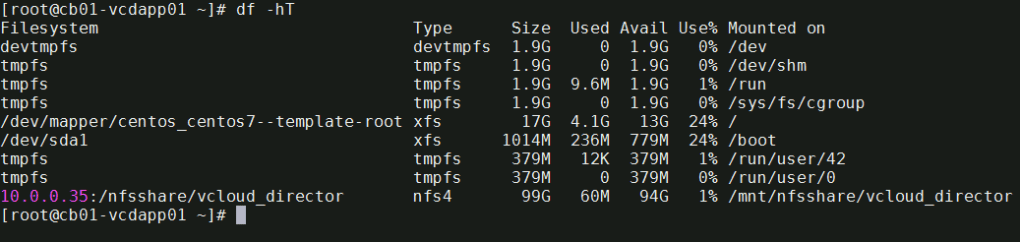
You can also use the df -hT command to check the mounted NFS share.
# df -hT
OT-5) Next we’ll create a file on the mounted directory to verify the read and write access on NFS share. IMPORTANT** during the vCD appliance deployment, it is expected that this directory is empty, else it could make the deployment fail. Remember to cleanup after the test.# touch /mnt/nfsshare/vcloud_director/test
OT-6) Verify the test file exists by using the following command:# ls -l /mnt/nfsshare/vcloud_director/

OT-7) Clean your room. Cleanup the directory so that it is ready for the vCD deployment.# rm /mnt/nfsshare/vcloud_director/test
After successfully testing the share, we now know that we can write to that directory from the vCD appliance IP address, and that we can remove files.
In my next post, I will cover deploying the vCloud Director 10.0 appliance. Stay tuned!

You must be logged in to post a comment.