VMware Cloud Foundation Home Lab – Part 3 (ESX Host Prep)

Blog Date: December 2025

In this post I’ll cover the basic ESX host prep needed for VMware Cloud Foundation. This post assumes that ESX 9 has already been installed. This post also assumes these are brand new hosts that have not been used for vsan before.

Configure the ESX Host basic network settings via the DCUI

  1. Open the DCUI of the ESX host.
    1. Open a console window to the host.
    2. Press F2 to enter the DCUI.
    3. Log in using the esx_root_user_password.
  2. Configure the network.
    1. Select Configure Management Network and press Enter.
    2. Select VLAN (Optional) and press Enter.
    3. Enter the VLAN ID for the ESX Management Network and press Enter.
    4. Select IPv4 Configuration and press Enter.
    5. Select Set static IPv4 address and network configuration and press the Space bar.
    6. Enter the IPv4 Address, Subnet Mask and Default Gateway and press Enter.
    7. Here I would also disable IPv6 if not in use.
    8. Select DNS Configuration and press Enter.
    9. Select Use the following DNS Server address and hostname and press the Space bar.
    10. Enter the Primary DNS Server, Alternate DNS Server and Hostname (FQDN) and press Enter.
    11. Select Custom DNS Suffixes and press Enter.
    12. Ensure that there are no suffixes listed and press Enter.
  3. Press Escape to exit and press Y to confirm the changes.
  4. Reboot the host.
  5. Repeat this procedure for all remaining hosts.

Configure the Virtual Machine port group on the standard switch

  1. In a web browser, log in to the ESX host using the VMware Host Client.
  2. Click OK to join the Customer Experience Improvement Program.
  3. Configure a VLAN for the VM Network port group.
    1. In the navigation pane, click Networking.
    2. Click the Port groups tab, select the VM network port group, and click Edit Settings.
    3. On the Edit port group – VM network page, enter the VM Management Network VLAN ID, and click Save.
  4. Repeat this procedure for all remaining hosts.

Configure NTP on the Host(s)

  1. In a web browser, log in to the ESX host using the VMware Host Client.
  2. Configure and start the NTP service.
    1. In the navigation pane, click Manage, and click the System tab.
    2. Click Time & date and click Edit NTP Settings.
    3. On the Edit NTP Settings page, select the Use Network Time Protocol (enable NTP client) radio button, and change the NTP service startup policy to Start and stop with host.
    4. In the NTP servers text box, enter the NTP Server FQDN or IP Address, and click Save.
    5. Click the Services tab, select ntpd, and click Start.
  3. Repeat this procedure for all remaining hosts.

Regenerate Self-Signed Certificate on ESX Hosts.

  1. In a web browser, log in to the ESX host using the VMware Host Client.
  2. In the Actions menu, click ServicesEnable Secure Shell (SSH).
  3. Log in to the ESX host using an SSH client such as Putty.
  4. Regenerate the self-signed certificate by executing the following command:
    #: /sbin/generate-certificates
  5. Reboot the ESX host.
  6. Log back in to the VMware Host Client and click ServicesDisable Secure Shell (SSH) from the Actions menu.
  7. Repeat this procedure for all remaining hosts.

I don’t know why, but every customer engagement that I have been on, these steps get overlooked. This is probably the simplest part to preparing your data center for VCF. VMware by Broadcom also has documentation with these exact steps located here: Preparing ESX Hosts for VMware Cloud Foundation or vSphere Foundation

VMware Cloud Foundation Home Lab – Part 2 (Network Topology)

Blog Date: December 2025

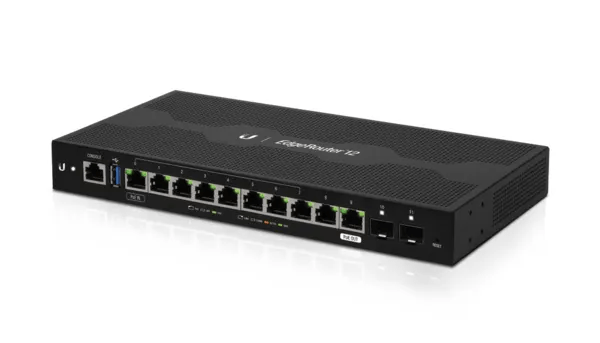
Below is the basic network Topology and vlan config for my new VMware Cloud Foundation home lab. For my home network, I had replaced my off the shelf consumer wifi router a few years ago, and purchased a Ubiquity EdgeRouter 12 so that I could have vlans for my VMware Home lab, that lasted me from vSphere 6 to vSphere 8.

On this router, I have defined and hung the vlans off from the built in virtual switch (192.168.X.1).

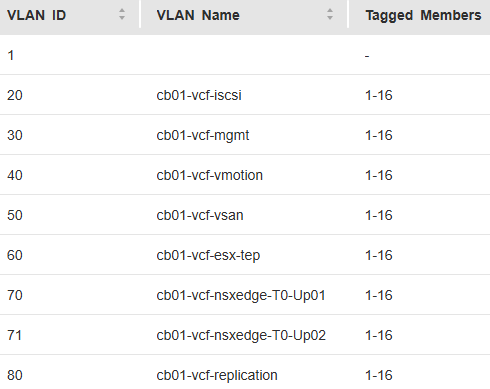
vlan (10.0.X.1)Description
20iscsi storage straffic
30Management
40vmotion
50vsan
60ESX TEP
70NSX Edge T0 Uplink01
71NSX Edge T0 Uplink02
80Replication

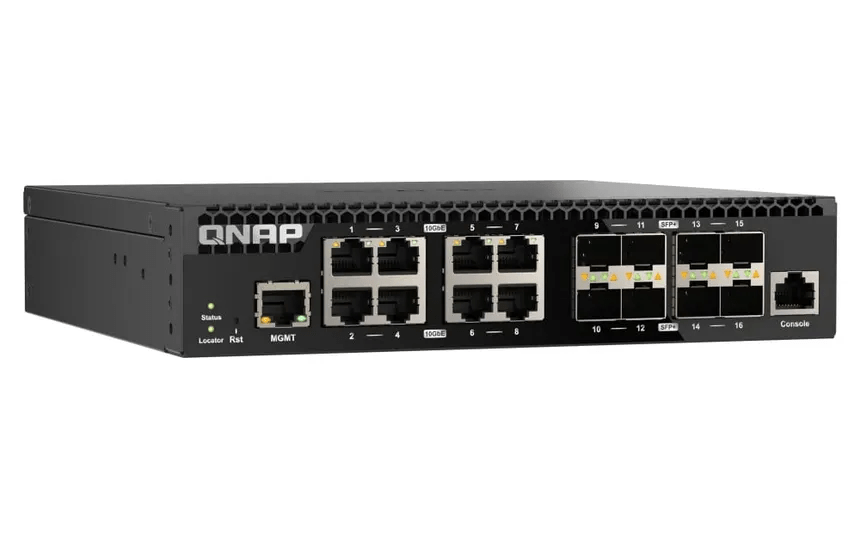
As detailed in my VCF 9 Home lab BOM, I chose to go with the QNAP (QSW-M3216R-8S8T-US) Layer 2 for my TOR switch. This Layer 2 managed switch supports 10G on the standard ethernet ports and on the SFP+ ports, giving me lots of options for connectivity.

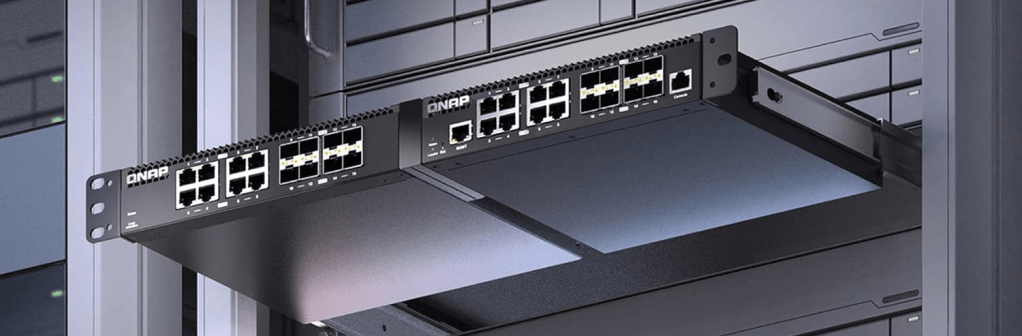
I can also mount two of them side by side in a standard 19 inch width rack offering more space save opportunities for future home lab expansion.

I have the same vlans tagged to the TOR switch

VMware Cloud Foundation Home Lab – Part 1 (MS-A2 BIOS)

Blog Date: December 2025

Continuing this blog series about my new home lab, I thought I would go over the BIOS setting I have selected for these MINISFORUM MS-A2’s.

Security
Secure Boot – Disabled

Trusted Computing
— See Device Support – Disabled

Advanced
Onboard Device Settings
PCI SR-IOV – Enabled

AMD PBS (**THIS IS OPTIONAL BASED ON YOUR CONFIG**)
PCIe/GFX Lane Configuration – x8
GFX Lane Speed – Gen 4
SSD0 – Gen 4
SSD1 – Gen 4
SSD2 – Gen 4

AMD CBS
NBIO Common Options
IOMMU – Enabled
PSPP – Performance
FCH Common Options
AC Power Loss – Previous
SMU Common Options
TjMax – 78

In my next Blog, I will cover my basic network set.

VMware Cloud Foundation Home Lab Bom – Part 2

Blog Date: October 2025

Continuing from my original blog post entitled: VMware Cloud Foundation Home Lab Bom,

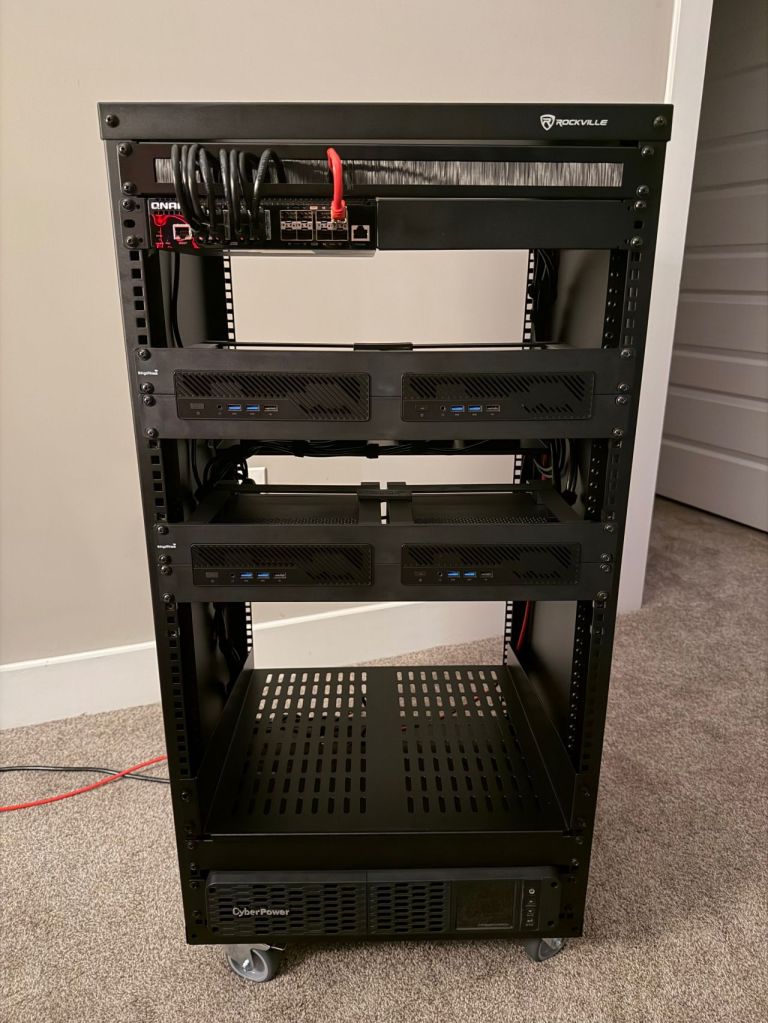
I went over the mini pc components and x4 MINISFORUM MS-A2 9955HX systems. In this blog I’ll cover the rack, rack mounts for the MS-A2s, UPS, and the 10G switch.

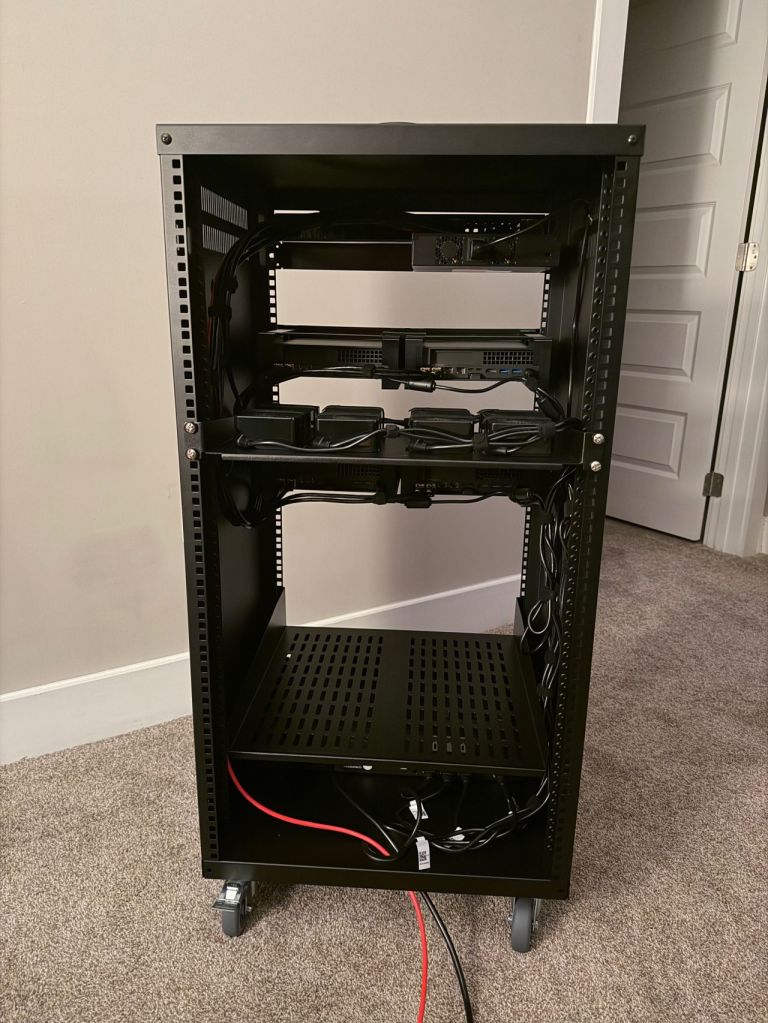
I am quite pleased with the wiring now that I have everything tidied up, although I forgot what a PITA cage nuts are. I’ve installed a shelf at the bottom for a future migration of my old lab 2x SuperMicro boxes that will either be used to host VCF Holodeck, or perhaps I’ll use them for a dedicated workload domain backed by NFS storage. The CPUs were depreciated in ESXi 8, but they still have some life left in them. Reaching into the way back time machine, that kit was Current CaptainvOPS Homelab 2020.

For the additional rack, rack mounts for the MS-A2s, UPS, and 10G managed switch:

QTYItem DescriptionLinkTotal Price
1A Rockville RR20U 20U Rack with wheels.Amazon.com$189.95
2Rack Mount for 2 MINISFORUM MS-01 19inch 2U Dual-MountAmazon.com$166
1QNAP 16-Port Half-Width Rackmount 10GbE Managed Network Switch (QSW-M3216R-8S8T-US)Amazon.com$599
1CyberPower CP1500PFCRM2U PFC Sinewave UPS Battery Backup and Surge Protector, 1500VA/1000W, 8 Outlets, AVR, Short Depth 2U RackmountAmazon.com$358.95
110Gtek 𝟭.𝟮𝟱/𝟮.𝟱/𝟱/𝟭𝟬𝗚-𝗧 𝗦𝗙𝗣+ 𝘁𝗼 𝗥𝗝𝟰𝟱, CAT.6a Copper Transceiver, Auto-Negotiation SFP+ Ethernet ModuleAmazon.com$44.99
11U Rack Mount Cable Management Panel with Tidy Brush Slot for Cable EntryAmazon.com$31.59
11U Server Rack Shelf – Vented Rack Mount Cantilever Tray for 19″ Network RackAmazon.com$32.99
1(Optional) 2U Server Rack Shelf – Universal Vented Rack Mount Cantilever Tray for 19″ Network Equipment RackAmazon.com$43.86

Total = $1,467.33

That brings the Grand Total for this new VCF 9 Home lab to $8,409.73

Thankfully I spread these purchases out over a couple of months. I assumed this would come in around 8k, but I over shot a little. RIP to my wallet.

I have a UniFi router that’ll handle the BGP so I did not need a new one. In my next blog, I’ll go over my basic network setup for this new lab.

VMware Cloud Foundation Home Lab Bom – Part 1

Blog Date: October 2025

It’s that time to give the home lab a big refresh, and purchase new hardware for VMware Cloud Foundation sandbox. As a VMware employee, I had access to internal labs that I could quickly spin up if I needed to test something with VCF. With every software company purchase, Broadcom has spun off the majority if not all of their newly acquired Professional Services division, and VMware was no different. Now back in Partner life, I needed to reinvest in my home lab. VMware Cloud Foundation is and expensive investment for customers, and as it turns out, it is not cheap for the home lab either lol.

Taking inspiration from William Lam’s VCF 9.0 Hardware BOM for Silicon Valley VMUG, I have modeled my VCF home lab BOM in a similar way.

QTYItem DescriptionLinkTotal Price
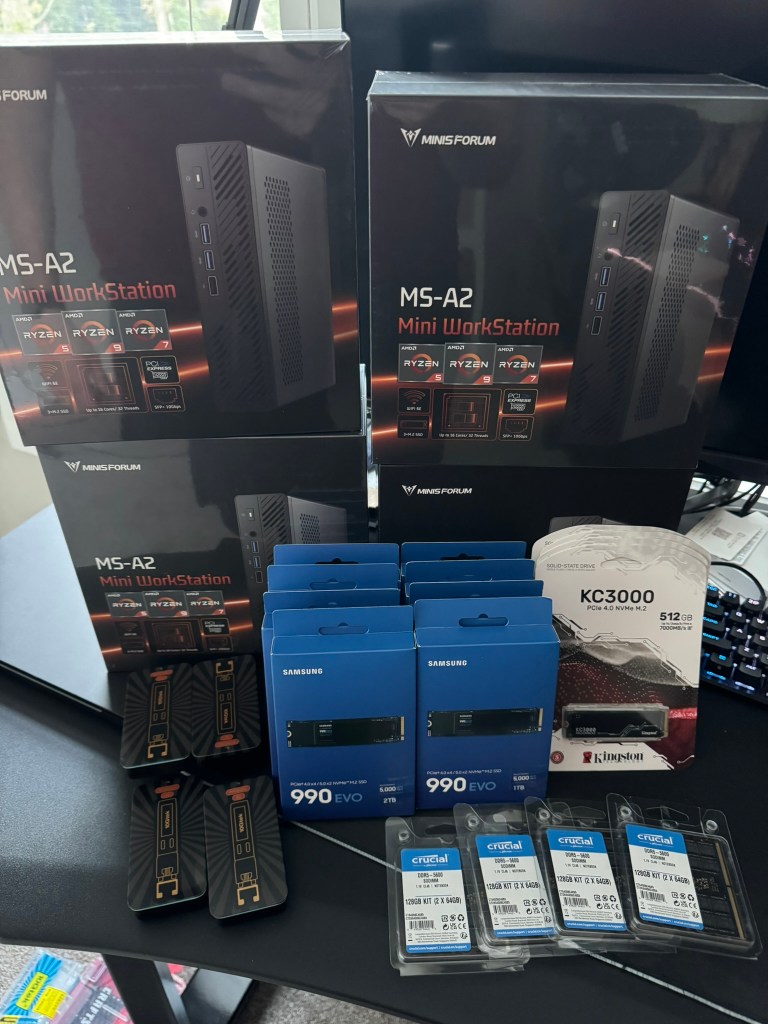
4MINISFORUM MS-A2 AMD Ryzen™ 9 9955HX / BareboneMINISFORUM.com$3,516.00 + warranty $359.96
= $3,875.96
410Gtek 𝟭.𝟮𝟱/𝟮.𝟱/𝟱/𝟭𝟬𝗚-𝗧 𝗦𝗙𝗣+ 𝘁𝗼 𝗥𝗝𝟰𝟱, CAT.6a Copper Transceiver, Auto-Negotiation SFP+ Ethernet Module dual kitAmazon.com$152
4Boot Drive:
Kingston KC3000 M.2 2280 512GB PCIe 4.0 x4 NVMe 3D TLC Internal Solid State Drive (SSD) SKC3000S/512G
Newegg.com$283.36
4NVMe Tiering: SAMSUNG 990 EVO SSD 1TB, PCIe Gen 4×4, Gen 5×2 M.2 2280 NVMeAmazon.com$319.96
4vSAN ESA:
SAMSUNG 990 EVO SSD 2TB, PCIe Gen 4×4, Gen 5×2 M.2 2280 NVMe
Amazon.com$479.96
4Memory:
128GB Kit (2x64GB) DDR5 5600MHz C46 SODIMM kit
BestBuy.com$1,831.16


Total = $6,942.4

Your tax and shipping costs may vary. I am still looking for 10G switch, rack, and rack mount hit for these to keep things tidy. I expect my total costs to come in under 8K USD. I’ll update this blog with the additional hardware when it comes in.

What’s New with VCF Fleet Management (Formally Aria Suite Lifecycle Manager)

Blog Date: June 2025

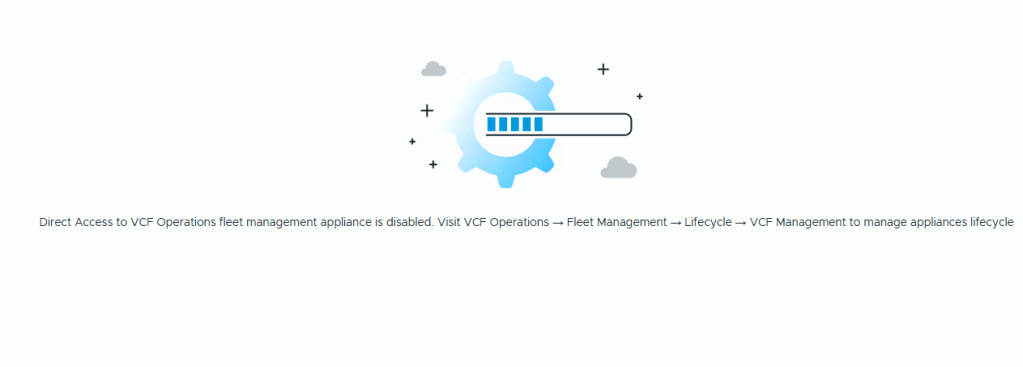
Aria Suite Life Cycle Manager has been renamed to VCF Fleet Management, and no longer has it’s own accessible UI.

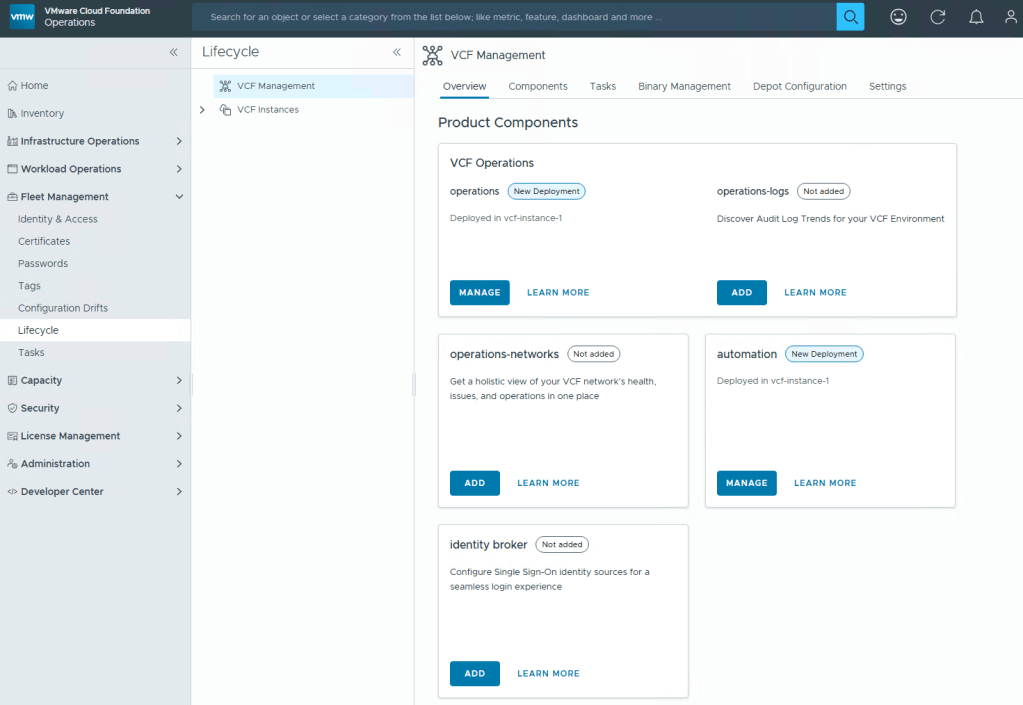
VCF Operations, formally Aria Operations, will now be your go to place to manage the lifecycle of Operations, Logs, Automation, and Network Operations. This will all be done through a new section on the left navigation menu, called Fleet Management.

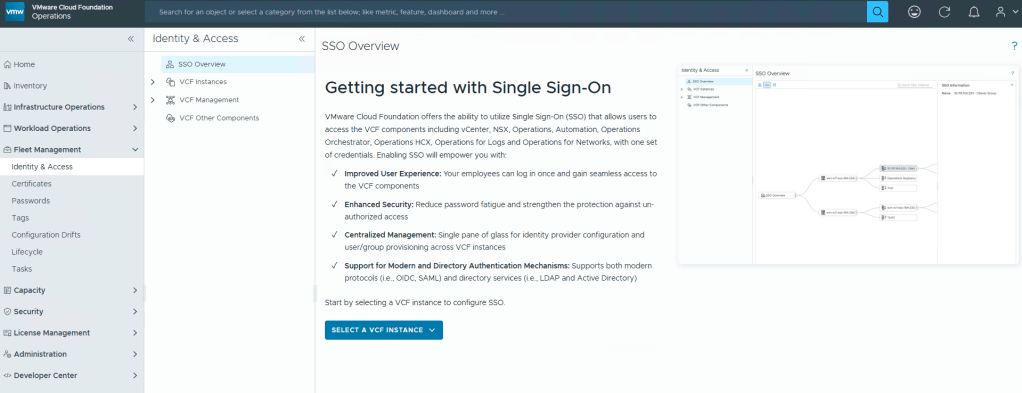
VMware Identity Manager/Workspace One Access finally has a successor, Identity Broker, that will be configurable through VCF Operations Fleet Management.

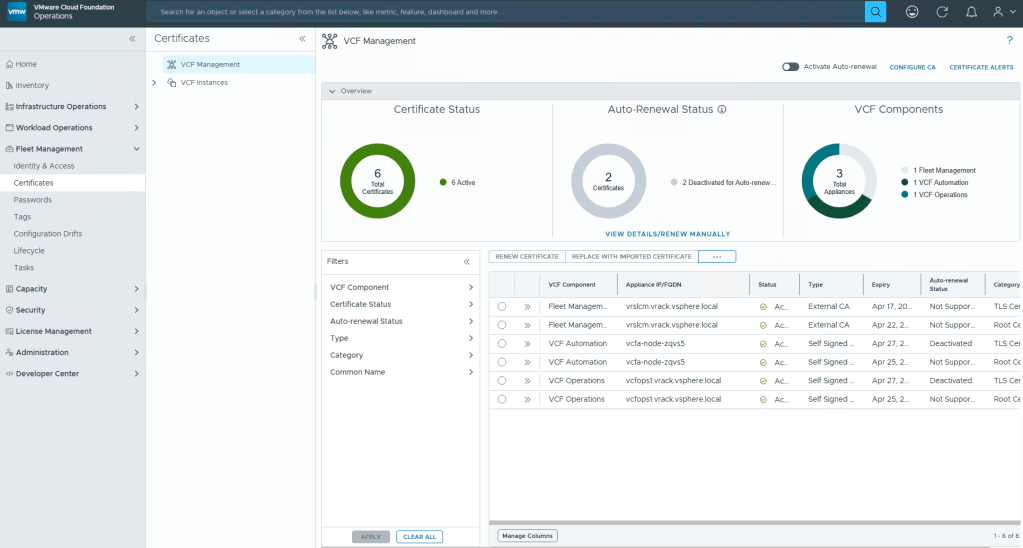
New capabilities are also being baked into Fleet Management that will allow Cloud engineers to manage certificates, and more capabilities will become available in the 9.1 release.

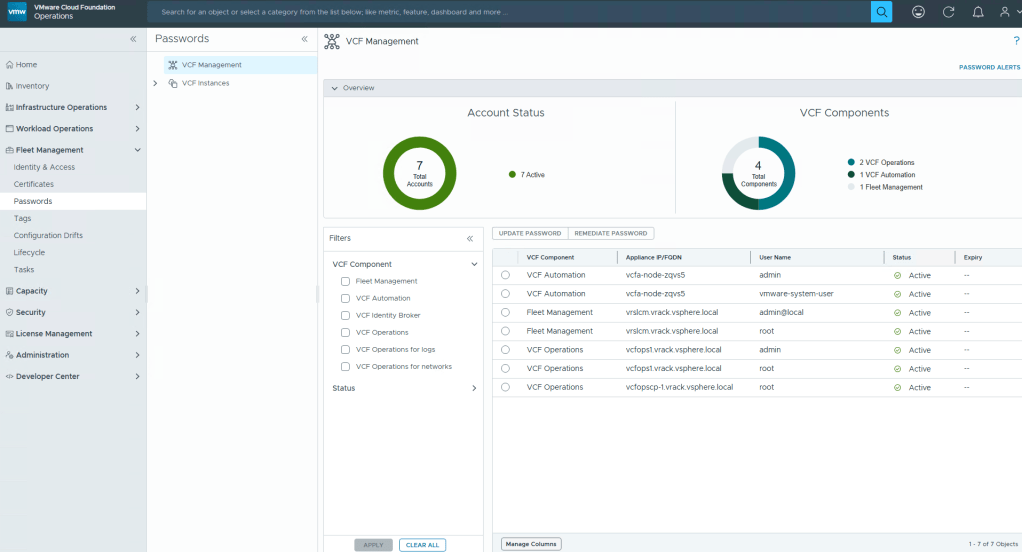
Passwords will also be another administration task that can be done through Fleet Management.

VCF Operations is becoming the center of the Private Cloud Universe to manage VCF. If this is any indication on what’s to come, I can only image that the SDDC manager interface will eventually become less and less relevant.

I for one am happy that the Aria Suite LCM is being sunset, and will eventually be fully integrated into VCF Operations under the Fleet management banner. It is unfortunate however, that remnants of it still remain as a headless server. I would have rather preferred the BU to do the job correctly, instead of this half-baked, “we’ll get it all next time” approach. All to reach those hard deadlines I suppose.

Virtual Machine Snapshots Quiescing Guest File System Not Completing Successfully.

Blog Date: March 2025

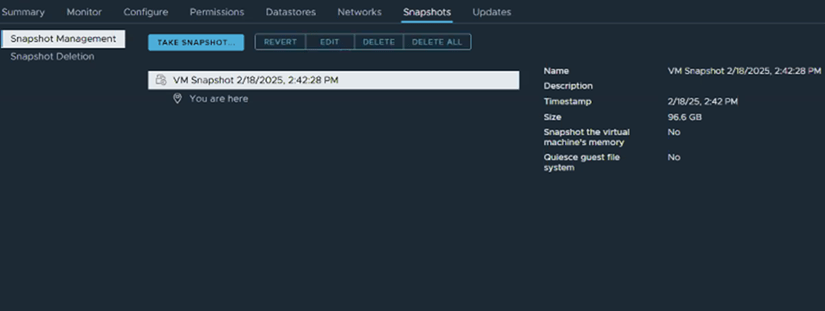
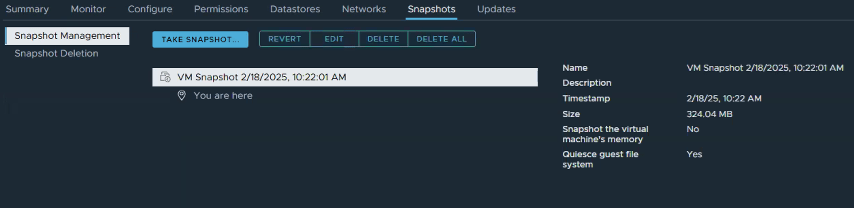
A customer of mine had an issue in their vSphere 8/VMware Cloud Foundation 5.x environment where on some of the 40 Windows OS based VMs, Snapshots created with ‘Quiesce guest file system’ would complete, but Quiesce guest file system would be labeled as ‘No’, or the vSphere snapshot operations task would just outright fail. This issue has been witnessed on Microsoft Server 2012 through Microsoft Server 2022.

There are several things that could affect the successful snapshots of virtual machines:
– VM tools installation or a lack there of.
– VM disk(s) are locked.
– Microsoft VSS errors on the Guest OS during the VM quiescing process.
– Guest File System lacks space.
– Guest File System lacks the Microsoft Reserved (msr) partition.
– Existing snapshots exceeded maximum number, or consolidation needed.

Symptom:

1. vSphere snapshot task with ‘Quiesce guest file system’ selected task completes, however when looking at the details of the snapshot, Quiesce guest file system is marked with ‘No’.

2. You verify that VM Tools is installed, running, and current.
3. Log into the VM to validate that the guest file system has enough free space~20% or so.
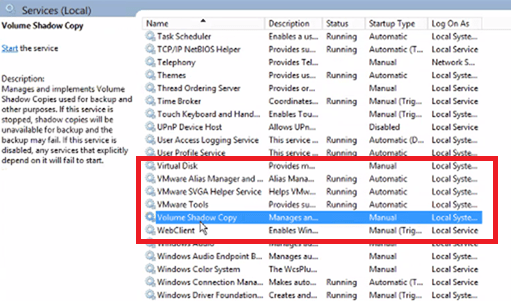
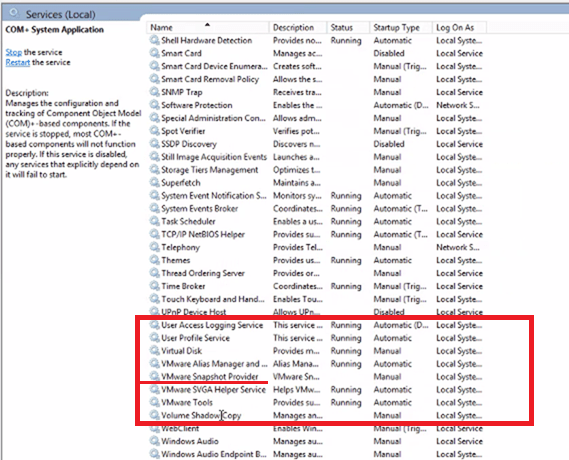
4. Check the Windows Services for “VMware Snapshot Provider”. It should be there, but in this case it would be missing.

Resolution:

In this example, the “Volume Shadow Copy Services Support” feature that gets installed with VMware Tools is malfunctioning, because we do not see the ‘VMware Snapshot Provider’ in Windows services. The following procedure should allow us to remove and re-install the service without the need for a reboot.

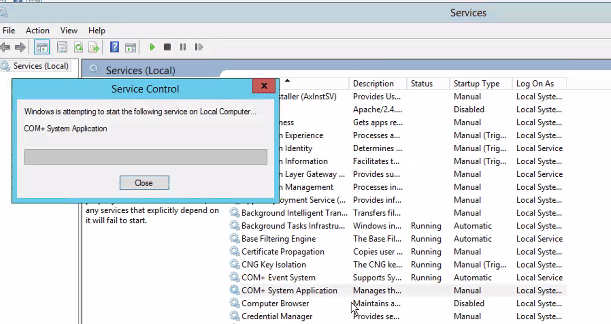
1. Start the COM+ System Application service (Leave startup type ‘manual’).

2. In Windows Control Panel, locate select VMware Tools and click “change”.
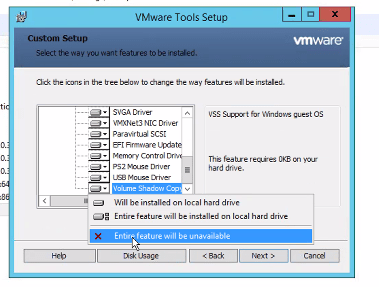
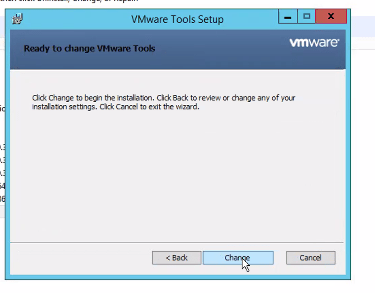
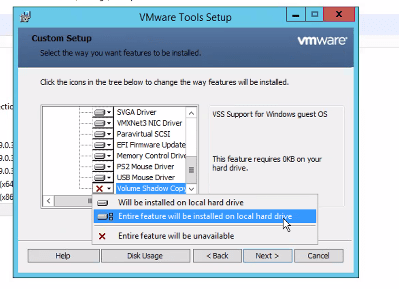
3. We will modify the VMware Tools installation, specifically we are looking for the “Volume Shadow Copy Services Support” at the bottom of the list. This offers VSS support for the guest operating system and facilitates snapshot operations. The service should be installed by default, but in this case is malfunctioning, and we are going to re-install it. Select it, and choose “Entire feature will be unavailable”.

Click ‘Next’ and then click ‘Change’.

4. We will modify the VMware Tools installation again in Windows Control Panel, change the installation once more, select the “Volume Shadow Copy Services Support” at the bottom of the list, and this time select “Entire feature will be installed on local hard drive”.

Click ‘Next’ and then click ‘Change’. Wait for the installation to complete.

5. Go back to the Windows Services screen, refresh it, and the ‘VMware Snapshot Provider’ service should now be listed.

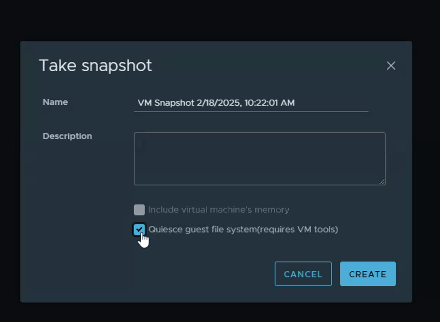
6. Go back to vSphere, and take a new snapshot of the VM with ‘Quiesce guest file system’ selected.

In this example, the snapshot successfully completes, and quiesces the guest file system successfully.

My Experience Passing The VMware Certified Professional – VMware Cloud Foundation 5.2 Certification Exam.

Blog Date: December 2024

Those of us who have taken the VMware Certified Professional Data Center Virtualization exams, can attest to those exams testing your knowledge and experience with vSphere, ESXi, and vSAN. We now have a new certification that tests our administration skills with VMware Cloud Foundation. Well, sort of…

What this exam got right: I do believe it was a good move to pull out questions regarding advanced deployment considerations around networking and VSAN stretch clusters, because those questions belong in a VCAP level exam that test our abilities around design and deployment. The exam also stayed away from questions that quiz us on deployment sizing, ports, and other factoids that in the real world, we would just consult the documentation for. I was also happy to see that there was significantly less “gotcha questions” than previous versions.

What I believe the exam got wrong: I do not believe this exam should have questions regarding the benefits and usage of add-ons like HCX, the Aria Suite, and Tanzu. To me, those questions should have been moved out to individual specialist exams that target those specific skillsets when used in conjunction with VCF. The exam did not go deep enough into the daily administration tasks like managing certificates and passwords, resolving trust issues between the SDDC manager and the VCF components like ESXi, vSAN, vCenter, and NSX. There should have been more questions on basic troubleshooting and questions regarding how to perform upgrades. These are basic administration skills that engineers should have, and are the area’s where I see engineers get themselves into trouble by coloring outside the VCF lines, especially coming from traditional vSphere environments with SAN storage.

Final thoughts: I do believe that this certification is a lot better than the VMware Cloud Foundation Specialist exams that have been retired, but this exam lacks focus on core skillsets necessary to administer VMware Cloud Foundation. This feels too much like an associate/specialist level exam. I would like to see a larger focus on testing an engineers skills administering VCF like what configurations should be done by the SDDC manager versus doing the configuration manually in the individual components. I would like to see questions that test an engineers basic VCF troubleshooting skills like what log files to look at for failed tasks and upgrades. The SOS command line tool in the SDDC manager is very powerful and VCF engineers should be aware of it’s basic functions. I would also like to see questions around the requirements and sequence of deploying hosts to a workload domain, decommissioning hosts, performing host maintenance, and some of the VSAN considerations engineers need to take into account for each. VMware Cloud Foundation is the modern private cloud, and although it is not feasible to have deep knowledge in each of the individual components that make up VCF like ESXi, vSAN, vCenter, vSphere, and NSX, I do believe we need to level-set on a basic set of skills to be successful.

I would highly recommend taking the VMware Cloud Foundation Administrator: Install, Configure, Manage 5.2 course. Many of the topics in the certification exam are covered in this training course. In its current form, you should also have a basic understanding HCX capabilities, and Aria Ops, Logs, and Automation. The exam also touches on the basic knowledge of the async patch tool and its function.

Testing VMware Cloud Foundation 4.x/5.x Depot Connections From The SDDC Manager CLI

Blog Date: September 30, 2024

While working with a customer recently, they were having a problem testing the SDDC managers connectivity to the online VCF_DEPOT and the VXRAIL_DEPOT. This particular customer was using VCF on VXRAIL.

After doing some searching, I came across our knowledge base article entitled: Troubleshooting VCF Depot Connection Issues

SSH into the SDDC manager as VCF, and then su to root. To test connectivity to the VMware Cloud Foundation Depot, run following curl command:

curl -kv https://depot.vmware.com:443/PROD2/evo/vmw/index.v3 -u customer_connect_username

If you have a VCF deployment running on VXRAIL, there’s an additional Dell Depot that will contain the rail update packages. To test connectivity to both VXRAIL and VCF Depots, run the following command:

curl -v http://localhost/lcm/depot/statuses| json_pp

The Depots can return a couple of status from the curl command:

“Status” : “SUCCESS” (everything is working as expected)
“Status” : “NOT_INITIALIZED” (This could indicate a connection problem with the depot)
“Status” : “USER_NOT_SET” (the depot user has not been specified)

For my customer, the VCF_DEPOT had a “SUCCESS” status, but the VXRAIL_DEPOT had a status of “USER_NOT_SET”.

Basic pings to test:

ping depot.vmware.com
ping download.emc.com

Basic curl commands to test:

curl -v https://depot.vmware.com
curl -v https://download.emc.com

Broadcom also offers a public list of URLs that the SDDC manager uses. That list can be found here: Public URL list for SDDC Manager