Let me start out by saying that if you’d like to install the Hyperic agent, a VMware platform (vRealize Hyperic) that is nearing the end of its’ life (late 2018), you should first **make sure having the agent installed on VMwares’ SUSE based appliance is supported.**
vRealize Hyperic is a terrific platform, that unfortunately has reached the end of its product development life cycle, and will ultimately reach the end of support late 2018.
With that said…
In this particular case I wanted to monitor the SUSE appliance virtual machines of VMware’s vCloud Availability, and since I already am using Hyperic to monitor our production environment management virtual machines…
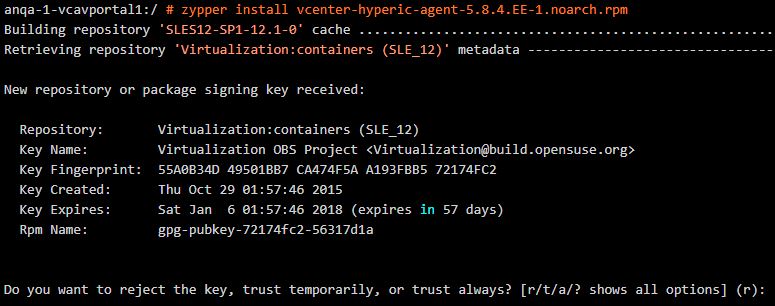
- To start the installation run:
# zypper install vcenter-hyperic-agent-5.8.4.EE-1.noarch.rpm
example output:
- Respond with: a
example output:
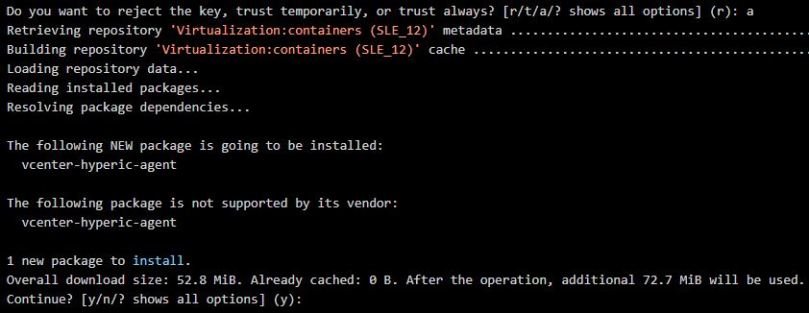
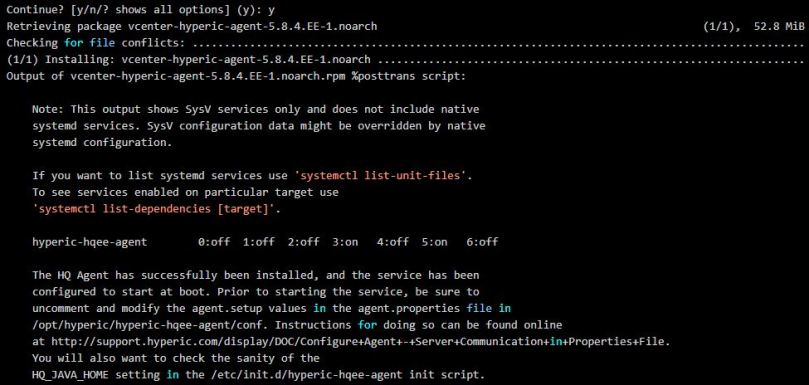
- Respond with: y
example output:
UPDATE SYSTEM FIREWALL TO ALLOW TCP PORT 7080
- Edit /etc/sysconfig/SuSEfirewall2 and update lines 281 and 379 with the addition of port 2144 for SUSE 11, or lines 253 and 351 with the addition of port 2144 for SUSE 12
- Note: For listing multiple ports SuSEfirewall 2 uses the following schema “1234 1234 1234” Inject port 2144 where applicable.
Line 281 for SUSE 11, or line 253 for SUSE 12
FW_SERVICES_EXT_TCP="2144"
Line 379 for SUSE 11, or line 351 for SUSE 12
FW_SERVICES_INT_TCP="2144"
- Stop and start the firewall so configuration is loaded
/etc/SuSEfirewall2 stop
Pause 5 seconds
/etc/SuSEfirewall2 start
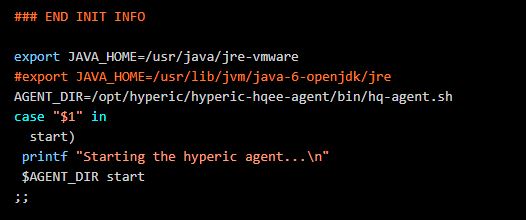
UPDATE JAVA CONFIGURATION FOR SUSE 12
- Edit /etc/init.d/hyperic-hqee-agent . Copy the following line (17) . #export JAVA_HOME=/usr/lib/jvm/java-6-openjdk/jre
- For VMware appliances SUSE 12 this needs to be updated to: export JAVA_HOME=/usr/java/jre-vmware.
- For VMware appliances SUSE 11 this needs to be updated to: export HQ_JAVA_HOME=/usr/java/default
- Add the new line, save and quit
CONFIGURE THE AGENT
- Prior to starting the service, be sure to uncomment and modify the agent.setup values in the agent.properties file in /opt/hyperic/hyperic-hqee-agent/conf:
# vi /opt/hyperic/hyperic-hqee-agent/conf/agent.properties
Uncomment and modify lines 71 through 80
agent.setup.camIP=<hyperic server IP or FQDN>
agent.setup.camPort=7080
agent.setup.camSSLPort=7443
agent.setup.camSecure=yes
agent.setup.camLogin=hqadmin
agent.setup.camPword= <hqadmin_password>
agent.setup.agentIP=*default*
agent.setup.agentPort=*default*
agent.setup.resetupTokens=no
agent.setup.acceptUnverifiedCertificate=yes
Uncomment line 86
agent.setup.unidirectional=no
Modify line 204. set to =true
accept.unverified.certificates=true
- ‘wq’ the file to save and exit
START THE AGENT
# sh /opt/hyperic/hyperic-hqee-agent/bin/hq-agent.sh start
-= OR =-
# /etc/init.d/hyperic-hqee-agent start
- Now you should be able to log into the hyperic UI and add the new server to inventory


You must be logged in to post a comment.