vSphere with Tanzu: Deployment of NSX-ALB Controller

Blog Date: August 11, 2022
NSX-ALB Controller version: 22.1.1
vSphere version 7.0.3 Build 20150588

In my previous blog: vSphere with Tanzu: NSX-ALB Controller Requirements and Deployment Prep. I went over the basic requirements and prep work for the NSX-ALB controller to use with Tanzu. In this blog, I’ll demonstrate deploying the NSX-ALB into my home lab. In this blog, I will be doing the basic NSX-ALB controller in my lab with no NSX-T.

NOTE: Production deployments should use NSX-ALB controller cluster. In my lab however, I am only deploying a single controller for this example.

NSX-ALB Controller Deployment

Obtain the NSX-ALB controller by following the VMware KB Article 82049. In this example I am using version 22.1.1

Import the Controller OVA into the vCenter.

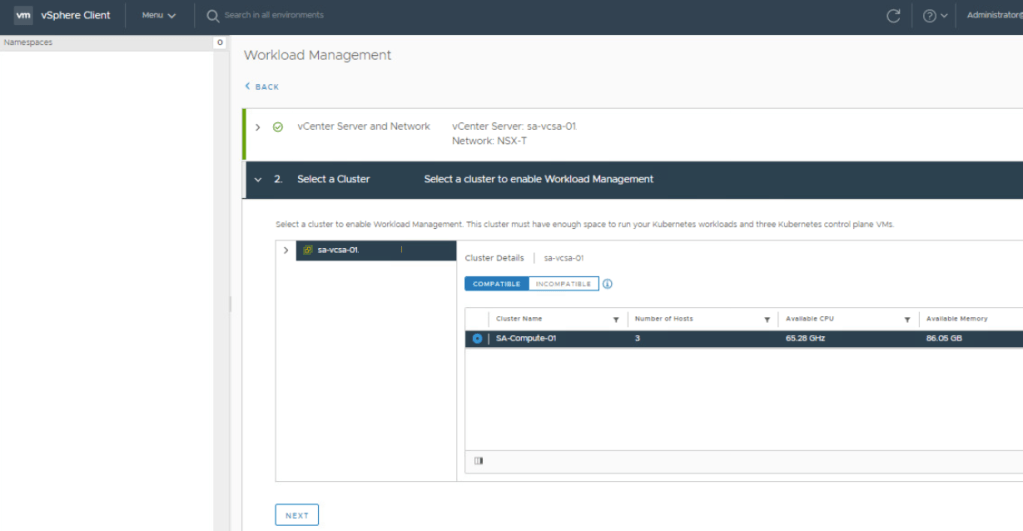
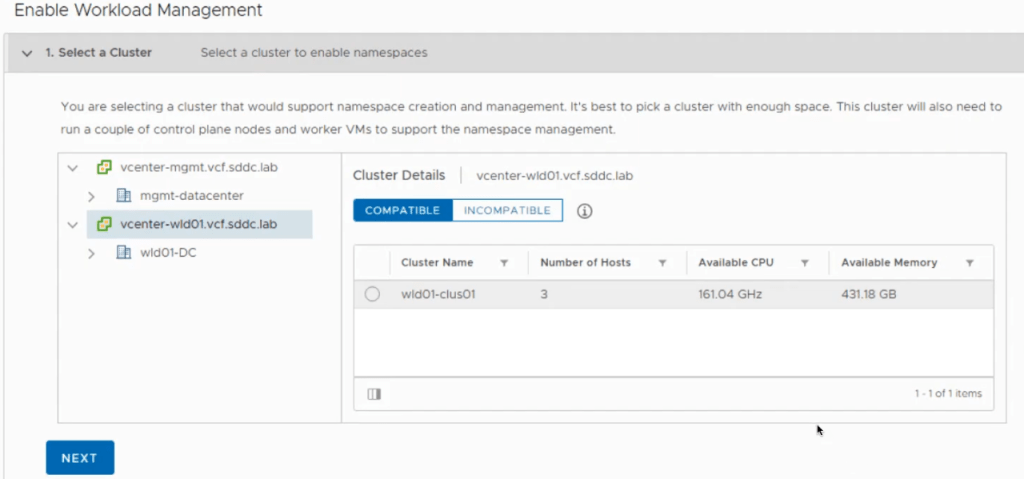
OVA Import Step 3: The controller would need to be deployed on a Compute Cluster that has access to the networks configured for this deployment. Click NEXT.

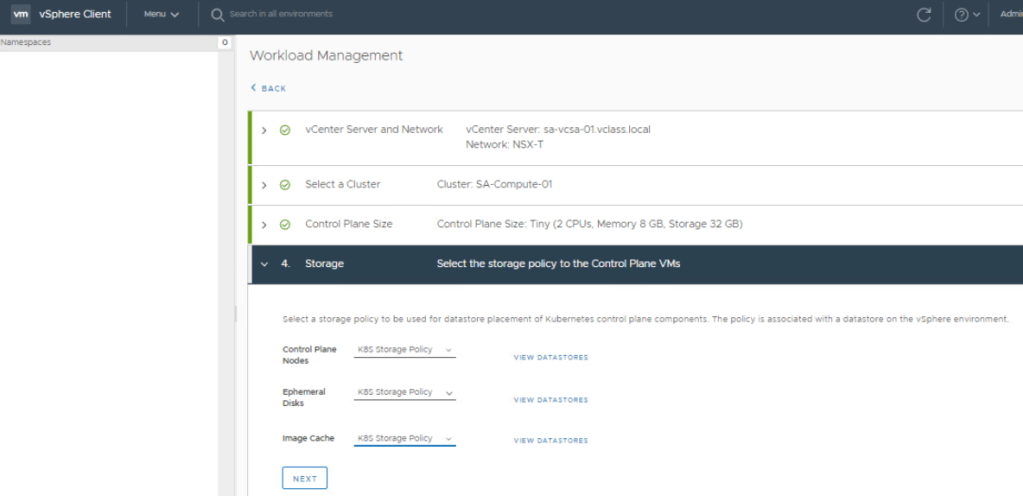
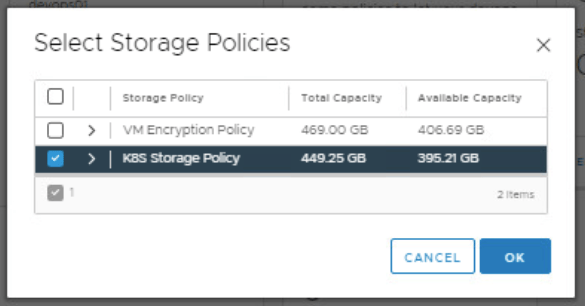
OVA Import Step 5: Select storage that the desired Compute Cluster has access to.

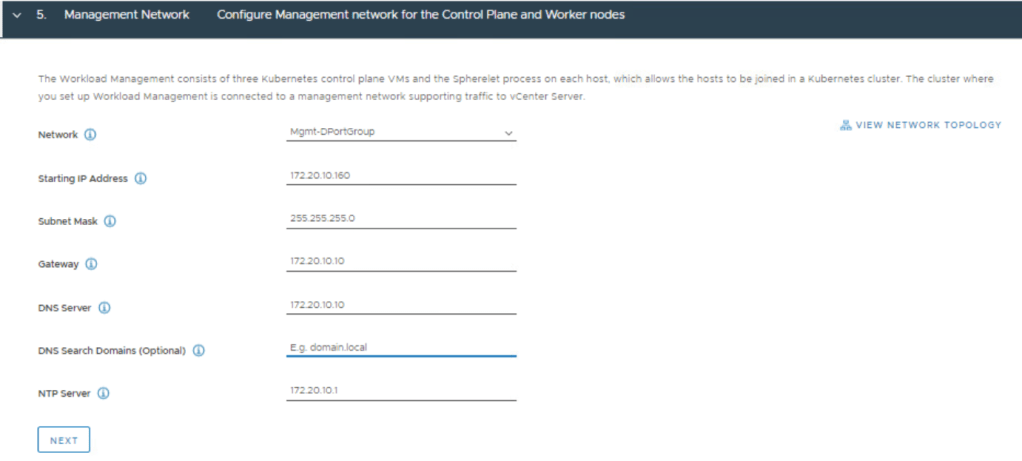
OVA Import Step 6: Select the management network distributed port group in the excel we filled in earlier, and click NEXT.

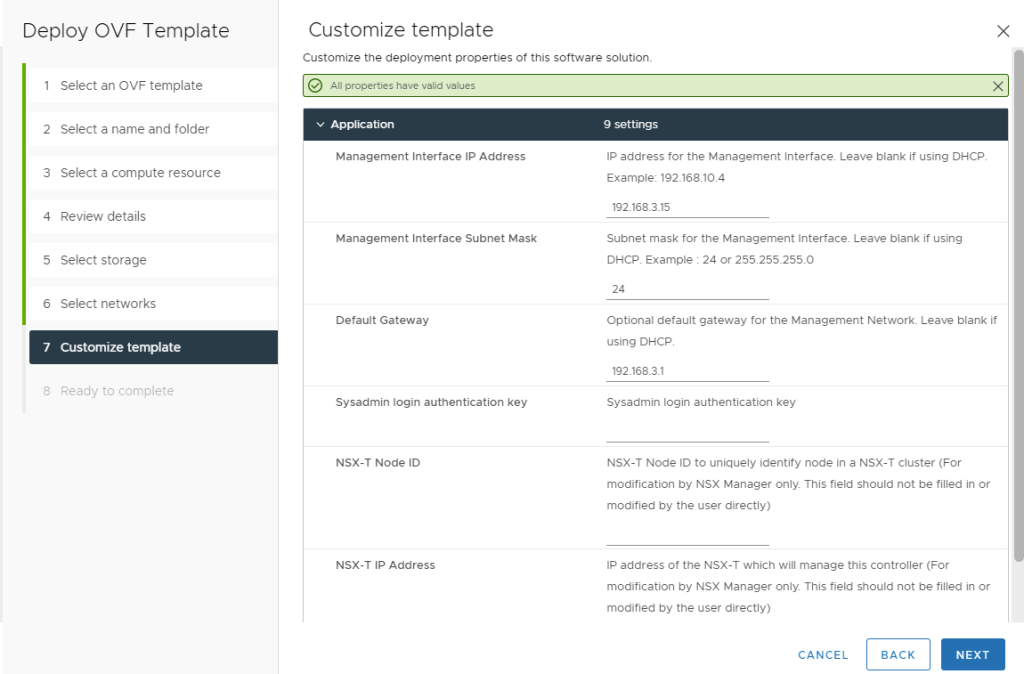
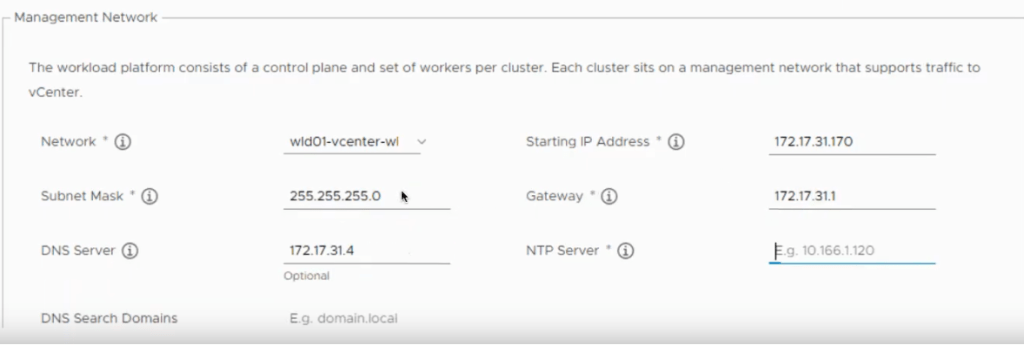
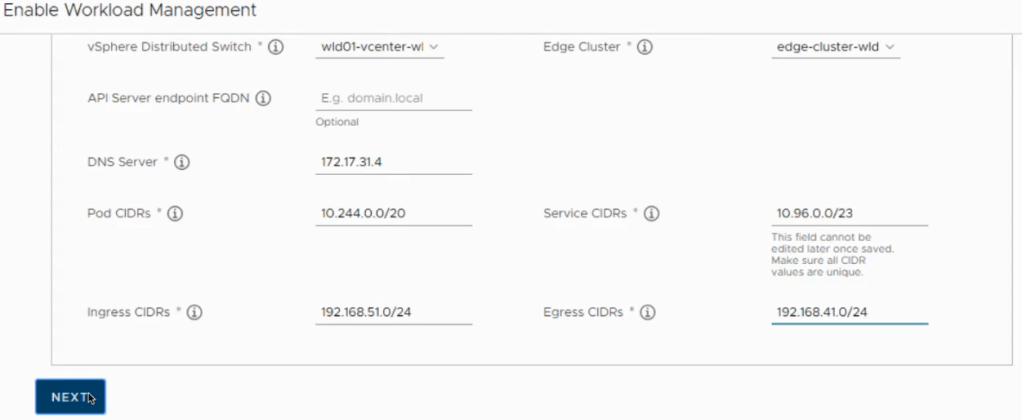
OVA Import Step 7: fill out the networking information for the NSX-ALB controller. Here we just need to add the controller IP, subnet, and gateway. Click NEXT.

OVA Import Step 8: Check for accuracy, and then click FINISH to start the deployment.

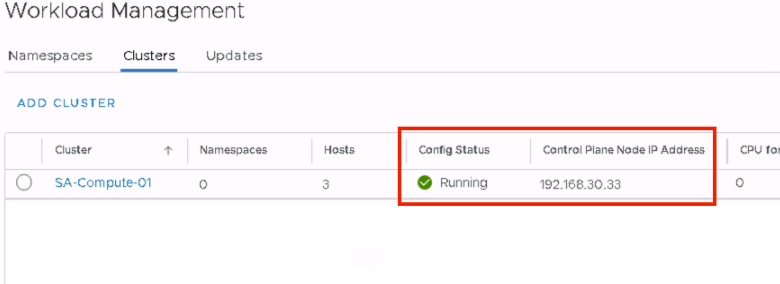
Once the NSX ALB OVA is deployed, start the VM. Wait for the VM to fully boot, and then access the web interface.

On the first login, you will need to create the admin password. Click CREATE ACCOUNT

After the admin account is created, you’ll need to add the DNS resolver(s) and DNS Search Domain. Click NEXT.

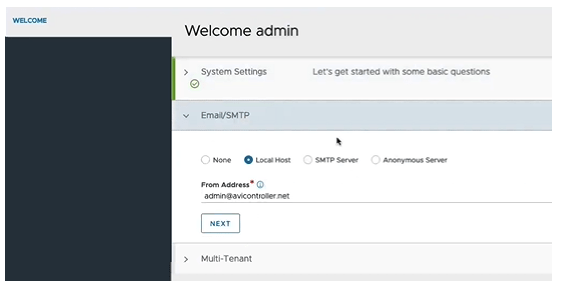
Add the “from” email address of your choosing. For this example, I am just using Local Host. Click NEXT.

For the multi-Tenancy, the defaults can be used unless otherwise specified. Toggle the check mark in the “Setup Cloud After” in the lower right because we want to configure the cloud component later, and click SAVE.

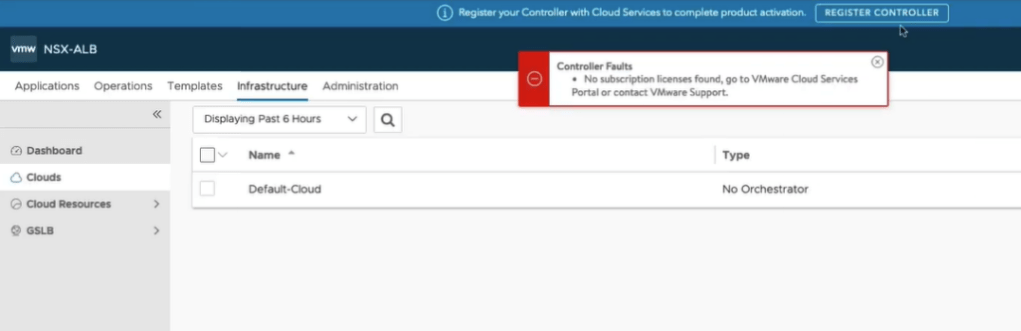
Now we are logged into the admin interface, and are immediately receive a controller faults error message that it doesn’t have license/subscription information, so we need to add it.

Click the Administration tab, and then on the left, expand Settings, and click Licensing.  Click the gear.

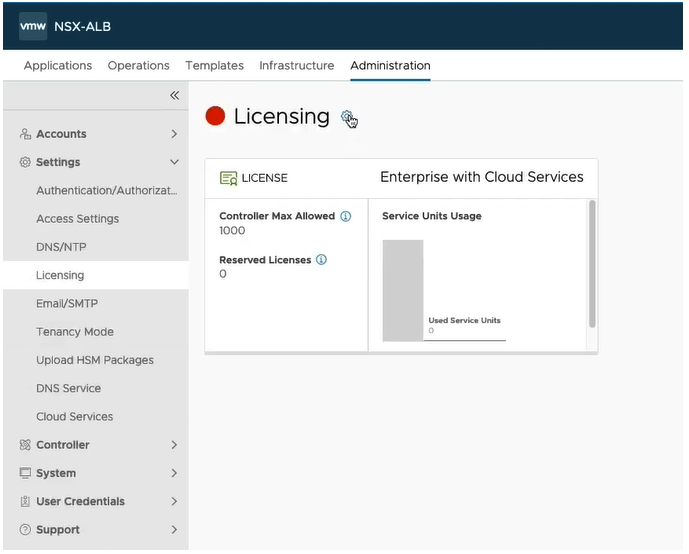
Select the Essentials Tier for Tanzu license. Click SAVE.

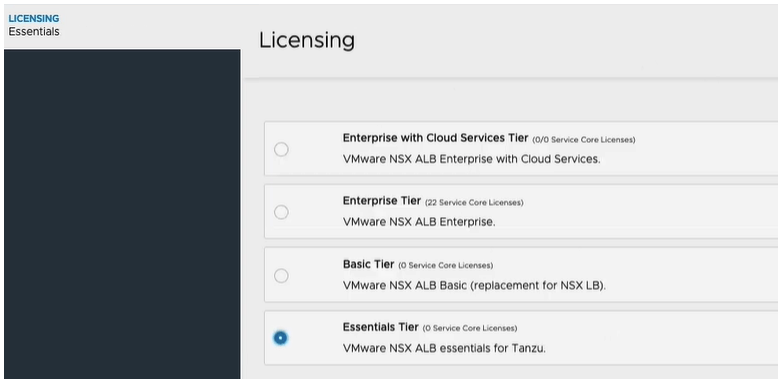
You can see the interface has changed, and it wants us to add a license key, however we are in the essentials mode, and can only use essentials features.  We do not need to change anything.

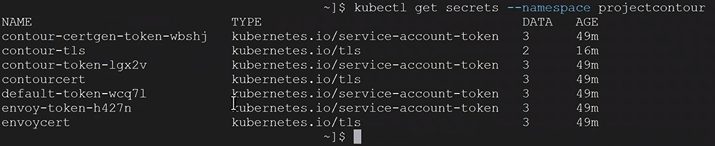
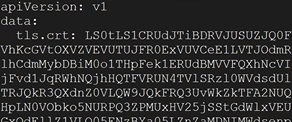
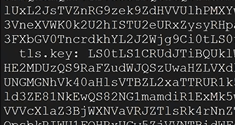
That covers the basic deployment for the NSX-ALB controller. In my next blog, I will walk through the process of assigning a signed certificate from my Microsoft CA to the controller. I will also show how to create and assign the self-signed certificate to the controller. Stay tuned.

vSphere with Tanzu: NSX-ALB Controller Requirements and Deployment Prep.

Blog Date: August 11, 2022
NSX-ALB Controller version: 22.1.1
vSphere version 7.0.3 Build 20150588

VMware Customers can find additional details on system design options and preparation tasks in the vSphere 7 with Tanzu Prerequisites and Preparations Guide. This blog is a summary focused on requirements when using vSphere Networking and NSX-ALB Load Balancing Controller, and the deployment of the controller. This example is for the the deployment of the controller without NSX (NSXT).

Hardware Requirements  

vSphere Cluster No. of Hosts CPU Cores Per Host Memory Per Host NICs Per Host Shared Datastore 
Minimum Recommended 16 (Intel CPU Only) 128GB 2x 10GbE 2.5 TB 

Note: Increasing the number of hosts eases the per-host resource requirements and expand the resource pool for deploying additional or larger Kubernetes clusters, applications, other integrations, etc. 

Software Requirements 

Note: For the most current information, visit the VMware Product Interoperability Matrices and vSphere 7 Release Notes 

Product Supported Version Required /Optional Download Location 
VMware ESXi hosts 7.x Required VMware Product Downloads 
VMware vCenter** vSphere 7.0U2 and later Enterprise Plus w/ Add-on for Kubernetes (or Higher) Required 
NSX ALB* NSX ALB Required 

Network Requirements – Layer 2/3 Physical Network Configuration 

vSphere with Kubernetes requires the following L2/L3 networks to be available in the physical infrastructure and extended to all vSphere cluster(s)’. This is the official reference page with the networking information and options for configuring vSphere with Tanzu networking: https://docs.vmware.com/en/VMware-vSphere/7.0/vmware-vsphere-with-tanzu/GUID-8908FAD7-9343-491B-9F6B-45FA8893C8CC.html 

To mitigate deployment delays from troubleshooting infrastructure-related problems, customers need to preconfigure both NICs with the appropriate network access, as detailed in the table below, and test for connectivity in advance of any on-site work. 

VLAN Description Host vmnic(s) Virtual Switch MTU IPv4 CIDR Prefix  Routable 
Management Network* NIC 1 & 2 vDS ≥≥1500 ≥≥ /27 Yes 
vMotion Network** NIC 1 & 2 vDS ≥≥1500 ≥≥ /29 No 
Storage / vSAN Network NIC 1 & 2 vDS ≥≥1500 ≥≥ /29 No 
Workload Network*** NIC 1 & 2 vDS ≥≥1500 ≥≥ /24 Yes 
Data Network NIC 1 & 2 vDS ≥≥1500 ≥≥ /24 Yes 

* If the ESXi hosts’ mgmt vmkNIC and other core components such as vCenter operate on separate networks, the two networks must be routable. 

** As opposed to a separate network, vMotion can operate on a shared network with ESXi hosts’ mgmt vmkNIC  

*** The workload network hosts K8s control plane and worker nodes 

When choosing the vSphere Networking model, all network segments and routed connectivity must be provided by the underlying network infrastructure. The Management network can be the same network used for your standard vCenter and ESXi VMKernel port functions, or a separate network with full routed connectivity.  Five consecutive IP addresses on the Management network are required to accommodate the Supervisor VMs, and one additional IP is required for the ASX ALB controller. The Workload CIDRs in the table above account for the typical number of IP addresses required to interface with the physical infrastructure and provide IP addresses to Kubernetes clusters for ingress and egress communications. If the CIDR ranges for Workload and Frontend functions are consolidated onto a single segment, they must be different ranges and non-overlapping. 

Additionally, the Workload Management enablement will default the IP address range for Kubernetes pods and internal services to 10.96.0.0/23. This range is used inside the cluster and will be masked behind the load balancer from the system administrators, developers, and app users. This range can be overridden if needed but should remain a minimum of a  /24. 

Tanzu Mission Control (if available): 

TKG cluster components use TCP exclusively (gRPC over HTTP to be specific) to communicate back to Tanzu Mission Control with no specific MTU outbound requirements (TCP supports packet segmentation and reassembly). 

Firewall Requirements 

VMware HIGHLY RECOMMENDS unfiltered traffic between networks for the system. Reference the VMware vSphere 7 with Kubernetes Prerequisites and Preparations Guide for the summary firewall requirements. 

If Tanzu Mission Control (TMC) is available, the platform needs internet access connectivity. 

Storage 

You will need to use vSphere supported shared storage solution. Typically, this is vSAN, NFS, iSCSI or Fibre Channel. Shared storage is required. Presenting storage volumes directly is not. 

Enterprise Service Requirements 

  • DNS: System components require unique resource records and access to domain name servers for forward and reverse resolution  
  • NTP: System management components require access to a stable, common network time source; time skew < 10 seconds  
  • AD/LDAP (Optional): Service bind account, User/Group DNs, Server(s) FQDN, and port required for authentication with external LDAP identity providers 
  • DRS and HA need to be enabled in the vSphere cluster. 

With the above mentioned requirements in mind, after the environment prep has been completed, I like to fill out the following excel with all of the information needed for the deployment and configuration of the NSX-ALB controller.

That covers the basic requirements and prep work for the NSX-ALB controller deployment. In my next blog: vSphere with Tanzu: Deployment of NSX-ALB Controller, I will walk through the basic deployment of the controller.

vSphere with Tanzu: Install Kubernetes CLI Tools from the Tanzu Control Plane on Ubuntu Dev VM.

Blog Date: August 8, 2022

Ubuntu 22.04
vSphere version 7.0.3 Build 20150588

On engagements with customers, I’ll have them deploy a developer VM where we can work and I can get them started on their Tanzu and Kubernetes journey. This one VM will have docker, docker credential helper, and the Tanzu Kubernetes CLI installed. For the purpose of this blog series, I’ll do the same. For this blog, I’ll walk through the process using Ubuntu 22.04. In my lab, I have already configured my Ubuntu VM with a static IP and host name.

Getting Started with Ubuntu and Installing Docker

Docker is available for download and installation on Ubuntu 22.04. To get started, let’s update the package repo first, and then we can install docker.

$ sudo apt update
$ sudo apt install docker.io

After the Docker installation has completed successfully, let’s start the Docker service, and enable it to run on boot.

$ sudo systemctl start docker
$ sudo systemctl enable docker.service

(Optional) Once that completes, run the following commands to allow docker to run as non-root:

$ sudo groupadd docker
$ sudo usermod -aG docker $USER
$ sudo newgrp docker

Let’s run the following command to see the Docker path. We should get a return /usr/bin/docker

$ which docker

Let’s make sure Docker is running with the following command.

$ sudo systemctl status docker

We should see an active (running) status.

You can verify the current Docker version installed, and see additional details with the following command.

$ sudo docker version

At this point, my customer would have completed to per-requisite to have an Ubuntu VM deployed for me. In this blog however, I will continue on assuming vSphere with Tanzu has already been enabled on a workload cluster in the environment.

Downloading The Kubernetes CLI vsphere-plugin.zip

The official VMware guide to Download and Install the Kubernetes CLI Tools for vSphere can be found here. In the vSphere Client, click the 3 hash marks in the upper left and select Workload Management. Select the Supervisor Clusters tab. Make note of the Control Plane Node Address (IP address). It will be needed for the next command to download the vsphere-plugin.zip.

In the example command, I am using the optional –no-check-certificate. Replace the IP address with your Control Plane Node IP Address

$ wget https://192.168.6.13/wcp/plugin/linux-amd64/vsphere-plugin.zip --no-check-certificate

Next, let’s unzip the vsphere-plugin.zip to /usr/bin/vsphere-plugin

$ sudo unzip vsphere-plugin.zip -d /usr/bin/vsphere-plugin

VMware does provide instructions on the control plane node landing page, if you open a web browser and go to https://<insert_control_plane_node_ip_address_here >

We are up to step 2, and we need to put the contents of the unzipped vsphere-plugin into your executable search path. Let’s execute the following commands.

$ echo 'export PATH=$PATH:/usr/bin/vsphere-plugin/bin' >> ~/.bash_profile
$ echo 'source <(kubectl completion bash)' >> ~/.bash_profile

Next, we’ll exit our current SSH session on the ubuntu dev vm.

$ exit

Now re-establish a SSH session to the ubuntu dev vm using the same account as before. Once logged in, let’s test that kubectl completion bash is working. We do this by entering ‘kubectl’ followed by a space and then hit tab twice.

$ kubectl 

Test Connection to Tanzu Control plane (optional)

From the Ubuntu dev VM, use the kubectl CLI to connect to the vSphere with Tanzu control plane as the authenticated user. Here I am using the –insecure-skip-tls-verify optional parameter

$ kubectl vsphere login --server <cluster_ip> --insecure-skip-tls-verify

It will prompt for a username and password. Once successfully logged in and if the account you chose has permissions to access the Tanzu control plane node, you should see a message stating you have access to the following contexts.

Now you are ready to begin working with Tanzu. More content to come. Stay tuned.

Tanzu Deployment on vSphere 7 with NSX-T.

Blog Date: December 7, 2021

VMware vCenter Server 7.0 Update 2d used.
VMware NSX-T Data Center 3.1.3.1 used.

Assumptions:

In a previous post titled vSphere with Tanzu on VMware Cloud Foundation/vSphere with NSX-T requirements, I went over the requirements I pass along to customers, along with the supporting VMware documentation, and this post assumes those requirements and those in the VMware documentation have been met. The same networking requirements exist here for standard vSphere 7 deployments with NSX-T.

  1. Validate and deploy an NSX-T edge cluster. For more information see: Configuring NSX-T Data Center for vSphere with Tanzu.
  2. Validate/Add NSX-T Network Segments
  3. Validate/Configure NSX-T IP Prefixes on the Tier-0 Gateway
  4. Validate/Configure NSX-T Route Maps on the Tier-0 Gateway
  5. Validate MTU greater than or equal to 1600 on all networks that will carry Tanzu traffic i.e. management network, NSX Tunnel (Host TEP, Edge TEP) networks, and the external network.
  6. Create a Subscribed Content Library for vSphere with Kubernetes.
  7. Create Storage Policies for vSphere with Tanzu.
  8. Deploy vSphere with Tanzu:

Deployment Steps:

In the vSphere Client, select Menu > Workload Management.

Click Get Started. (The Enable Workload Management wizard opens.)

On the vCenter Server and Network section, select NSX-T. Click Next.

On the Select a Cluster section, select the ESXi cluster to support vSphere with Tanzu.

Next, select the size of the control plane. Click Next.

This image has an empty alt attribute; its file name is vcf-deploy7.png

Fill in the Management Network details.

Scroll down, and fill in the Workload Network details.  As mentioned in a previous post, I will argue that the API Server endpoint FQDN entry is mandatory when applying a certificate. NOTE: The Pod and Service CIDRs are non-routable. The UI provides default values that can be used, otherwise you specify your own. The Ingress and Egress CIDRs will be routable networks defined by the network team.  Click Next.

Select the storage policy for Control Plane Nodes, Ephemeral Disks, Image cache. vSAN Default Storage Policy can be used if only storage/cluster provided. Click Next.

That’s it.  Click Finish.  The Tanzu deployment will now proceed (The entire process can take up to 45 minutes to complete).

The Control Plane Node IP address is the same API Server Endpoint  we referred to earlier in this post. This will be the end point where you can download and install the vSphere plugin and the vSphere docker credential helper. To validate connectivity, simply open a web browser and go to the IP address http://<ip-address&gt;

If you are not able to reach the Control Plane Node IP address/API Server Endpoint, it is possible that you might have invalid MTU settings in your environment that will require further troubleshooting. I did come across this at a customer site, and documented the MTU troubleshooting process here. Good luck.

In my next post, I will cover how to configure your first namespace.

vSphere with Tanzu on VMware Cloud Foundation – Configure VMware Photon OS Developer VM

Blog Date: December 5, 2021 Updated: August 8, 2022
VMware Cloud Foundation 4.3.1 used.
VMware vCenter Server 7.0 Update 2d used.
VMware NSX-T Data Center 3.1.3.1 used.
VMware Photon OS 3.0

On engagements with customers, I’ll have them deploy a developer VM where we can work and I can get them started on their Tanzu and Kubernetes journey. This one VM will have docker, docker credential helper, and the Tanzu Kubernetes CLI installed. For the purpose of this blog series, I’ll do the same.

Getting Started with Photon OS and Installing Docker

The first step was to deploy the Photon OS ova: https://github.com/vmware/photon/wiki. This URL has all of the instructions on getting started as well as running Docker which only requires two commands:

The Docker service needs to be set up to run at startup. To do so, input the following commands:

$ sudo systemctl start docker
$ sudo systemctl enable docker

(Optional) Once that completes, run the following commands to allow docker to run as non-root:

$ sudo groupadd docker
$ sudo usermod -aG docker $USER
$ newgrp docker

The following command will start docker if it is not already running. Likewise you can do a status instead of a start:

$ systemctl start docker

Downloading The Kubernetes CLI

First, if this is going to be a shared box, it will be a good idea to create a directory where we can place the files:

$ mkdir -p /opt/vsphere-plugin

If needed you can locate the control plane node IP address from the workload management section in vSphere.

The Kubernetes CLI can be downloaded from the https:// via wget.

$ wget https://<cluster_ip>/wcp/plugin/linux-amd64/vsphere-plugin.zip

Unzip the vsphere-plugin.zip to the ‘/opt/vsphere-plugin’ directory we created before.

$ unzip vsphere-plugin.zip -d /opt/vsphere-plugin

Configure the environment variable PATH to include the extracted ‘opt/vsphere-plugin’ and set up tab auto completion.

$ echo 'export PATH=/opt/vsphere-plugin:$PATH' >> ~/.bash_profile
$ echo 'source <(kubectl completion bash)' >> ~/.bash_profile

cat the ~/.bash_profile file to verify the new entries. The output should look something like:

$ cat ~/.bash_profile
export PATH=/opt/vsphere-plugin:$PATH source <(kubectl completion bash)

Install and Configure the vSphere Docker Credential Helper

The vSphere docker credential helper helper cli is used to securely push/pull container images to and from the embedded harbor registry. Please see VMware’s official documentation Install the vSphere Docker Credential Helper and Connect to the Registry for more information.

First, if this is going to be a shared box, it will be a good idea to create a directory where we can place the files:

$ mkdir -p /opt/vsphere-docker-credential-helper

From the developer VM, use the kubectl CLI to connect to the vSphere with Tanzu control plane as the authenticated user.

$ kubectl vsphere login --server <cluster_ip> -u <username@example.domain>

To download the vsphere-docker-credential-helper.zip package for Linux operating systems, run the wget command.

$ wget https://<cluster-ip>/wcp/helper/linux-amd64/vsphere-docker-credential-helper.zip

Run the unzip command to extract the downloaded zip package to the custom directory created in a previous step.

$ unzip vsphere-docker-credential-helper.zip -d /opt/vsphere-docker-credential-helper

Now we need to configure the docker client to use the embedded harbor registry cert. Please see VMware’s Document Create Configure a Docker Client with the Embedded Harbor Registry Certificate for more information.

Create a directory path for the private registry in /etc/docker/certs.d/ that corresponds to the IP address of the Harbor instance.

$ mkdir /etc/docker/certs.d/IP-address-of-harbor/

We need to download the certificate for the embedded harbor registry. VMware also has this documented under Download and Install the Embedded Harbor Registry Certificate. For this example I’ll use the vSphere client method.

Select the vCenter cluster where Workload Management and the embedded Harbor Registry are enabled.
– Select Configure > Namespaces > Image Registry.
– In the Root certificate field, click the link Download SSL Root Certificate.
– Save the root-certificate.txt, and rename it to something like ca.crt.

Copy the embedded Harbor Registry ca.crt file that you downloaded to the /etc/docker/certs.d/IP-address-of-harbor/ created in the previous step.

That directory should now look something like:

/etc/docker/certs.d/IP-address-of-harbor/ca.crt

Restart the docker service so that the new certificate is used:

$ systemctl restart docker

To test that the docker credential helper is working, you can log into the embedded harbor registry using your fully qualified domain credentials. As long as you don’t get a certificate trust error, you are good to go.

$ docker-credential-vsphere login <harbor_ip>

This blog should have prepped the Developer VM (Photon OS) that we will be using going forward. There will be a future blog post on pushing a docker image to the embedded harbor registry, but I am not going to cover this here. In my next post, I’ll walk through the steps of installing a Tanzu Kubernetes Cluster inside the namespace we deployed using this VM. Stay tuned.

vSphere with Tanzu on VMware Cloud Foundation – Enable Embedded Harbor Registry

Blog Date: December 2, 2021
VMware Cloud Foundation 4.3.1 used during deployment.

In my last post, I went over the process of Configuring Your First Kubernetes Namespace. In this post I will go over the simple steps to enabling the embedded harbor registry. There are basically two methods to deploying a Harbor registry; the embedded harbor which I will be showing in this post, and Deploying Harbor Registry as a Shared Service.

Note: To use the embedded Harbor Registry, you must deploy the Supervisor Cluster with NSX-T Data Center as the networking solution.

Procedure:

In the vSphere client/workload domain that has Tanzu deployed, select the compute cluster, click on the configure tab, and then in the center menu, scroll down until you find Namespaces. Under Namespaces, select “Image Registry”.

Click Enable Harbor.

In the Select Storage Policies window, select K8S Storage Policy and click OK

The embedded Harbor Registry begins deploying.

The deployment can take up to 20 minutes depending on how large the cluster is, but I have seen the deployment take less than 10 minutes for small clusters of four.

You’ll find the IP address and link to the Harbor UI on this page once the deployment completes. We’ll come back to this in a later post. If you’d like, you can log into the harbor registry UI with the user and or group account that was defined in the namespace permissions section.

In my next post, I’ll go over the steps of getting the Ubuntu VM ready, which I will either refer to as the developer box or developer workstation. We’ll get docker installed, the vsphere plugin which has the Kubernetes cli, and the docker credential helper to start with. Later on we’ll also install some TKG extensions like helm, kapp, and ytt.

vSphere with Tanzu on VMware Cloud Foundation – Configuring Your First Kubernetes Namespace.

Blog Date: December 2, 2021
VMware Cloud Foundation 4.3.1 Used During Deployment.

In my previous post, I described how to deploy vSphere with Tanzu on a VMware Cloud Foundation 4.3.1 instance. In this post I will describe how to configure your first namespace.

Procedure:

Access the vSphere client. Select Menu > Workload Management > Namespaces.

Click Create Namespace.

Expand the inventory tree and select the compute cluster.

As am example, you can enter namespace-01 as your namespace name. (The name must be in a DNS-compliant format (a-z, 0-9, -)).

Click Create. ( The namespace is created and shows a Config Status of Running and a Kubernetes Status of Active.)

Select the Don’t show for future workloads check box.

Click Got It.

Now we can move on to the next section and apply permissions, storage and VM class.

  1. Click Add Permissions
    1. Identity source: <make selection>
    2. User/Group Search: <customer specific>. In this example, I have created a vsphere.local account. You can easily use an active directory account or group here.
    3. Role: <customer specific>. In this example, I have chosen “can edit” that way I can create and destroy things inside the namespace.
    4. Click Ok
    5. (Rinse-wash-repeat as necessary)

Click Add Storage and add the storage policy. 

The namespace is configured with a storage policy and user permissions.  The assigned storage policy is translated to a Kubernetes storage class.

Under VM Service, click Add VM Class. Here we need to associate a VM class with the namespace, that will allow developers to self-service VMs in the namespace. This gives vSphere administrators flexibility with resources available in the cluster. In this example, best-effort-xsmall was chosen because this is a nested lab environment. You should work with your developers to determine the best sizing strategy for the containerized workloads.

Now that the Namespace, Storage, and VM Class policies have all been defined, your window should look something like:

That’s it. Technically we can start deploying workloads to the new namespace. However, because I am already logged into vSphere, I like to enable the embedded Harbor registry. In my next post, I’ll go over the simple process of how to enable the embedded harbor registry.

vSphere with Tanzu on VMware Cloud Foundation – Deployment.

Blog Date: December 1, 2021

VMware Cloud Foundation 4.3.1 Used During Deployment:

Assumptions:

In my previous post vSphere with Tanzu on VMware Cloud Foundation/vSphere with NSX-T Requirements, I went over the requirements I pass along to customers, along with the supporting VMware documentation, and this post assumes those requirements and those in the VMware documentation have been met.

Procedure:

  1. Validate/Create a Storage Policy for vSphere with Tanzu, if default vSAN policy wont be used.
  2. Validate Deployed NSX Edge Cluster.
  3. Validate/Add NSX-T Network Segments
  4. Validate/Configure NSX-T IP Prefixes on the Tier-0 Gateway
  5. Validate/Configure NSX-T Route Maps on the Tier-0 Gateway
  6. Validate MTU greater than or equal to 1600 on all networks that will carry Tanzu traffic i.e. management network, NSX Tunnel (Host TEP, Edge TEP) networks, and the external network.
  7. Create a Subscribed Content Library for vSphere with Kubernetes.
  8. Deploy vSphere with Tanzu:

Deployment Steps:

After you have configured VM (storage) policies in vSphere and added segments in NSX-T Data Center, you can deploy vSphere with Tanzu.  SDDC Manager first validates your environment then redirects you to the vSphere Client where you complete the deployment. From the SDDC manager UI, navigate to Solutions and select Deploy.

Select All to have SDDC manager run a deployment prerequisites check.  Click Begin.

Select the desired cluster for the Tanzu workload.  Click Next

The SDDC manager will begin running the Validation. All Statuses should succeed .  Else troubleshoot/Retry.  Click Next.

After successful validation, SDDC will switch you over to the vSphere client to complete the deployment.

In the vSphere client, select the desired cluster to enable Tanzu.  Click Next.

Next, select the size of the control plane. Click Next.

Fill in the Management Network details.

Scroll down, and fill in the Workload Network details.  As mentioned in a previous post, I will argue that the API Server endpoint FQDN entry is mandatory when applying a certificate. NOTE: The Pod and Service CIDRs are non-routable. The UI provides default values that can be used, otherwise you specify your own. The Ingress and Egress CIDRs will be routable networks defined by the network team.  Click Next.

Select the storage policy for Control Plane Nodes, Ephemeral Disks, Image cache. vSAN Default Storage Policy can be used if only storage/cluster provided. Click Next.

That’s it.  Click Finish.  The Tanzu deployment will now proceed (The entire process can take up to 45 minutes to complete).


One the process is complete, we will see a config status of running with a green check. The cluster will have a yellow triangle because we have not assigned a license yet.

The Control Plane Node IP address is the same API Server Endpoint  we referred to earlier in this post. This will be the end point where you can download and install the vSphere plugin and the vSphere docker credential helper. To validate connectivity, simply open a web browser and go to the IP address http://<ip-address&gt;

From here, you can download the CLI plugin for windows.

If you are not able to reach the Control Plane Node IP address/API Server Endpoint, it is possible that you might have invalid MTU settings in your environment that will require further troubleshooting. I did come across this at a customer site, and documented the MTU troubleshooting process here. Good luck.

In my next post, I will cover how to configure your first namespace.

vSphere with Tanzu on VMware Cloud Foundation/vSphere with NSX-T Requirements

Blog Date: December 1, 2021

VMware Cloud Foundation 4.3.1 Used During Deployment:

Summary requirements:

– For VMware Cloud Foundation 4.3.1 software requirements, please refer to the Cloud Foundation Bill of Materials (BOM)
– For vSphere with Tanzu, it is recommended to have at least three hosts with 16 CPU Cores per host (Intel), 128GB per host, 2x 10GBe Nics per host, and a shared datastore of at least 2.5 TB.
– This post assumes VCF 4.3.1 has already been deployed following recommended practices.

System Requirements for Setting Up vSphere with Tanzu with NSX-T Data Center

The following link to VMware’s documentation should be reviewed prior to installation of Tanzu. This link includes networking requirements.
Tanzu with NSX-T Data Center Requirements

Specific Tanzu Call-outs:

IP Network

POD CIDR

Services CIDR

Ingress CIDR

Egress CIDR

Management Network

IPv4 CIDR Prefix

Greater than or equal to /20

Greater than or equal to /22

Greater than or equal to /24

Greater than or equal to /24

5 consecutive IPs

Justification:

POD CIDR: Dedicate a /20 subnet for pod networking. Private IP space behind a NAT that you can use in multiple Supervisor Clusters.Note: when creating TKG clusters, the IP addresses used for the K8s nodes are also allocated from this IP block.
Services CIDR: Dedicate a /22 subnet for services. Private IP space behind a NAT that you can use in multiple Supervisor Clusters.
Ingress CIDR: TKGS sources the ingress CIDR for allocating routable addresses to the Kubernetes clusters’ API VIP, ingress controller VIP, and service-type Load-Balancer VIP(s). Note: This subnet must be routable to the rest of the corporate network.
Egress CIDR: TKGS sources the egress CIDR to enable outbound communication from namespace pods. NSX-T automatically creates a source network address translation (SNAT) entry for each namespace, mapping the pod network to the routable IP address, respectively. Note: This subnet must be routable to the rest of the corporate network
Management Network: Five consecutive IP addresses on the Management network are required to accommodate the Supervisor VMs.
MTU: Greater than or equal to 1600 on all networks that will carry Tanzu traffic i.e. management network, NSX Tunnel (Host TEP, Edge TEP) networks, and the external network.


Note:  Kubernetes cluster requires identifying private IPv4 CIDR blocks for internal pod networks and service IP addresses. The Pods CIDR and Service CIDR blocks cannot overlap with IPs of Workload Management components (vCenter, ESXi hosts, NSX-T components, DNS, and NTP) and other data center IP networks communicating with Kubernetes pods. The minimum Pods CIDR prefix length is /23, and the minimum Service CIDR prefix length is /24.

Also: If using Tanzu Mission Control, TKG cluster components use TCP exclusively (gRPC over HTTP to be specific) to communicate back to Tanzu Mission Control with no specific MTU outbound requirements (TCP supports packet segmentation and reassembly).

Deploy an NSX-T Edge Cluster

The following link to VMware’s documentation should be reviewed, and can be used to deploy the necessary NSX Edge Cluster prior to the Tanzu deployment.
Deploy an NSX-T Edge Cluster

Enterprise Service Requirements

  • DNS: System components require unique resource records and access to domain name servers for forward and reverse resolution.
  • NTP: System management components require access to a stable, common network time source; time skew < 10 seconds.
  • DRS and HA: Need to be enabled in the vSphere cluster
  • (Useful but Optional): Ubuntu developer VM with docker installed for use while interacting with Tanzu.

In my next post, I’ll go over deploying vSphere with Tanzu on VCF with NSX-T.

vSphere with Tanzu: Project Contour TLS Delegation Invalid – Secret Not Found

Blog Date: June 25, 2021
Tested on vSphere 7.0.1 Build 17327586
vSphere with Tanzu Standard

On a recent customer engagement, we ran into an issue where after we deployed project Contour, and created a TLS delegation “contour-tls”, but we ran into an issue where Contour did not like the public wildcard certificate we provided. We were getting an error message “TLS Secret “projectcontour/contour-tls” is invalid: Secret not found.”

After an intensive investigation to make sure everything in the environment was sound, we came to the conclusion that the “is invalid” part of the error message suggested that there was something wrong with the certificate. After working with the customer we discovered that they included the Root, the certificate, and the intermediate authorities in the PEM file. The root doesn’t need to be in the pem.  Just the certificate, and the intermediate authorities in descending order. Apparently that root being in the pem file made Contour barf. Who knew?

You could possibly see that the certificate is the issue by checking the pem data for both the <PrivateKeyName>.key and the <CertificateName>.crt by running the following commands, and comparing the pem output. IF it doesn’t match this could be your issue as well. The “<>” should be updated with your values, and don’t include these “<” “>”.

openssl pkey -in <PrivateKeyName>.key -pubout -outform pem | sha256sum
openssl x509 -in <CertificateName>.crt -pubkey -noout -outform pem | sha256sum

Below are the troubleshooting steps we took, and what we did to resolve the issue. We were using Linux, and had been logged into vSphere with Tanzu already. Did I mention that I hate certificates? But I digress….

The Issue:

You had just deployed a TKG cluster, and then deployed Project Contour as the ingress controller that uses a load balancer to be the single point of entry for all external users. This connection terminates SSL connections, and you have applied a public wildcard certificate to it. You created the TLS secret, and have created the TLS delegation, so that new apps deployed to this TKG cluster can delegate TLS connection terminations to contour. However, after you deployed your test app to verify the TLS delegation is working, you see a status of “Invalid. At least one error present, see errors for details.”, after running the following command:


kubectl get httpproxies

Troubleshooting:

  1. You run the following command to gather more information, and see in the error message: “Secret not found” Reason: “SecretNotValid
kubectl describe httpproxies.projectcontour.io

2. You check to make sure the TLS Secret was created in the right namespace with the following command, and you see that it is apart of the desired namespace. In this example, our namespace was called projectcontour, and the TLS secret was called contour-tls.


kubectl get secrets -A

3. You check the TLS delegation to make sure it was created with the following command. In this example ours was called contour-delegation, and our namespace is projectcontour.

kubectl get tlscertificatedelegations -A

4. You look at the contents of the tlscertificatedelegations with the following command, and nothing looks out of the ordinary.

kubectl describe tlscertificatedelegations -A

5. You check to see the secrets of the namespace with the following command. In this example our namespace is called projectcontour and we can see our TLS delegation contour-tls.


kubectl get secrets --namespace projectcontour

6. You validate contour-tls has data in it with the following command. In this example, our namespace is projectcontour and our TLS is contour-tls.

kubectl get secrets --namespace projectcontour contour-tls -o yaml

In the yaml output, up at the top you should see tls.crt: with data after

Down towards the bottom of the yaml output, you should see tls.key with data after

Conclusion: Everything looks proper on the Tanzu side. Based on the error message we saw “TLS Secret “projectcontour/contour-tls” is invalid: Secret not found.” The “is invalid” part could suggest that there is something wrong with the contents of the TLS secret.  At this point, the only other possibility would be that the public certificate has something wrong and needs to be re-generated.   The root doesn’t need to be in the pem.  Just the certificate for the site, and intermediate authorities in descending order.

The Resolution:

  1. Create and upload the new public certificate for contour to vSphere with Tanzu.
  2. We’ll need to delete the secret and re-create it.  Our secret was called “contour-tls”, and the namespace was called “projectcontour”.
kubectl delete secrets contour-tls -n projectcontour

3. We needed to clean our room, and delete the httpproxies we created in our test called test-tls.yml, and an app that was using the TLS delegation. In this example it was called tls-delegation.yml

kubectl delete -f test-tls.yml
kubectl delete -f tls-delegation.yml

4. Now we created a new secret called contour-tls with the new cert. The <> indicates you need to replace that value with your specific information. The “<>” does not belong in the command.

kubectl create secret tls contour-tls -n projectcontour --cert=<wildcard.tanzu>.pem --key=<wildcard.tanzu>.key

5. Validate the pem values for .key and .crt match. The <> indicates you need to replace that value with your specific information. The “<>” does not belong in the command.


openssl pkey -in <PrivateKeyName>.key -pubout -outform pem | sha256sum

openssl x509 -in <CertificateName>.crt -pubkey -noout -outform pem | sha256sum

6. If the pem numbers match, the certificate is valid. Lets go ahead an re-create the tls-delegation.  Example command:

kubectl apply -f tls-delegation.yml

7. Now you should be good to go. After you deploy your app, you should be able to check the httpproxies again for Project Contour, and see that it has a valid status

kubectl get httpproxies.projectcontour.io

If all else fails, you can open a ticket with VMware GSS to troubleshoot further.