VMware Cloud Foundation: SDDC Manager Day 1 Configurations: Configure Certificate Authority

Blog Date: 10/6/2023

After VCF has been deployed, you can log into the SDDC manager and configure a certificate authority. This is useful if there’s a desire to use custom signed certificates. SDDC manager has the ability to run OpenSSL and create certificates for the associated VMware products in the SDDC. Alternatively, you can also configure the Certificate Authority to use a Microsoft CA. In this blog I will cover the steps to setup the OpenSSL. One thing to note is that by default, the certificates authored using the method will be valid for a year.

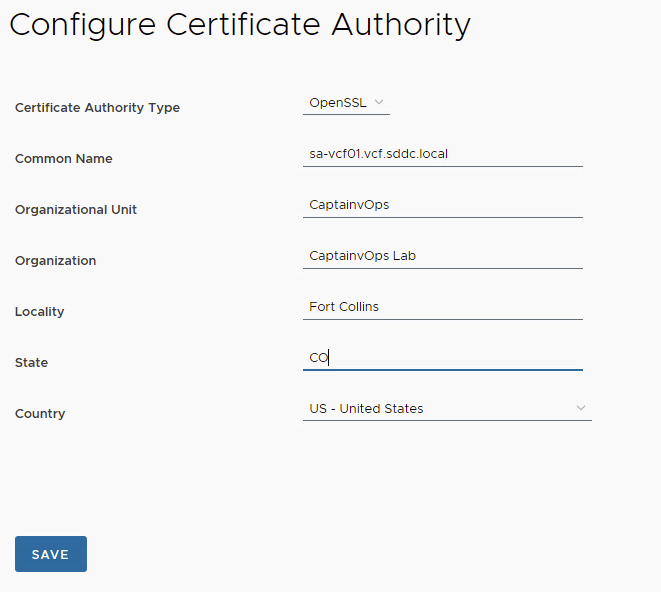
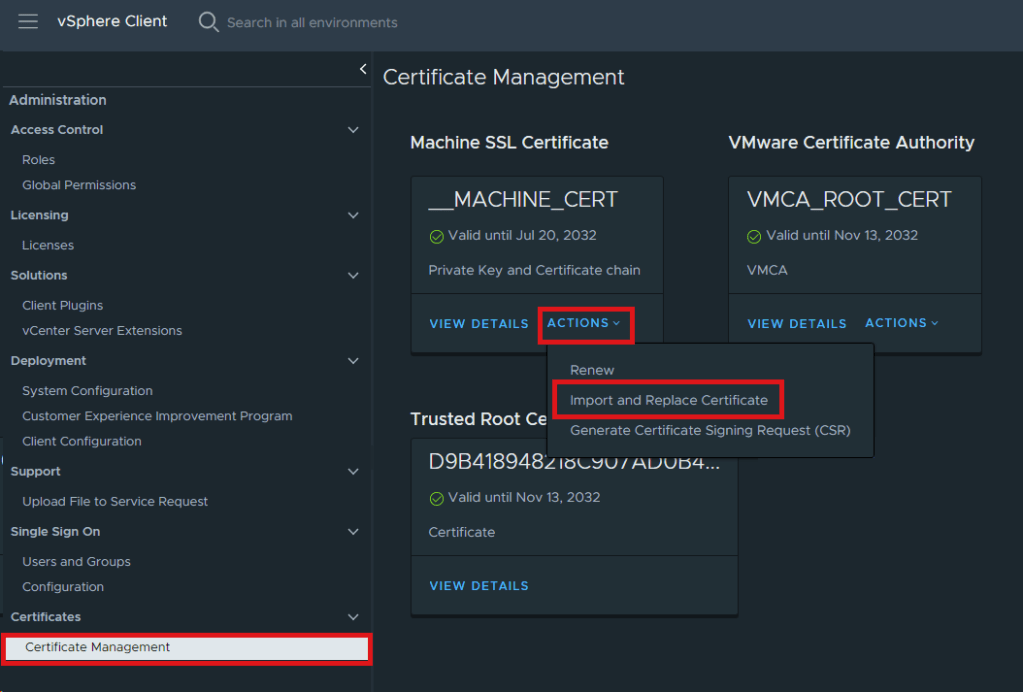
In the left pane, scroll down and click Certificate Authority under Security. In the right pane, click the EDIT button. In the Certificate Authority Type, select OpenSSL. Fill in your environment specific details, and then click SAVE.

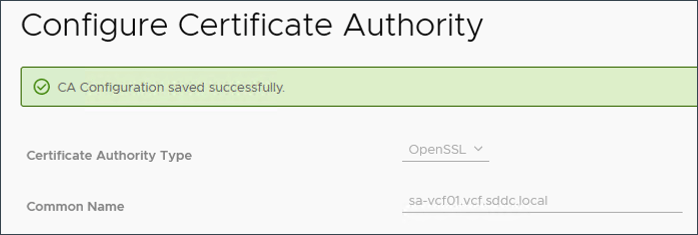
The CA Configuration Saved Successfully message appears on the page.

For more information, checkout VMware’s documentation on Managing Certificates in VMware Cloud Foundation.

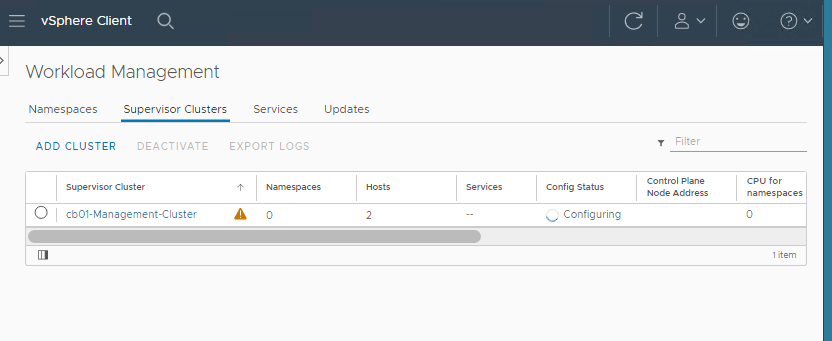
To update the certificates in SDDC manager, I would first take a snapshot of whatever you are updating the certificate of, then in SDDC manager locate Workload Domains in the left pane under Inventory. Select the management domain (or desired domain), and then click on the Certificates tab.

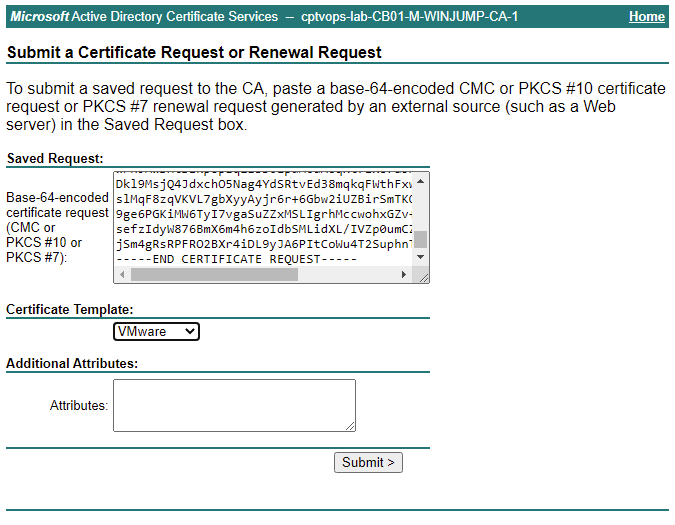
In this example, place a check mark in the box for sddcmanager, and click the GENERATE CSRS button to configure the CSR details with your organization’s specific details.

Click NEXT.

On the Subject Alternative window, you may wish to add additional info, otherwise click NEXT.

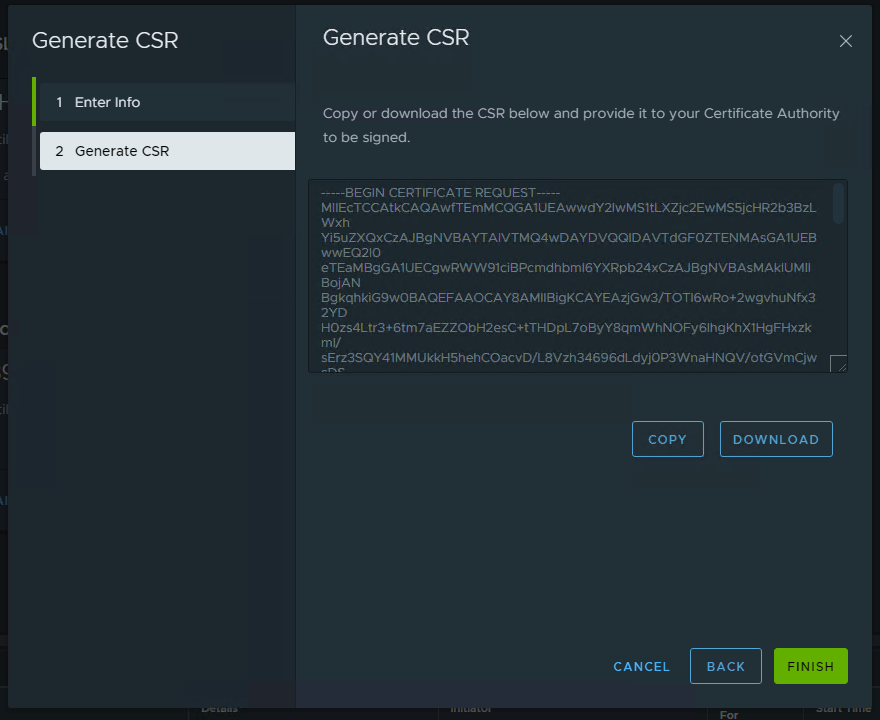
Click the GENERATE CSRS button. Wait for the CSR Generation is successful message before continuing. You might need to refresh the browser periodically.

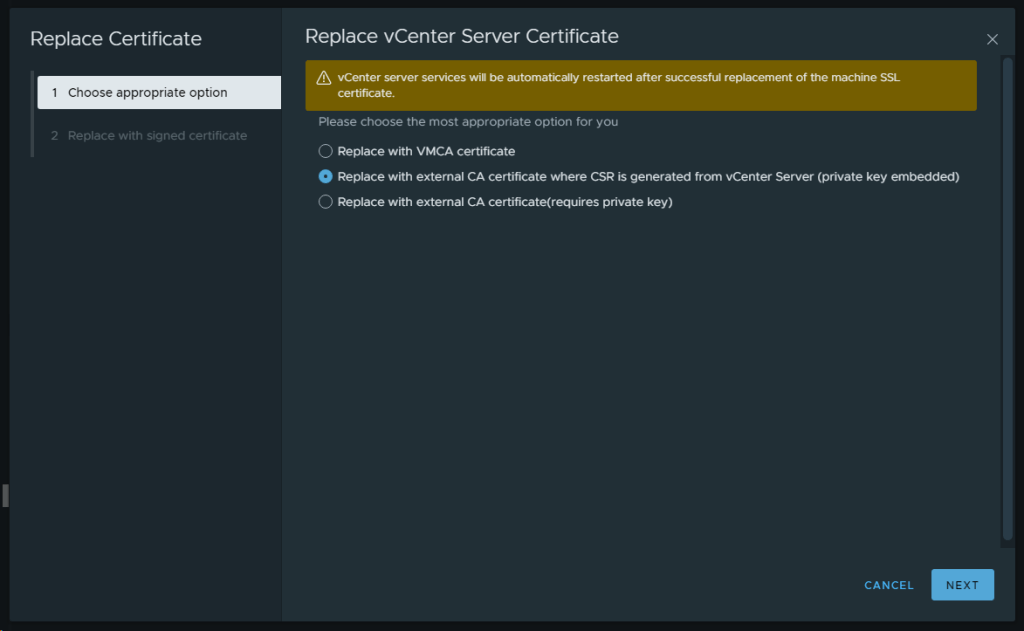
Now we can generate the signed certificate from the certificate authority, which in this case will be the SDDC manager considering we enabled OpenSSL. Leave sddcmanager selected, and click GENERATE SIGNED CERTIFICATES button. In the Generate Certificates pop-up window, click the Select Certificate Authority drop-down menu and select OpenSSL. Click GENERATE CERTIFICATES. You will need to wait until you see the certificate generation is successful message. View the Certificate Operation Status column to see that the certificate generation was successful.

With the sddcmanager still selected, click the INSTALL CERTIFICATES button. Refresh the browser a few times until you see security warnings about the new certificate as a result of the change. In the end, you should see a Certificate Installation is successful message display.

At this point you can restart the SDDC manager appliance to ensure the new certificate is in use going forward. Now simply rinse, wash, and repeat on the remaining appliances you wish to update the certificate.

In my next blog, I’ll go over the process of deploying an NSX edge cluster in the management domain. this will be used in the future when we create the network segment for vRealize/Aria.

VMware Cloud Foundation: SDDC Manager Day 1 Configurations: Connect to an Online Depot

Blog Date: 9/29/2023

Another day 1 operation in a newly deployed VCF environment, would be to configure a service account to connect the SDDC manager to your organization’s VMware Customer Connect account.

This service account would need the following permissions: Access to view licenses, products, and be able to download products. This service account would need to be configured in the VMware Customer Connect portal. For the user email address, I typically have customers use a group distribution email. Configuring SDDC manager to use a service account, will allow it to access the VMware Depot without relying on a employee account, which will be more secure. Just be sure to set a strong 18-20 character password, and record the account details in a secure location. *PRO TIP: Log into the customer connect portal using the service account you created, and verify that you can view licenses, products, and download products. This will insure the account meets all access requirements that the SDDC manager will need when we configure the depot settings below.

Just like we did in the previous blog, we’ll click the question mark in the upper right, and select Guided Setup.

On the next screen, we’ll want to continue with Step 2 Configure SDDC Manager. Click VIEW DETAILS.

Select Connect to the Online Depot and click NEXT.

If there’s no proxy to configure for the SDDC manager to reach the internet, click SKIP CONFIGURE PROXY.

Add the details for the VMware depot service account mentioned above and click AUTHORIZE.

Assuming the service account has the correct permissions, you shouldn’t get any errors. A connectivity error may indicate a firewall access issue.

To validate that you can see and download bundles, under Lifecycle Management in the left hand menu, select Bundle Management. (No available bundles when screenshot was taken).

For more information on how to connect to the VMware Depot, see VMware’s Documentation Download and Install Bundle from SDDC Manager.

In the next blog, I will cover how to configure a certificate authority in the SDDC manager using Open SSL.

VMware Cloud Foundation: SDDC Manager Day 1 Configurations: Identity Provider

Blog Date: 9/22/2023

Another day 1 operation in a newly deployed VCF environment, would be to configure an identity provider. Just like we did in the previous blog, we’ll click the question mark in the upper right, and select Guided Setup.

On the next screen, we’ll want to continue with Step 2 Configure SDDC Manager. Click VIEW DETAILS.

In the Configure SDDC Manager wizard, click Connect Identity Provider, then click Next.

Here, we will be configuring the identity provider that will be used in the vCenter. Click the Select Identity Provider from the drop-down menu, select Embedded. Click the Select Identity Source drop-down menu, select AD over LDAP. Click Next.

Fill in the LDAP Settings.

In this example, I don’t use a certificate for LDAP connectivity. Your mileage may vary. Click NEXT. Validate the information on the Review page matches the table above, then click SUBMIT. Wait for the save to complete, then validate that Connect an Identity provider has a green check mark.

Now that a identity provider has been established, you can now configure access to those who you trust to perform administrative tasks. The SDDC manager already comes preconfigured with a vsphere.local group called sddcadmins defined in the vSphere. Depending on your security needs, you can also add users and groups directly in the SDDC manager. In this example. I will configure access through the sddcadmins group in vSphere.

If we drop down into the vSphere, first we will want to set the identity provider as the default authentication source.

Next, you’ll want to locate the SDDCAdmins group and add the organization’s trusted admins who will be administering the SDDC. Typically, I have customers define an AD group with the SDDC admins, so that you only need to define the group in the vSphere. As the AD account membership to the group organically changes with users, you won’t have to worry about updating the vCenter group.

Likewise, you can also add the vSphere admins group defined in AD to the Administrators group in vSphere.

For more information on configuring access in the SDDC, see VMware’s documentation on Managing Users and Groups in VMware Cloud Foundation.

VMware Cloud Foundation: SDDC Manager Day 1 Configurations: Backups

Blog Date: 9/15/2023

After VCF has been deployed, you can log into the SDDC manager and configure the backups for the SDDC manager and NSX. (This does not configure vCenter backups, so you will still need to log into the vcenter:5480 to configure that manually). You can opt to use the guided setup by clicking the question mark in the upper left.

When the wizard loads, On the left side, click Register a Backup Server and click NEXT.

Select the four prerequisite check boxes and click NEXT. Register the external SFTP server to enable automatic backups for SDDC Manager. Note: The SSH fingerprint text box is automatically filled once a successful connection to the backup server has been made.

Click Register. Wait for the registration to complete and the Setup Automatic Backup page displays. Setup Automatic Backups configure the wizard with the values that best suite your backup strategy.

Click Save.

After the backup settings have been saved, it is wise to manually kick-off the backup job by clicking Backup Now. You can monitor the backup task job status in the bottom tasks pane.

For more information, see the official VMware documentation -> Backup and Restore of VMware Cloud Foundation.

In the next blog, I’ll walk through connecting VCF to an identity provider.

See you there! We’ll be Presenting: DRaaS and On-Premises Disaster Recovery Solutions at The 2023 US VMware Explore in the CXS Theater!

It’s that time of year again, and I am very excited that VMware Explore has been moved back to sunny Las Vegas! To that end, I am also very excited to announce that I get to co-present a CSX Theater session CXS1280LV this year with Jack Levy.

VMware customers interested in leveraging new or existing cloud investments for Disaster Recovery and Ransomware Recovery, will most certainly be interested in attending our 45 minute presentation at the CSX Theater in the solutions exchange area.

A link to the CXS Theater session in the content catalog can be found here: DRaaS and On-Premises Disaster Recovery Solutions: Go from Zero to Hero

In today’s world, disaster recovery is not only about protecting the enterprise during a data center failure. The truth is there are bad actors out there also trying to extort money through ransomware. It’s time to get serious about disaster recovery, and VMware is here to help. Protect your business from human, climate and ransomware disasters. Learn from our experts about VMware’s various disaster recovery solutions from on-premises to our disaster recovery-as-a-service (DRaaS) offerings with ransomware recovery options in the cloud. Define the recovery strategy and protect your assets. In this session, we’ll be covering VMware Site Recovery Manager with vSphere replication, VMware Cloud Disaster Recovery plus the optional Ransomware recovery capabilities, and we’ll have a couple brief recorded demos of the setup process.

We will also be giving an exclusive presentation for our TAM and VMware Success 360 customers in a session that won’t be found in the content catalog TAM3792LV.

I’ll admit that I have always been excited to attend VMware Explore when I was a customer, back when it was called vmworld. My first time as a customer, was back in 2016 when vmworld was moved to Las Vegas. This year, the new Explore will be in Las Vegas for the first time, and it will be my first time presenting as a VMware employee. Does that mean I have come full circle?

Regardless, I am looking forward to the event, being able to meet with my customers I have worked with over the years as a consultant, and getting to meet some of my VMware colleagues that I have had the pleasure to work with over the years.

Jack Levy and I started around the same time on the same team Americas Professional Services Org, and became fast friends.

We are both excited about the opportunity to present at VMware Explore, and we look forward to seeing you at our session!

vCenter 8 Machine SSL Certificate Management

vSphere 8
Windows Server 2019 Certificate Authority
Blog Date: December 16, 2022

Replacing the machine SSL certificate is a breeze in vSphere 7 and 8. Many organizations have security requirements and need for the vSphere web interface to have that secure padlock icon. Most organizations I have come across have a Microsoft Certificate Authority in house, but there are exceptions. In my lab, I have a Microsoft CA configured, and that is what I’ll be using in this example.

VMware has a pretty good KB2097936 article that discusses how to use vSphere Certificate manager.

Installing and managing custom signed certificates is not difficult. Can this be done during normal business hours? I would argue, yes. Some organizations will choose to do it after hours, however. When the certificate is installed, services are restarted on the vCenter to reflect the change. During that minute or two, you won’t be able to manage your vSphere infrastructure from the vSphere client, but all of your ESXi hosts, and all of your workloads will continue to run untouched. If the certificate is bad, you can always revert to snapshot and have everything as it was prior to replacing the SSL certificate in a matter of minutes. Again, the ESXi and VMs will be unaffected. However, what you do need to keep in mind, is that when you replace the certificate on the vCenter, other services that direct connect to the vCenter like Aria (vRealize) Operations, log insight, automation, network insight, etc., would all need to have their connection to the vCenter refreshed. Any third party solutions out there would also need to have their connection to the vCenter refreshed.

  1. I recommend that you take a snapshot prior to messing with certificates.
  2. After you’ve logged into the vSphere client with an admin level account, click the three hash marks next ‘vSphere Client’ in the upper left (some call it a hamburger), and select “Administration” from the menu.
  3. On the Administration page, select “Certificate Management” under ‘Certificates’.
  4. On the Certificate Management screen, you will see Trusted Root Certificate at the bottom and Machine SSL Certificate at the top. In this example, we are only worried about the Machine SSL Certificate. Just below it, you will see an “Actions” drop menu, and from the menu we need to select Generate Certificate Signing Request (CSR).

5. Fill out the specific details for your certificate. Every box should be filled out. Boxes marked optional are just that. I personally fill out the Subject Alternative Name with the FQDN and IP address on the vCenter comma separated. Click NEXT.

6. You can COPY or DOWNLOAD the CSR. In this example, click COPY and then click finish.

7. Now we need to connect to the Microsoft CA web portal. Click “Request a Certificate”.

8. Click advanced certificate request

9. Paste the vCenter CSR created earlier into the saved request box. Next, chose the Certificate Template. I created a VMware template using the VMware knowledge base article here KB2112009.

10. Select “Base 64 encoded”, and then click “Download certificate”.

11. Now that we have downloaded the base 64 encoded certificate for the vCenter, we also need the CA certificate. We can download this from the Microsoft CA Web Portal homepage. Click “Download a CA certificate”

12. For the Encoding Method, select Base 64, then click “Download CA certificate”.

13. In the vSphere client Certificate Management screen, click the Actions drop menu and select “Import and Replace Certificate”.

14. On the Replace vCenter Server Certificate screen, select the “Replace with external CA certificate where CSR is generated from the vCenter Server….” option and click NEXT.

15. Upload the vCenter Machine SSL Certificate in the top box, and the CA certificate in the bottom box. In some configurations, your organization might have more than one CA, so you may need to upload a chain CA root certificate(s). In this example, I only have one CA certificate, so there’s only one to upload. Once you click REPLACE, know that the vCenter will become unavailable while services are restarted.

16. You will either need to dump your existing cookies for the vSphere environment that you just replaced the certificate for, or use private/incognito browser mode and reconnect to the vCenter. Services should restart in a few moments. As long as your certificate was correct, you should now see the secure padlock.

17. Once logged into the vCenter, you can go back to the Certificate Management screen, and you should see the new Machine SSL Certificate. You will also see a new Trusted root certificate has been installed. From this point forward, you will need to manage both the Machine SSL certificate and the CA Trusted Root Certificate that has been installed on the vCenter. Depending on organizational policies, the validity length of these certificates will differ. In my home lab, I have my Microsoft CA configured for 10 years because I know I will rebuild it prior to the certificates expiring, and I don’t want to manage certificates more than I have to.

When everything checks out, don’t forget to clean your room and delete the snapshot.

How To Manually Set The IP Address On Photon OS From Command Line

Blog Date: December 8th 2022.

Out in the field, I have had a Photon OS appliance like Site Recovery Manager, and vRealize Lifecycle Manager deploy without the proper networking configuration. For me, these appliances have been deployed to a network where the Gateway and DNS were reachable, but the appliance will sometimes complete its first boot without successfully configuring the network. Sometimes you can get out of this situation by simply redeploying the appliance. There are those other times where the appliance just refuses to configure the networking, so a manual approach is required.

DISCLAIMER: I have only done this process on VMware Photon OS based appliances that did not successfully complete their first boot. Your mileage may vary attempting this on an appliance that has successfully deployed.

As always – Take snapshots before proceeding.

Commands To Update Photon OS Network Configuration

Using the VMware console, we first need to check and see what interface is being used with this command:

# /opt/vmware/share/vami/vami_interfaces

Next we need to set the interface IP, NETMASK, and GATEWAY with this command:

# /opt/vmware/share/vami/vami_set_network <INTERFACE> STATICV4 <IP_ADDRESS> <NETMASK> <GATEWAY>

To set the domain suffix and DNS, use this command:

# /opt/vmware/share/vami/vami_set_dns -d <domain suffix> <DNS1> <DNS2>

Assuming no errors, reboot the appliance.

In the event those commands do not work because not all Photon Operating Systems are 100% alike, you can also try this method below:


Update Photon OS Network Configuration File:


Let’s first list the network configuration files. To do this, run the following command:

# ls /etc/systemd/network

In this example, we see one configuration file “10-eth0.network”. We will use the next command to edit the file using vi and make the appropriate changes:

# vi /etc/systemd/network/10-eth0.network

Once you are done making the necessary changes, do a “wq!” to save the changes and quit the editor.

Reboot the appliance for the changes to take affect.

vSphere with Tanzu: Deploying and configuring your first Namespace.

Blog Date: November 08, 2022
NSX-ALB Controller version: 22.1.1
vSphere version 7.0.3 Build 20150588

In the previous blog series I covered deploying vSphere with Tanzu using the NSX Advanced Load Balancer. You can find those blog posts below:

1 – vSphere with Tanzu: NSX-ALB Controller Requirements and Deployment Prep
2 – vSphere with Tanzu: Deployment of NSX-ALB Controller
3 – vSphere with Tanzu: Replacing NSX-ALB Controller Certificates
4 – vSphere with Tanzu: Configuring the NSX-ALB Controller
5 – vSphere with Tanzu: Storage Policy and Subscribed Content Library Creation
6 – vSphere with Tanzu: Deploying Tanzu with NSX-ALB

Whether you have a vSphere with Tanzu deployment with NSX-T, a vSphere with Tanzu deployment on VMware Cloud Foundation, or vSphere with Tanzu deployment with NSX-ALB, you will eventually arrive here. In this blog post, I will walk through the process of Deploying and configuring your first Namespace.

On the workload management screen, you can create your first Namespace on the Namespaces tab by clicking CREATE NAMESPACE.

Be sure to create a Namespace with a DNS compliant name. Click CREATE when ready.

You will also want to set permissions on the Namespace to control access.

  1. Click Add Permissions
    1. Identity source: <make selection>
    2. User/Group Search: <customer specific>. In this example, I have created a vsphere.local account. You can easily use an active directory account or group here.
    3. Role: <customer specific>. In this example, I have chosen “can edit” that way I can create and destroy things inside the namespace.
    4. Click Ok
    5. (Rinse-wash-repeat as necessary)

Click Add Storage and add the storage policy. 

The namespace is configured with a storage policy and user permissions.  The assigned storage policy is translated to a Kubernetes storage class.

Under VM Service, click Add VM Class. Here we need to associate a VM class with the namespace, that will allow developers to self-service VMs in the namespace. This gives vSphere administrators flexibility with resources available in the cluster. In this example, best-effort-xsmall was chosen because this is a nested lab environment. You should work with your developers to determine the best sizing strategy for the containerized workloads.

Now that the Namespace, Storage, and VM Class policies have all been defined, your window should look something like:

You are now ready to start deploying Kubernetes workloads to Tanzu.

vSphere with Tanzu: Deploying Tanzu with NSX-ALB

Blog Date: September 08, 2022
NSX-ALB Controller version: 22.1.1
vSphere version 7.0.3 Build 20150588

In this vSphere with Tanzu NSX-ABL series, I have covered several prerequisites and deployments leading up to this final blog in the series, the actual deployment of Tanzu on the NSX-ALB controller. You can find those blogs here:

1 – vSphere with Tanzu: NSX-ALB Controller Requirements and Deployment Prep

2 – vSphere with Tanzu: Deployment of NSX-ALB Controller

3 – vSphere with Tanzu: Replacing NSX-ALB Controller Certificates

4 – vSphere with Tanzu: Configuring the NSX-ALB Controller

5 – vSphere with Tanzu: Storage Policy and Subscribed Content Library Creation

If you have been following along in this blog series of Deploying Tanzu with NSX-ALB controller, I have been using a spreadsheet filled out ahead of time for this deployment. We will be referring to it here to it here as well to deploy Tanzu. Note: In this style of deploying the NSX-ALB controller without NSXT networks, we do not get access to the embedded harbor registry.

Prior to deploying Tanzu, you need to create some storage tags and policies (at least one of each), and create a subscribed content library. I go through that setup here.

In this deployment example, I am only using the NSX-ALB controller with no NSX(NSXT) networks. vSphere Distributed Switch is selected by default. Click NEXT in the lower left.

VMware recommends a minimum of 3 hosts in a compute cluster when enabling Tanzu for production deployments. However, this is a lab and I only have 2 hosts available. Select the desired compute cluster with HA and DRS enabled. If no cluster is compatible,

Select the desired storage policy and click NEXT.

Refer to the spreadsheet, and fill in the information for the NSX-ALB controller. You will also need to log into NSX-ALB and get the certificate for the controller. This can be found on Templates > Security > SSL/TLS Certificates. Click on the down arrow to the right of the controller to export, and then on the new screen that opens, under Certificate, click COPY TO CLIPBOARD.

Click NEXT

Refer to the spreadsheet, and fill in the details for the management network. Remember the control plane needs a block of 5 consecutive IP addresses.

Refer to the spreadsheet, and fill in the details for the workload network. The “Internal Network for Kubernetes Services” default CIDR can be used. You can also specify your own if the default CIDR conflicts with other networks. This is strictly for internal communication.

Select the content library we configured earlier.

Choose the Control Plane Size that fits your needs and add the API server DNS Name. A word of Caution: Even though the “API Server DNS Name(s)” section says ‘Optional’, I would still fill this in. Currently, there is no easy way to add it after the initial deployment.

Click FINISH

The deployment process can 15 to 20 minutes. Sometimes longer depending on the size of the cluster. Good time to grab a drink…

In the vCenter recent tasks window, you should start seeing some deployment activities.

After the deployment completes successfully, there will be a notification bar across the top “TKG plugin has been added”, asking to refresh the browser. After the screen refresh, you should see a config status of Running.

Browsing the vCenter inventory, you should now see a new object called Namespaces, with at least two Avi SE (Service Engine) VMs.

Don’t forget to license the Compute Cluster for Tanzu.

If you haven’t done so already, the next step would be to setup a dev VM to have a common jump server to interact with Tanzu. I have detail that process on the following blog: vSphere with Tanzu: Install Kubernetes CLI Tools from the Tanzu Control Plane on Ubuntu Dev VM

Stay tuned for more content.

vSphere with Tanzu: Storage Policy and Subscribed Content Library Creation

Blog Date: August 16, 2022
vSphere version 7.0.3 Build 20150588

Storage Policies for vSphere with Tanzu

Part of the prep work prior to Tanzu Kubernetes deployment in your environment, is to configure a storage policy or policies for Tanzu workloads. for more information, consult VMware’s Storage Policies for vSphere with Tanzu and vSphere with Tanzu Storage documentation. Here I will walk through the basic configuration we setup for customers to get them started.

Create the Storage Tag

1 – in the vSphere inventory, select the desired storage to house the Tanzu Kubernetes workloads.
2 – Under tags, click assign.

3 – Click Add Tag

4 – Name the tag.  In this example we are using tanzu.

5 – Click the Create New Category, and give it a name.  In this example we used: k8s
Leave all other defaults, and click CREATE.

6 – Click CREATE again to complete the tag setup.

7 – Assign the newly created tanzu tag to the datastore.

Create and Assign a Storage Policy

1 – On the vSphere menu, select “Policies and Profiles”.
2 – Under VM Storage Policies, click CREATE.

3 – Name the storage profile. Make sure to use a DNS compliant name (lowercase, no spaces).  In this example, we used : tanzu-storage. Click NEXT

4 – On Policy structure, Enable tag based placement rules.  Click NEXT

5 – On the Tag based placement screen:
5a – Choose the Tag category: k8s 
5b – Usage option: Use storage tagged with Tags: tanzu
5c – Click NEXT

6 – On the Storage compatibility screen, the tagged compatible datastores will be listed.  Click NEXT

7 – Review and click FINISH.

At this point, we just completed the configuration and assignment of storage tags and policies. Let’s create the subscribed content library for Tanzu.

Create Subscribed Content Library for Tanzu Kubernetes

For more information on creating a subscribed content library for Tanzu Kubernetes, see VMware documentation here.

1 – vSphere Menu, Select Content Libraries, and click CREATE.

2 – Name the new content library (example: tanzu-content-library), select the desired vCenter and click NEXT. 

3 – Configure the content library.
3a – Choose “Subscribed content library”
3b – Enter the Subscription URL: https://wp-content.vmware.com/v2/latest/lib.json
3c – Download content frequency depends on customer needs and bandwidth requirement. There’s roughly 27 OVAs available to download.

4 – Click NEXT

5 – Respond yes to the “tanzu – unable to verify authenticity” message.  This is expected

6 – Select a security policy if needed, otherwise click NEXT.

7 – Select the storage for the content library.

8 – Review the configuration, and click FINISH

Depending on the chosen sync frequency, you may start to see that a sync has started in the vSphere recent tasks window. If you click on the content library, you can see the available OVAs.

This completes the vSphere environment prep for the Tanzu deployment.